
Experienced tailors do not make the pattern for each skirt model separately, but used the patterns of the straight skirt pattern. Having the design experience is quite admissible, since the basis of the pattern of the tulip skirt, skirts on the coquette or skirts to the fold and other identical to the basis of the straight short classic skirt.
The pattern of the classic skirt can be the basis even for modeling more complex skirt styles, such as skirt-year, skirt-pants, etc.
When going to sew a skirt with your own hands, you don't have to build a new pattern every time, it is enough to make one, but to accurately fit it under your shape. You can use this pattern constantly, making only small adjustments and additions directly on the fabric.
Unfortunately, it rarely happens that the constructed pattern of the skirt is perfect. During the first fitting, it is often necessary to adjust it. Therefore, for the first time, leave an allowance for the seams 2-2.5 cm, which will correct the inaccuracy of the cut and make additional changes to the skirt drawing.
Pattern skirt - pencil. Very simple construction available for beginners. Video in English, but you can choose titers in any other language. If you like to sew, be sure to subscribe to this video channel. You will find out a lot of useful. The channel is created by professional tailors.
Measiers for building patterns and fabric consumption
To build a drawing, you will need to withdraw only three standards: waist grumps; hip girth; Skirt length. So that the pattern of the skirt is as accurate as possible, you need to correctly remove these measurements.If you have difficulty, you can see the article of the site "How to shoot measurements."
Mereks "Waist Girth" and "Hips Girth" are used in half-size calculations. Therefore, the obtained values (from) and (OB) are divided into 2 and write down. These measurements will be required to build patterns and are designated on the scheme of Art and Sat, respectively.
The volume of the waist and the thighs obtained the volume of the waist and the thighs must be made of free-fitting 1cm.
To accurately determine the skirt length, the waist is needed to stuff with a cord or centimeter tape. The measure of the skirt length is measured from the waist line to the floor. From the measurement of the measurement of the "length to the floor" (DzP = 106 cm), take 35-40cm: DzP = 106 - 35 = 71 cm.
Fabric consumption for a skirt-pencil, a tulip skirt based on the pattern of a classic skirt fit into the "one length" plus 10-15 cm. If deep folds are provided or additional finishing elements, such as overhead pockets, then consumption increases.
To buy more fabrics will have to and in the event that a complete measure "The volume of the thighs" exceeds 130 cm. For such a piece of fabric, "two lengths" plus 10-15 cm.
Preparation for building pattern
Before you start building the pattern, prepare paper, pencils, ruler, felt-tip, tape and scissors. The pencil should be soft, the felt-tipper is useful for marking points and basic lines, and the tape is convenient to use for gluing paper.
See how to make the pattern and other tips beginners.
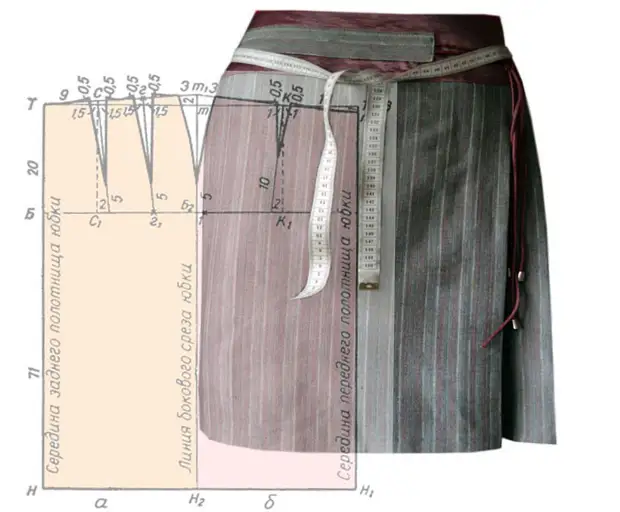
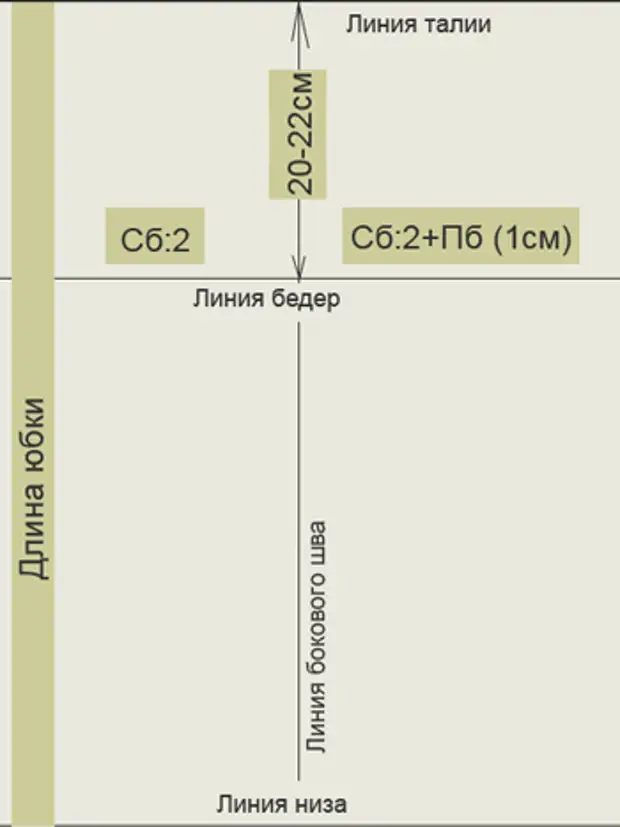
To build patterns, direct skirt is convenient to use millimeter paper. The paper grid allows you to quickly and accurately apply the main lines. You can use another type of paper (traction), but in any case, you first need to make a quadrilateral, one side of which will be equal to the length of the skirt, the second - hollows plus 1 cm.
In the drawing, this measure about is divided into two standards of SB, since the pattern will immediately be built on two halves of the skirt. The right side is for the front, left - for the rear halves.
Set aside from the top line (waist) 20-22 cm and spend a solid horizontal line (line of the hips). Now this drawing is ready to build a straight skirt pattern.
Build pattern straight classic skirt
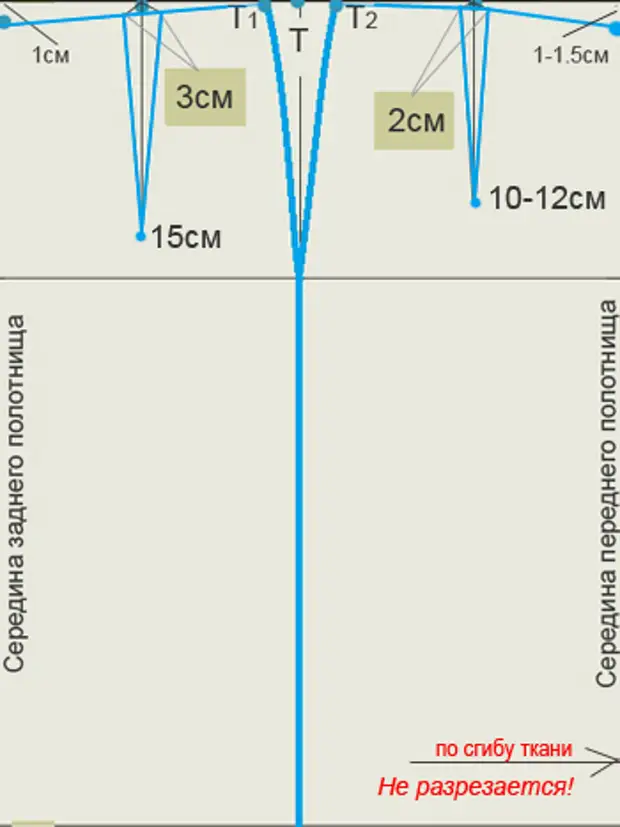
At first, on top of the vertical line dividing the skirt into two parts, put the point from the point from the point (T) split in half and put tags. In the drawing, I specifically did not mark them with letters so as not to clutch the pattern. But if you wish, you can mark them with any letters, for example B1 and B2.
From these points, swipe down the vertical lines of the plotting. For the rear half of the skirt - 15 cm and for the front of approximately 10-12 cm.
Now we need to build a bevelled waistline for both halves of the skirt.
To do this, set aside from the top line to the left edge of 1 cm (rear part of the skirt) and 1.5 cm - along the right edge (front of the skirt). Connect these points with a point (T).
In the drawing, these lines turned out straight, but you need them to make a slightly "convex" relative to the top of the pattern (belt feed line). Now you can build a drawing of the molding. The depth of rear halves - 3 cm, the front half of the skirt - 2 cm. Make it is completely simple and easy to understand this scheme. Pay only attention that it is necessary to cut the top of the outtage at an angle, so do not forget these lines to be outlined too.
It remains only to calculate the position of points T1 and T2 and the pattern will be ready.
First, you need to calculate the sum of all solutions according to the following formula:
(Sat + PB) - (ST + PT), where PT and PB are an increase in the waist and thighs of 1 cm.
From the result obtained, take 5 cm (the amount of the rear and front folding). The residue is divided in half and postpone this value from the side seam line and put points T1 and T2.
Now the pattern of a straight skirt is completely built. It remains only with the help of a special pattern to smoothly draw lines down from points T1 and T2. Usually this line is built using the calculations, but it is not necessary. As a last resort, if you have little experience, take 2 cm in this place, and specify this line on the fitting.
Small advice
After the pattern of a straight skirt is built on paper, you need to make patterns of additional parts of the skirt and belt. Be sure to make the patterns of these parts, they will help you accurately calculate the flow of fabric and make the fabric layout.
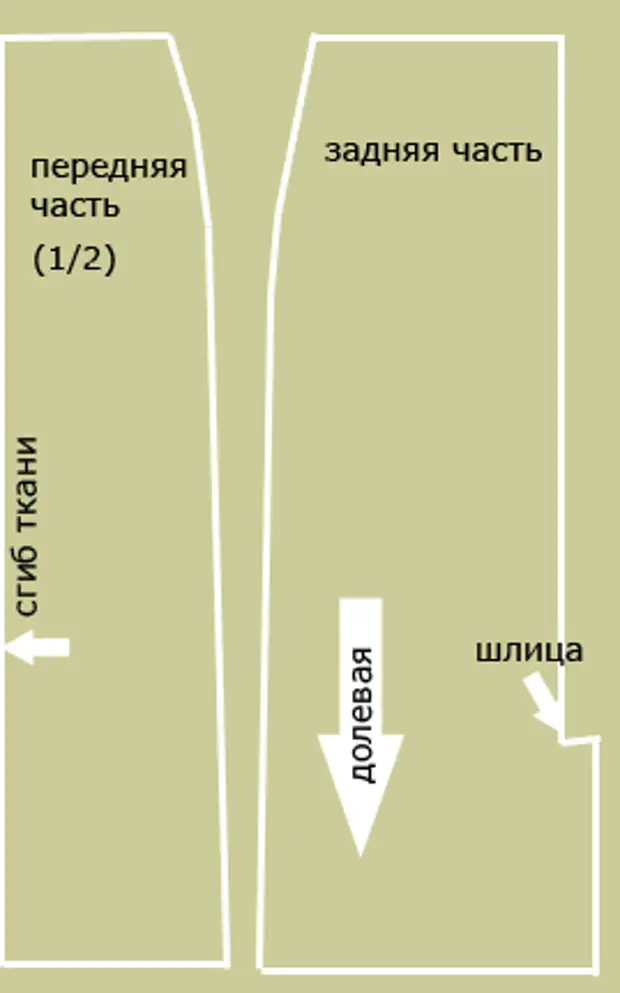
Please note that the front half is cut into full (without connecting seam). Therefore, before opening the tissue, fold it in half on the equity line and accurately make a half pattern of the front of the skirt. The back portion is cut out of two parts, since a direct skirt is usually done with a slot and a secret zipper is installed in the same seam.
See also how to sew a secret zipper.
Doing the layout of global patterns on the fabric, do not forget to add allowances for the middle seam and the upper cut is 1.5 cm, on the side seams - 2-2.5 cm, and on the bending of the bottom of the skirt, add no less than 3 to 4 cm.
To check the accuracy of building the pattern of a straight skirt, you can first sew a "experienced" sample from inexpensive fabric. To check, it will be enough to connect the side seams and fasten the molding or folds.
Do not score that any ready-made pattern of a skirt from a magazine or an Internet resource cannot take into account the individual features of the figure. For a more accurate fit of the skirt on the figure, it is necessary to perform the fitting of sour cream parts. And only after repeated "refinement", you can make an almost perfect pattern of skirts for your shape.
If you managed to achieve this, then transfer such a pattern on thick paper (cardboard) or film (oilcloth) and use it as a basis for cutting other styles and skirt models.