
We collected this information on the bitches, save for ourselves and share with friends. Tried for you, dear. On the Internet you will not find this.
Step 1
Remove orchid from the pot and put it in a wide pelvis. To make you easier to pull out orchid, remember a slightly wall pot. If this does not help - carefully, so as not to damage the air roots of the phalaenopsis, cut or scatter the old pot.
Usually, the stronger the root of Phalaenopsis is developed, the stronger she "keeps" the pot, and the harder it is to free it. However, if the orchid is weakened or sick, she has few living roots, she easily leaves the pot, a slightly pull it out for the stem.
Step 2.
It should be rinsed and clean the roots from the residual substrate. It happens that they are very intertwined between themselves and free them from the substrate is very difficult. To easily clean the roots, pour into the pelvis a little warm water and lower them into the water for 10-20 minutes to mock. Do not leave all orchid in the water together with the leaves, only the root system.
Then try to unravel her with your fingers. Help your shower, direct the water stream to the rest of the bark to wash them out. If some roots are tightly thorroid in the bark, do not attempt to free them in order not to injure.
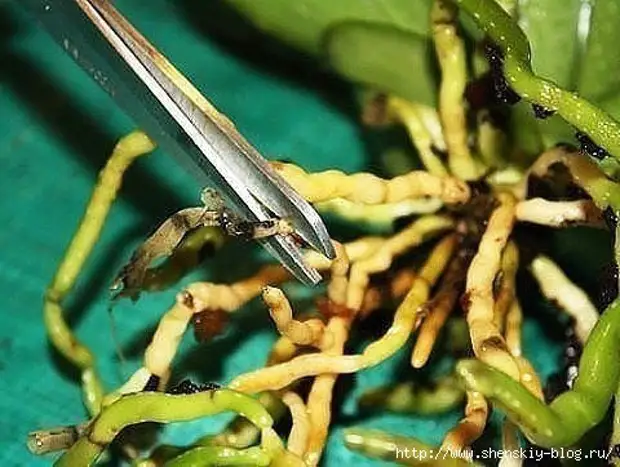
Step 3.
Carefully inspect the root for the presence of rot. All rotten, as well as dry roots need to be deleted. If only part of the root is damaged - cut only this part to a healthy (green or white) tissue.
Before the "circumcision" procedure, the scissors need to be disinfected with alcohol or hold over the fire, so as not to incur through open sections any infection.
After all operations, be sure to treat Falenopsis wounds.
It is possible: sprinkle with activated carbon (crowded tablets) or cinnamon, lubricate with garlic solution, smeared gray, handle with antiseptics, green.
Step 4.
Remove old yellow leaves if they are. You need to delete them carefully so as not to damage other leaves, according to the following scheme: Cut the sheet along in the middle and remove it from the stem by pulling the cuttings in different directions.
It often happens that new roots grow on top of the old lower leaves. If you want to deepen them to the substrate, then the bottom leaves can be removed, even if they are not yet aslets, because They will interfere with landing. Delete on the same scheme as yellow leaves.
You should also remove drying or yellowed patterns, leaving a small pendum (0.7-1 cm).
All sections, wounds on the leaves also need to be disinfected.
Step 5.
After you have handled all the wounds, you need to give them to delay and dry. You can leave orchid about 2 hours, and then continue the transplant. Or you can conduct a transplant in 2 stages: in the evening, let's say, to do the first 4 steps, leave orchid at night to succeed, and finish it in the morning. During the night, cuts will have time to delay better.
Only if you are going to leave orchid overnight, make sure that in the sneakers of the leaves and the core of the phalaenopsis there is no extra water, otherwise the posture can begin. Get labeled water with paper napkins.
Step 6.
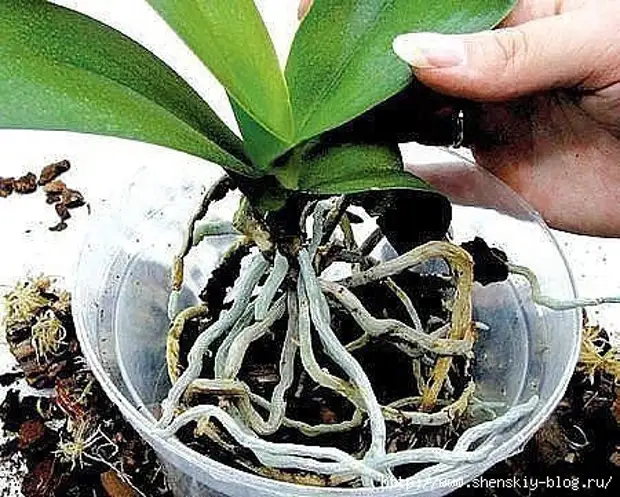
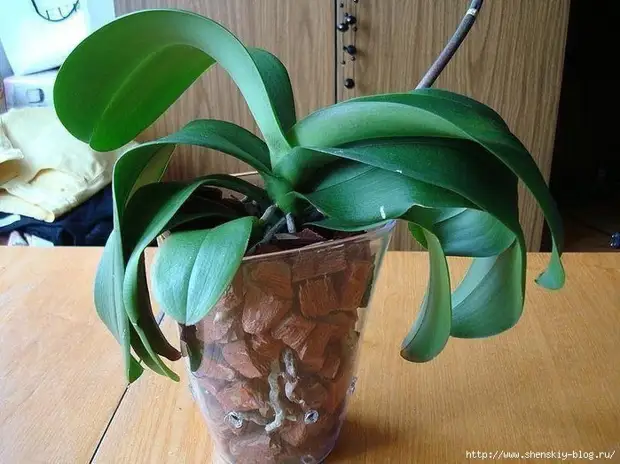
The next step is to plant a phalaenopsis. The perfect substrate for him is large slices of the crust. Sizza in Cora (usually pine), to increase humidity to it, you can add moss (sphagnum). However, along with the crust, you can also use charcoal, cut wine plugs or foam. In such a substrate with large fractions, the void roots necessary for aeration are formed. It is not necessary to fill them with a smaller substrate, so the roots will be breathing.
Choosing a pot, focus on the sizes of the root system. The pot must be of such a diameter so that when lowering it in the root system on the sides, 1-2 cm of free space would remain.
If Phalaenopsis is your first orchid, then be sure to take a transparent pot - so it will be easier for you to care for her. You will see the condition of the roots and will be able to unmistakably determine when the room plant should be poured.
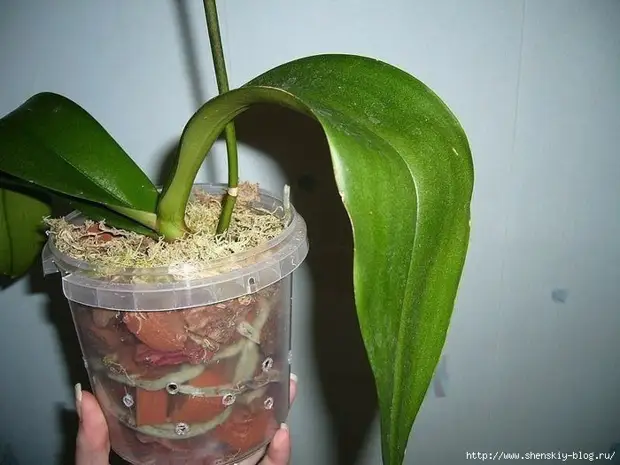
At the bottom of the pot lay a layer of crust of a large fraction. Then we sleep the layer of pieces in bed and put the plant itself in the pot. Holding the plant with hand add bark in small portions.
It is necessary to fill the substrate all the space between the roots. To do this, we carefully tapping a pot on the walls, and separate pieces of the cortex propellet between the roots with hand or a wooden stick.
When landing, Phalaenopsis should be placed in the center of the pot. If his stem is not smooth, but slightly mows on the side, then it is not necessary to plant it into the center. And do not try to straighten the stem, toning it or residue something, he still falls on his side.
Do not plunge the base of the stem! Squeeze so that the upper roots are slightly covered with the substrate.
Air roots, if small, can also be deepen into the substrate. But if they are long and there is a risk of breaking them at the same time, it is better to leave as it is.
Step 7.
The transplanted orchid for the first time until it is rooted, put in the shady cooler place. Do not water it approximately a week. At this time, you can spray the leaves, but only with clear and warm weather. If Phalaenopsis is actively growing, add the slightenled fertilizer is recommended to the water for spraying.
A source