
On the inclined and oval drawing lines, it is expanding and coating the parts - for example, along the neckline, the batch of the bolt sleeves, shoulder, the regulated, etc. In order to calculate the addition or blasting of the loop along the contour, the detailed triangle is built inside the drawing, in which the calculated The line lies against a straight corner.
Closing loops on shoulder
To build a calculated triangle, spend a horizontal line through the lower point of the shoulder and lower perpendicular from the top point of the shoulder. Knowing knitting density, count the loops based on the triangle, which you need to gradually close.
Then, in the height of the triangle, count the number of rows, when knitted which all loops are closed. Since the loops of one shoulder are closed only at the beginning of the facial rows, and the other is only at the beginning of the involve, one loop group can be closed through a row.
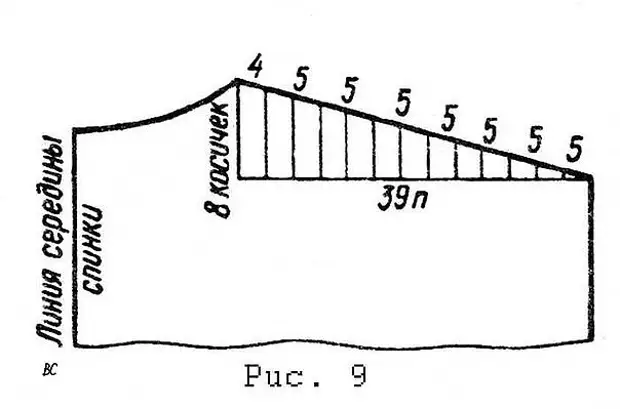
Of the two closed rows, one edge pigtail is formed on the side. The number of pigtails shows how many times the loops are closed, i.e. how many groups should break the number of shoulder loops. To find out how many loops cover for one reception, the number of loops of the whole shoulder (the base of the triangle) is divided by the amount of braids at the height of the calculated triangle (Fig. 9).
For example, on the basis of a triangle 39 loops, and in height - 16 rows (8 pigs). 39 Loops: 8 pigs - 4 loops (7 loops - residue). The rest of the loops is distributed over the same loop into each group. Consequently, the shoulder should close 7 times at 5 loops and 1 time 4 loops. In order for the shoulder when knitting, there was a smooth line without steps, you can apply a partial knitting of shortened rows, i.e. not to close, but to dissolve in the front rows of the hinges of one shoulder, in the wrong one. Close at once all the loops after the general series is tied.
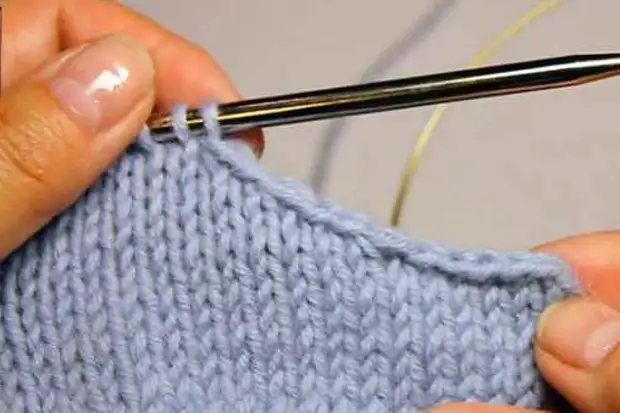
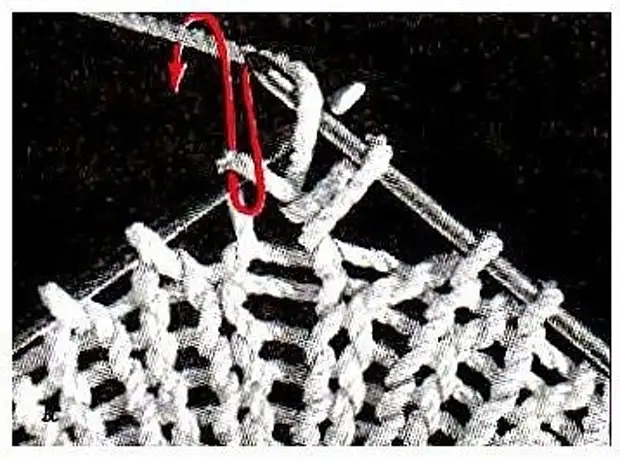
For a smooth line without steps, this method can be used: closed at the beginning of the wrong row (left shoulder on the back) The required amount of loops, at the end of the next row (facial), the last two loops are simply facial for the front threads.
Turning knitting on the wrong side, the number of next reception loops is closed (considering that one loop is already closed at the end of the front row). So one loop is closed at the end of the row, and the remaining loops of the group - at the beginning of the next row.
Horizontal breast paddock
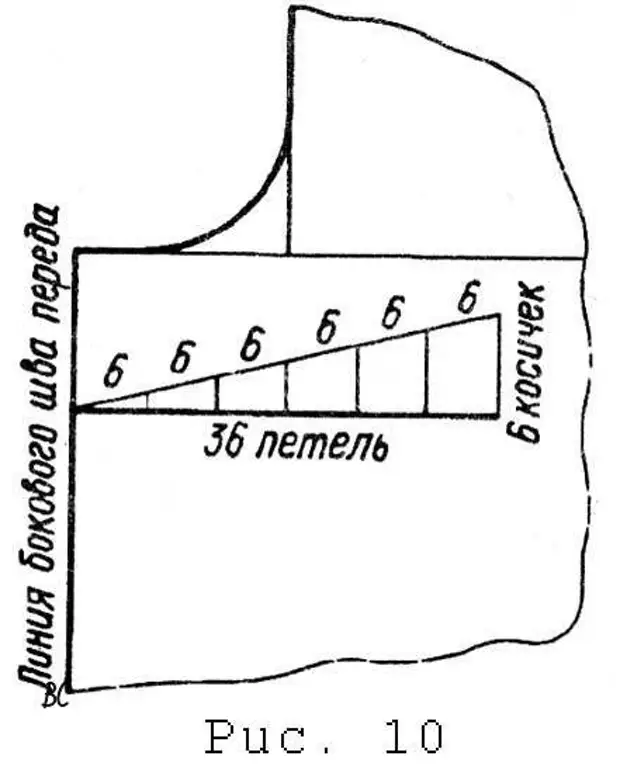
The calculated triangle is built on the drawing when building the basis. Knowing knitting density, count loops based on the triangle and braids in height (Fig. 10). Make the number of loops on the number of pigtails. Since the pulp is performed by partial knitting, that is, the loops are dissatisfied, the result of dividing is a housing, which is dissatisfied with one reception.
For example, on the basis of a triangle - 36 loops, in height of 12 rows (6 pigs). 36 loops: 6 pigs = b hinge. Therefore, it is dissatisfied with the side seam of 6 loops in the end of the purged row (left swallow) at the end of the penny row (right dye). After execution of the cut, continue to work on all loops.
Lower line sleeves in the product "Bat"
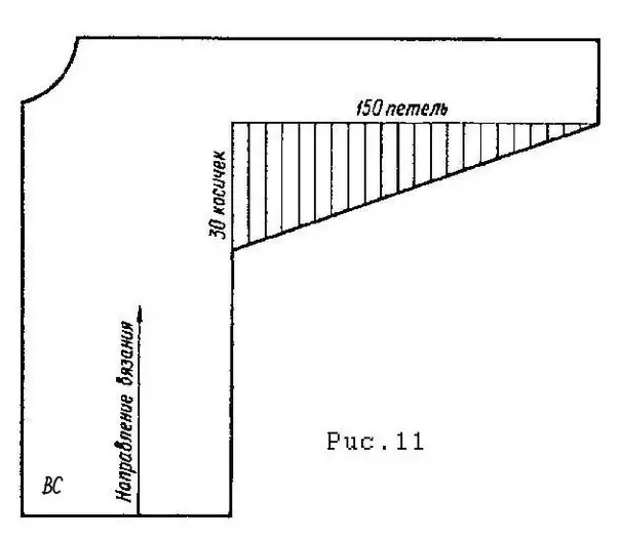
To construct a calculated triangle, the side seam line continues up and on it is carried out perpendicular from the point of the sleeve width on the brush line (Fig. 11). Knowing knitting density, calculate the number of loops based on the triangle for gradual addition.
In the height of the triangle, calculate the required number of rows in which all loops add. To find out how many loops need to be added in one reception, the number of loops are divided by the number of pigtails. For example, on the basis of a triangle - 150 loops, and in height - 60 rows (30 pigs). 150: 30 = 5. It is necessary to add 5 loops at the end of the front row when knitting a single sleeve and at the end of the purged row - when knitting the other.
Line corner coquetki
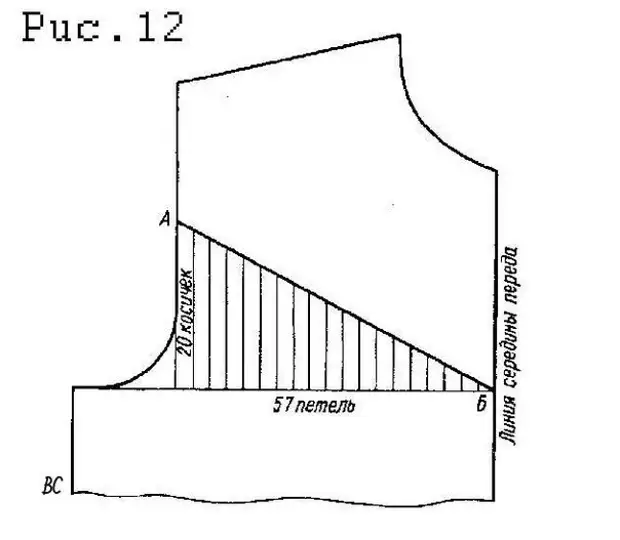
The slope of the coquette line may be less or more depending on the LED. The coquetki AB (Fig. 12) is replaced by one pattern to another. In order to continue not to reduce and not increase the total number of loops, both patterns should be the same knitting density.
For example, it is convenient to change the facial surface to the involving. In this case, the calculation of the substitution of the pattern is made in a triangle. To do this, spend a horizontal line from point b to side seam and omit perpendicular from point A.
Knowing the knitting density, count the number of loops on the base of the triangle, then at its height - the number of rows, when knitting which one pattern is replaced on another. Since the substitution of the pattern is more convenient to produce only on the front side, it is important to know the number of facial rows or side braids in the height of the triangle. And to find out the procedure for replacing the loops of the main pattern on the coquette pattern, the number of loops on the base of the triangle on the number of lateral braids are divided.
For example, on the basis of a triangle - 57 loops, and in height - 20 braids. 57 Loops: 20 braids = 2 loops (17 loops - residue). Consequently, in the face rows, given the balance, 17 times. Change the pattern on three loops, and 3 times (better than the latter) - on two hinges. In the wrong rows knit all the loops in the drawing.
Of the above examples of inclined lines, it can be seen that there are estimated triangles for lines with a large inclination, in which the height is significantly less than the base, and it is important for calculating the number of edge braids on it.
According to such triangles, as a rule, the loops, which need to be closed or added, replaced to another pattern or dissatisfied with partial knitting. Drawing triangles are built to lines with a slight inclination, in which the height is equal to or more base.
To calculate such triangles, it is enough to know the number of centimeters or rows in height. They calculate the distance through which the addition or recess is produced on one loop. Examples of such lines can serve as the lines of the regulated and the militant neck.
Publishing loops by side seam
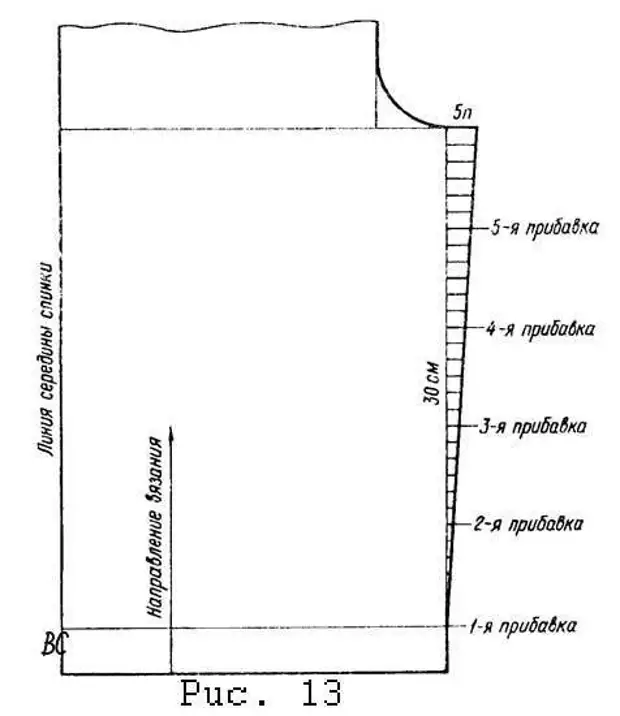
If the product is expanding from the end of the gum at the bottom to the target, then the side seam line is a vertical line with a slight inclination on the drawing. To build a calculated triangle to it, carry out perpendicular from the start point of expansion to the chest line (Fig. 13).
Knowing knitting density, calculate the number of loops on the base of the triangle, for gradual addition. Measure a centimeter tape height of the triangle and to learn the intervals between additives, divide the distance in centimeters to the number of loops.
For example, on the basis of a triangle - 5 loops, in height - 30 cm. 30 cm: 5 loops = 6 cm. Consequently, on the side seam every 6 cm it is necessary to add one loop. The locations of the loops are better to apply to the drawing, the first - at the beginning of the expansion immediately after the rubber band, and the four are the following - every one b.
Loop reduction loops
To construct a calculated triangle, carry out perpendicular from the point of starting expansion on the lines of the cuff to the loose line (Fig. 14, a). Knowing knitting density, calculate the number of loops that need to be added on the base of the triangle.
The height of the triangle is measured in centimeters, when they need to be needed to add a loop. To learn intervals between additives, divide the distance in centimeters to the number of loops. If the result is less than 5 cm, it is more convenient to knit, counting the rows between the additives. For this, at the height of the triangle, count the number of rows and divide it to the number of loops.
For example, at the base of the triangle - 24 loops, in height - 34 rows. During the division, the result will be less than 5 cm, so the number of rows in height counts. At a knitting density of 4 rows in 1 cm in height, 136 rows (4 x 34 = 136) are obtained. Make the number of rows on the loop: 136: 24 = 5 (16 rows - the residue). The remainder of the rows during division is distributed one by one in the intervals between the additions. Consequently, on the side lines of the sleeves, it is necessary to add on one loop 16 times in each 6th row and 8 times in each 5th.
When knitting the sleeve with a sharp extension from the cuff can be applied without constructing a triangle in the drawing. To do this, in the last irons, the cuff must be added to each 3 or 4th loop with a closed (twisted) with an attachment or twisted stretch between hinges.
Calculating the number of loops on the needle, it is divided by half as it is done when calculating half of the sleeve (Fig. 14, b). Knowing the density of knitting, according to the drawing, determine the number of loops along the loose line. Next, calculate the difference and receive the number of loops for the addition. The distance between the cuff and line of the armor, in centimeters or rows, is divided by the number of these loops. Result - Intervals between additives.
For example, after adding loops in the last irons, the cuffs on the knitting needles should be 80 loops. 80: 2 = 40 loops. There should be 108 loops on the loop line. 108: 2 = 54 loops. The difference between the narrow and wide parts of the sleeve is 14 loops (54 - 40 = 14). The distance between the linus of the cuff and the armor line is 34 cm. When dividing (34: 14) the result will be less than five, so at a given distance the number of rows are calculated.
With knitting density of 4 rows in 1 cm it will be 136 rows. Next, they share the number of rows on the addition: 136 rows: 14 = 9 rows (10 rows - residue). The remainder of the rows is distributed one by one at the intervals between the additions. Consequently, on both sides, the sleeves are added on one loop 10 times in each 10th row and 4 times in each 9th.
A source