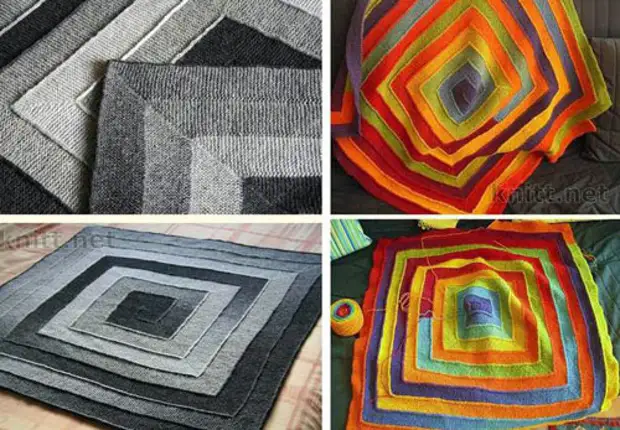
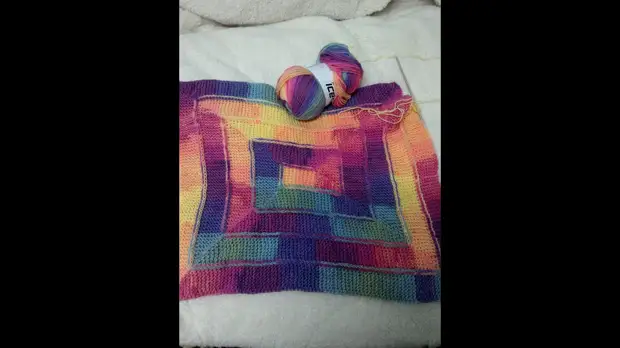


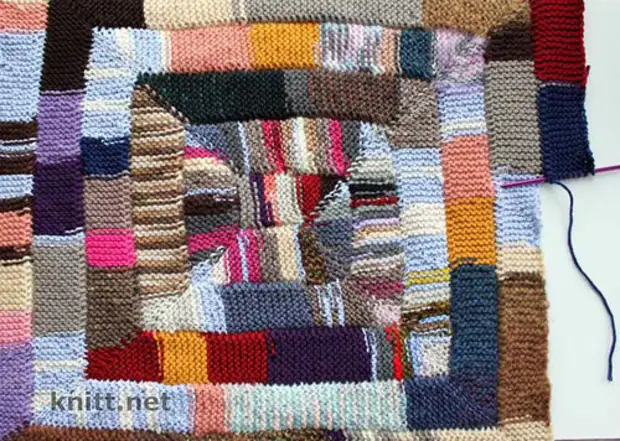
An unusual way to knitting the spokes of 10 loops from the remains of yarn. Designer of this model Frankie Brown.
Size: 107 cm x 122 cm
It will take: yarn and needles for your choice, for example, 14 Motes Noro Kureyon, Figures 5.5 mm
Work description:
Removing all the first loops, knit 9 rubles (18 rows - all persons). Now perform an open dual angle:
* Remove 1, 8 persons, thread before work, remove 1 as when knitting is elegant, thread at work, turn. Remove 1 as when knitting is elegant, thread at work, 9 persons.
Remove 1, 7 persons, thread before work, remove 1 as when knitting is elegant, thread at work, turn. Remove 1 as when knitting is elegant, thread at work, 8 persons.
Continue as established by tie to 1 loop less, and turning the trace. loop when turning to avoid holes.
When 1 P remain, to penetrate it face (and not just to remove).
Now change the direction of the process, increasing the number of loops to 9 p, and turning the loop when turning. "Run 1 Rubber on 10 loops, then knit the second angle, repeating from * to ** (when tieding a rift on 10 loops, you can knit so that the connection site is neat to remove 1, raise and penetrate the face 1 p, broach at the end of the first row ).
It was the most difficult part. From now on, you only turn the angle 1 time in every corner!
Now knit in the opposite direction along the side of the initial 9 rubles, connecting the strip as the knitting as follows:
Row 1: Remove 1, 8 persons, remove 1, lift 1 persons with a loop along the side, broach.
Series 2: 10 persons.
When you get to the next. Angle, perform a single angle (from * to **) and go to the trail. side It's all! Continue to achieve the desired value of the plaid.
Tellular instructions for the corner:
These instructions insert between * and ** in the pattern above.
Row 1: Remove 1, 8 persons, thread before work, remove 1 as when knitting is elegant, thread at work, turn.
Series 2: Remove 1 as when knitting is elevated, thread at work, 9 persons.
Row 3: Remove 1, 7 persons, thread before work, remove 1 as when knitting is broken, thread at work, turn.
Row 4: Remove 1 as when knitting is elegant, thread at work, 8 persons.
Row 5: Remove 1, 6 persons, thread before work, remove 1 as when knitting is broken, thread at work, turn.
Series 6: Remove 1 as when knitting is elegant, thread at work, 7 persons.
Row 7: Remove 1, 5 persons, thread before work, remove 1 as when knitting is broken, thread at work, turn.
Row 8: Remove 1 as when knitting is elegant, thread at work, 6 persons.
Row 9: Remove 1, 4 persons, thread before work, remove 1 like when knitting is broken, thread at work, turn.
Row 10: Remove 1 as when knitting is elegant, thread at work, 5 persons.
Row 11: Remove 1, 3 persons, thread before work, remove 1 as when knitting is broken, thread at work, turn.
A number 12: Remove 1 as when knitting is elegant, thread at work, 4 persons.
Row 13: Remove 1, 2 persons, thread before work, remove 1 like when knitting is broken, thread at work, turn.
A number 14: Remove 1 as when knitting is elegant, thread at work, 3 persons.
Row 15: Remove 1, 1 persons, thread before work, remove 1 as when knitting is elegant, thread at work, turn.
Row 16: Remove 1 as when knitting is elegant, thread at work, 2 persons.
A number of 17: 1 individuals, thread before work, remove 1 as when knitting is elegant, thread at work, turn.
A number 18: Remove 1 as when knitting is elegant, thread at work, 1 persons.
Row 1: Remove 1, 1 Persons, thread before work, remove 1 like when knitting is broken, thread at work, turn.
Series 2: Remove 1 as when knitting is elegant, thread at work, 2 persons.
Row 3: Remove 1, 2 persons, thread before work, remove 1 as when knitting is elegant, thread at work, turn.
Row 4: Remove 1 as when knitting is elegant, thread at work, 3 persons.
Row 5: Remove 1, 3 persons, thread before work, remove 1 like when knitting is ezen, thread at work, turn.
Row 6: Remove 1 as when knitting is elegant, thread at work, 4 persons.
Row 7: Remove 1, 4 persons, thread before work, remove 1 like when knitting is elegant, thread at work, turn.
Row 8: Remove 1 as when knitting is elegant, thread at work, 5 persons.
Row 9: Remove 1, 5 persons, thread before work, remove 1 as when knitting is elegant, thread at work, turn.
Row 10: Remove 1 as when knitting is elegant, thread at work, 6 persons.
Row 11: Remove 1, 6 persons, thread before work, remove 1 as when knitting is broken, thread at work, turn.
A number 12: Remove 1 as when knitting is elegant, thread at work, 7 persons.
Row 13: Remove 1, 7 persons, thread before work, remove 1 as when knitting is elegant, thread at work, turn.
Series 14: Remove 1 as when knitting is elegant, thread at work, 8 persons.
Row 15: Remove 1, 8 persons, thread before work, remove 1 like when knitting is elegant, thread at work, turn.
Series 16: Remove 1 as when knitting is elegant, thread at work, 9 persons.
Master class on the confusion of beautiful pigtails (location connection location)
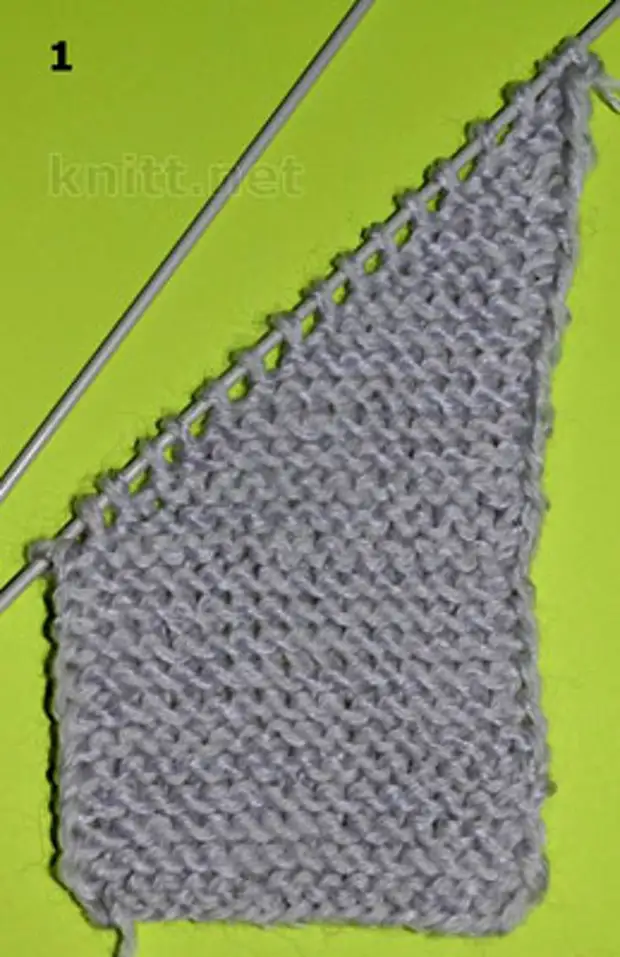
In order to explain to you to clarify the principle of knitting a blanket of 10 loops, I specifically scored 17 loops for better visibility.
After I lezed several rows up with a scattle knit (all loops facial, only 1 loop is removed, and the latter is lying as the edge-out).
Note! If you want to get a pigtail at the junction of each closed circle, then you need to perform an injaliated edge loop. If you want the border to be not noticeable, then the last loop is touched by the front.
In the photo 1, the start of knitting performed the 1st open angle. Each last loop wrapped the thread when turning.
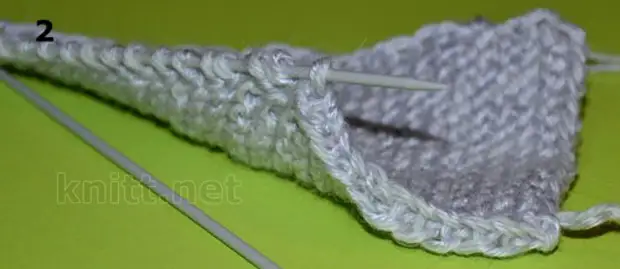
In photo 2 shows a pigtail that is formed by the edge loop acclaimed with an invalid.
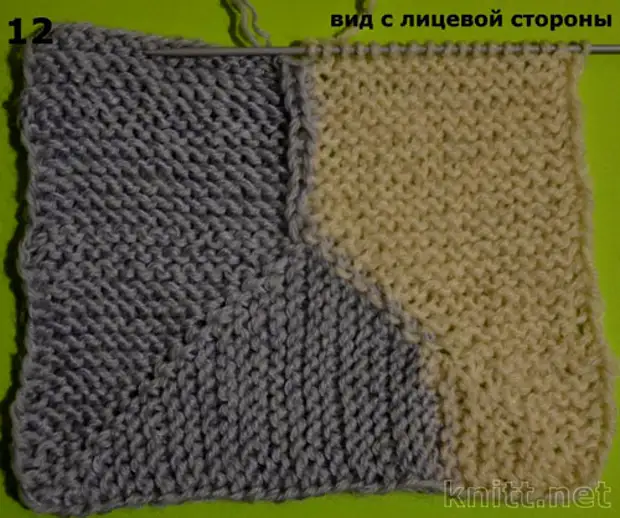
In the photo 3, the turn is connected and we proceed to the confusion of the junction and binding the strips.
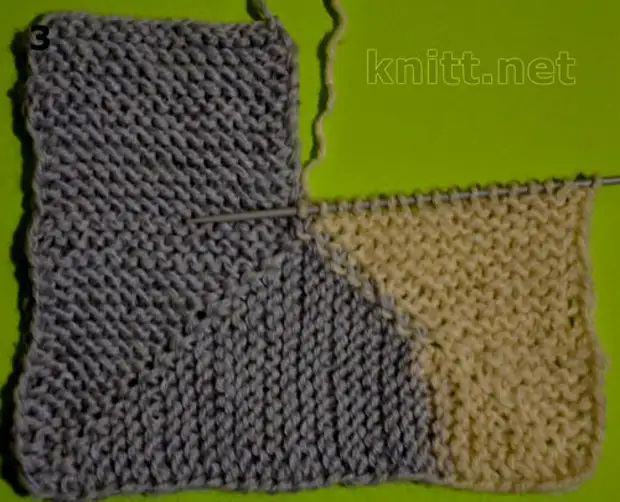
Photo 4 Mouse formed by the edge loops when binding turned on the front side.

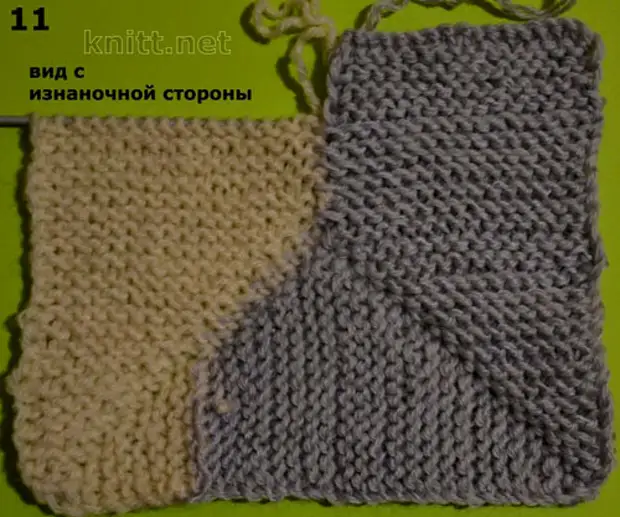
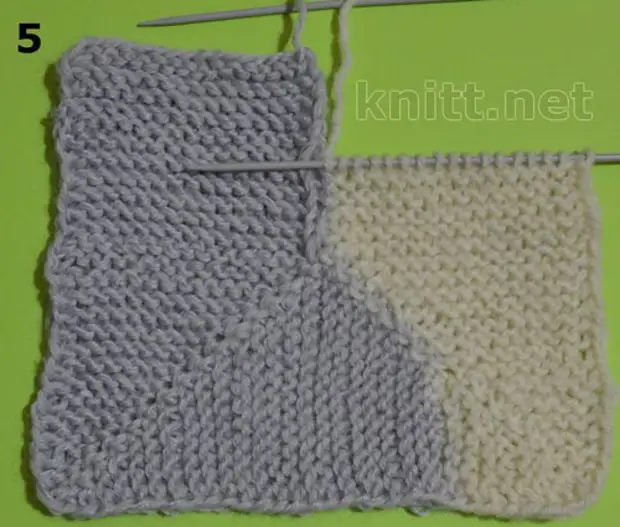
Photo 5 The half of the ranks are accumulated, the joint of the gray stripes and a beige strip is tied.
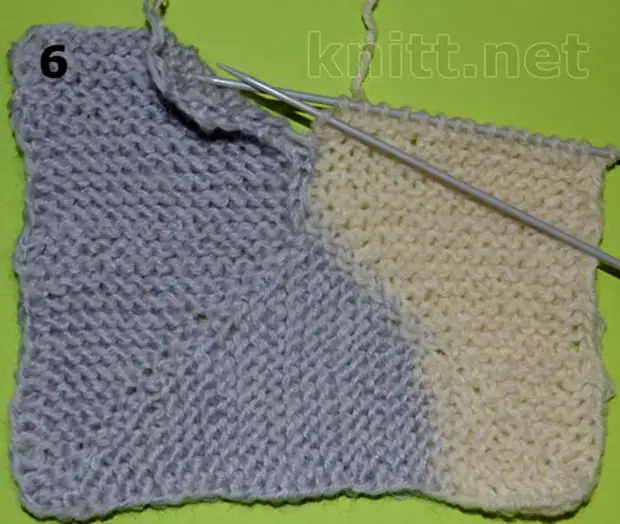
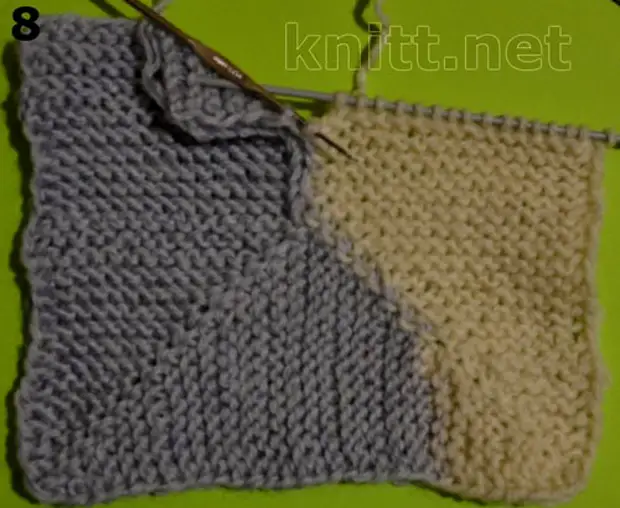
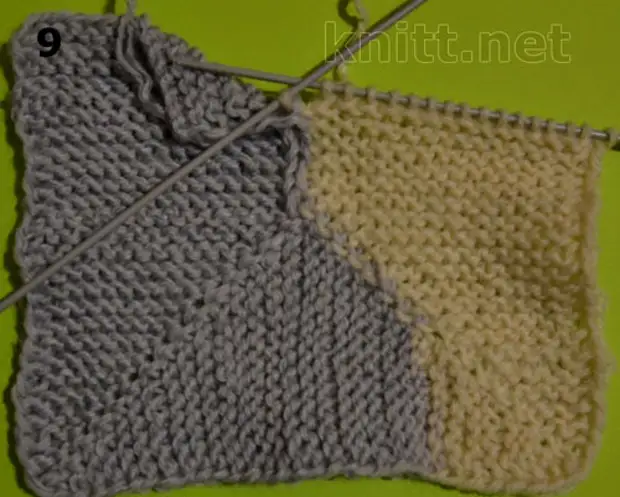
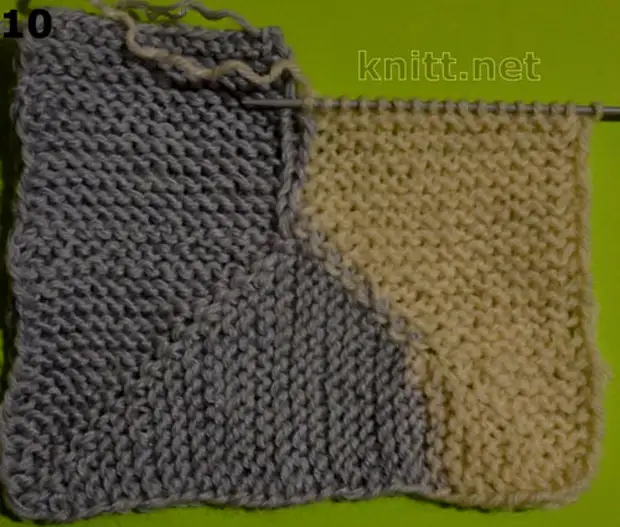
In photo 6-9, the process of checking the junction loops is shown.
1) We have a beige lane loop to a penultimate neighbor loop to a gray strip.
2) Having rejected the edge moster slightly stretch the hook through the thread under the pigtail (shown in photo 7)
3) stretch the beige latter loop through gray (shown in photo 8)
4) we dress the resulting loop to the needles and insert her faces. Completing a row of beige loops (shown in photo 9-10)
5) Turn knitting and insert a series of facial loops, removing 1 loop and tied up the last paragraph as the edge-out.
6) We continue to knit on this principle further. When you get to the next. Angle, perform a single angle and go to the trail. side It's all! Continue to achieve the desired value of the plaid.