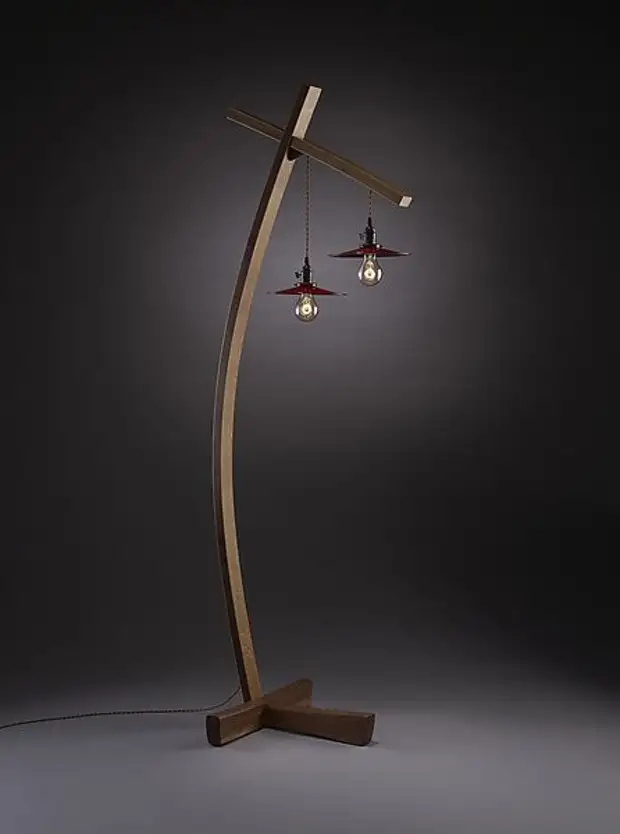
You can read the newspaper or a book on your favorite chair sometimes difficult because of the lack of light. Buy the lamp is irrational, but to make a lamp with your own hands much more economical - it can be transferred from place to place, setting up the lighting as convenient as possible to read. In addition, this product will excellently complement the interior. As a material for its manufacture, wood is used - the master class is shown below, in which the ash is used for the manufacture of the luminaire.
Solving the question, how to make a flooring on your own and at home, it is not enough to just know those dimensions by which the details will be peaked. In the manual below, all information on this process is given - ranging from applying tags and ending with the assembly of the product.
We make sidewalls
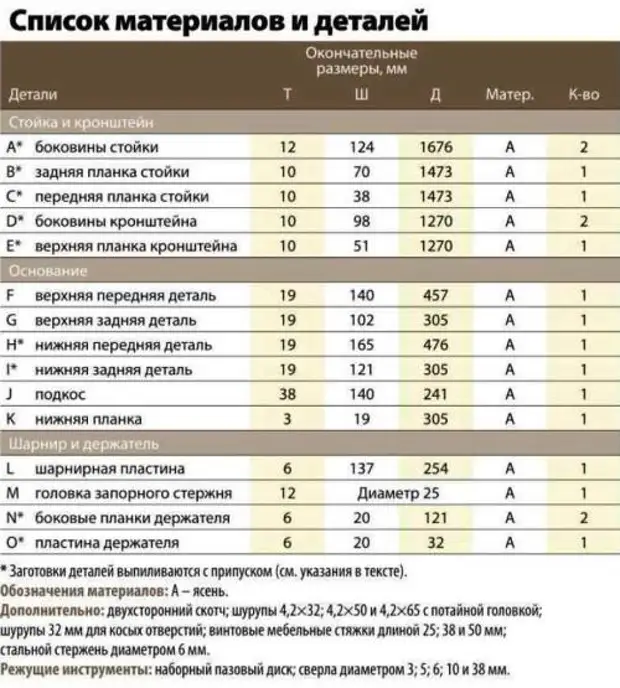
We cut the following elements of the future floor lamp:
side sides (a) racks;
front part (C) racks;
rear (b) racks;
bar E, which will be located on top;
Side Parties Bracket D.
Details A, B, C and E need to be made with a 25 mm in length, shown in more detail the drawings below. Purpose assignment will be described further by text.
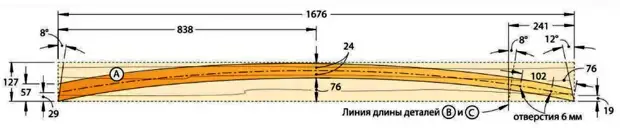
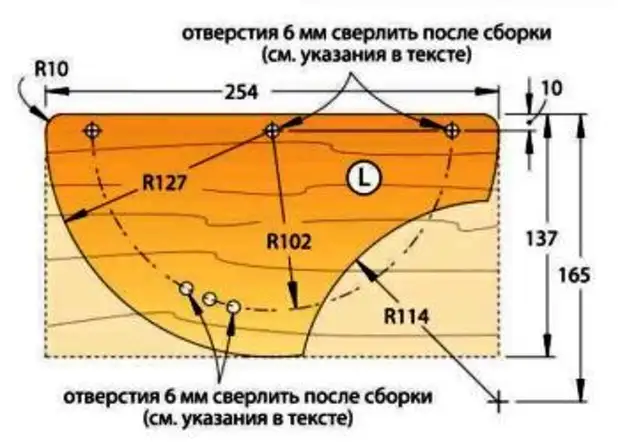
Drawing sidewall stand
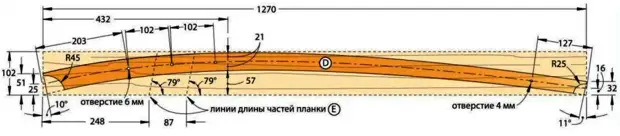
Drawing of the sidewall bracket
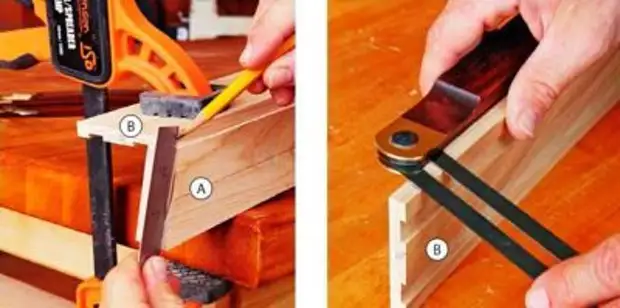
Please note! If the blanks for the side sides of the rack and holder beghed in a double-sided sticky tape, it will be possible to quickly make the markup of all lines, points of intersection, the places of future holes and "one fell" to cut all the same or symmetric parts.
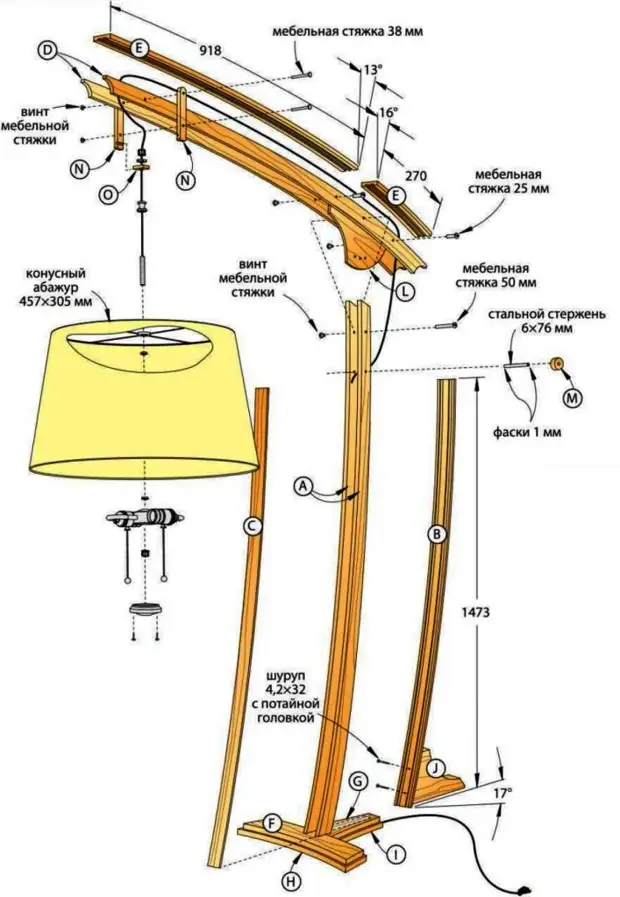
Detailed tree view with lampshade
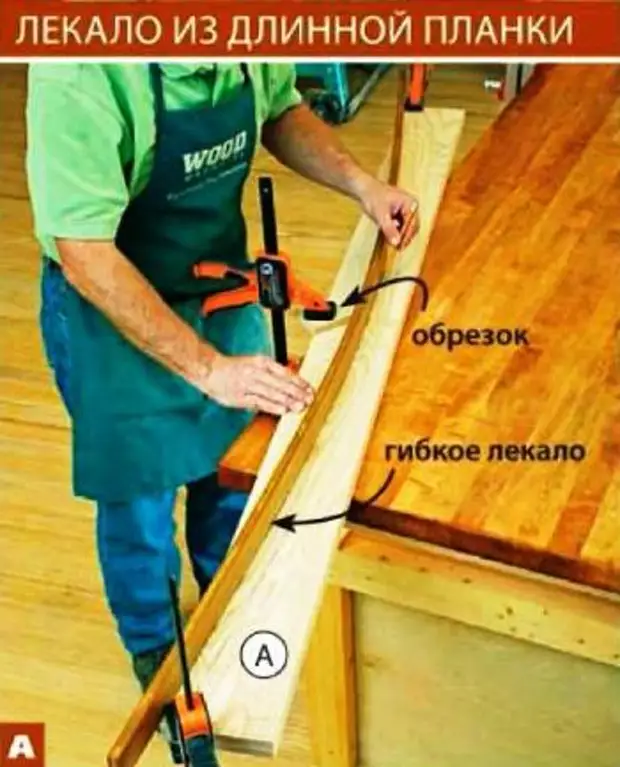
On each pair of blanks, there are upper points and ends of the arc. To make flexible patterns, from MDF thickness of 12 mm drinking a strip 50x1830 - it will help to place arcs on two pairs of blanks. In this way, uniform and smooth arcs are stuck on large lengths and in the manufacture of different furniture, where necessary.
Thereafter:
Place the corners of the cut at the end of each pair of blanks;
On the side sides of A, we note the length of the rear b;
At the ends of the side of the bracket D, there are semicircular cuts.
In all the places specified in the drawings we make a hole with a diameter of 6 mm.
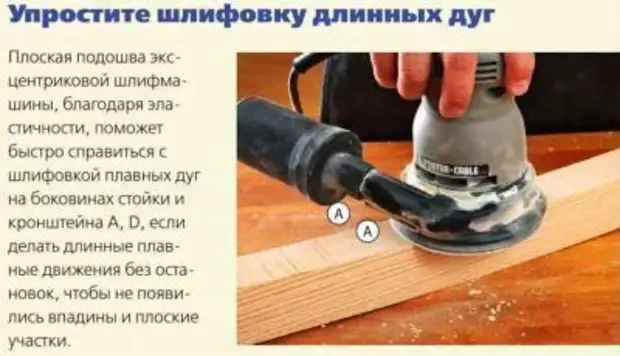
Focusing on the placed areas and making angle, at the holder D and side sides, and the racks are crying the ends. With the help of a ribbon saw on the marked loop, we cut the blanks, making an outside of the battery. After that, everything is grinding and disconnecting the side of the sides (we use White Spirit to remove traces of Scotch).
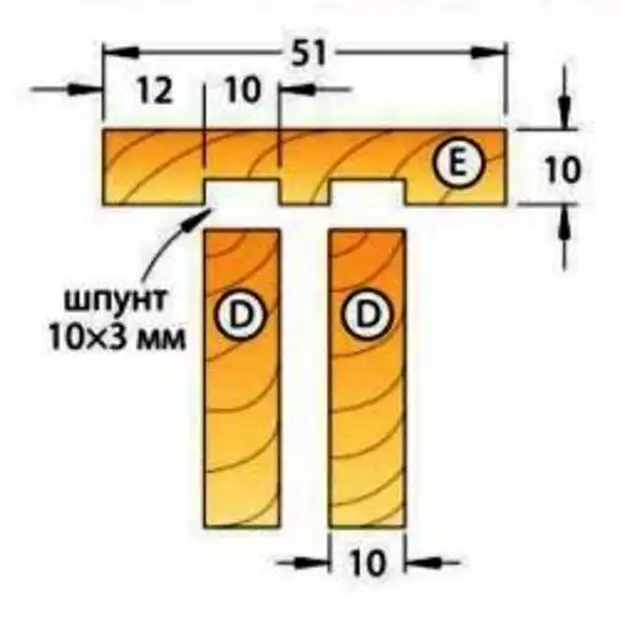
At the back of the racks, drink the tongs (grooves), on the nearby part C - the folds.
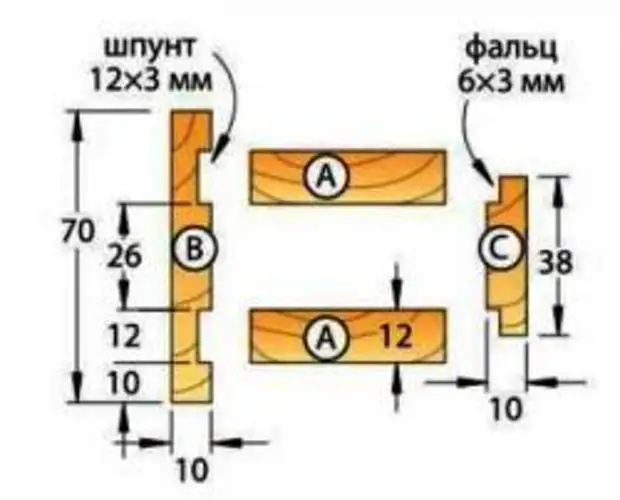
Detailed drawing of the cross section of racks and their assembly scheme
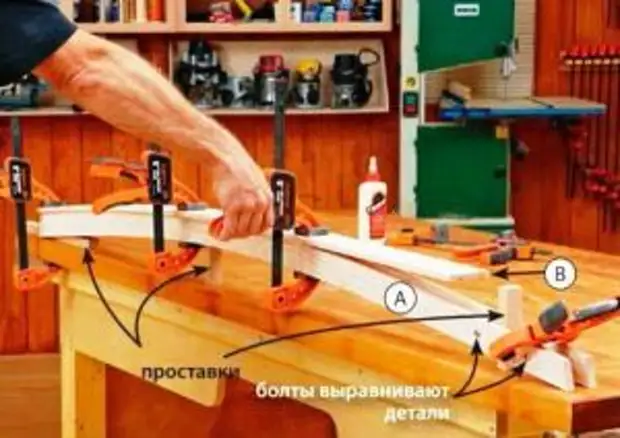
Aligning the ends of the side sides, lay the blanks on the table so that their curved edges look up. Clamp attach to them back B, noting the angle of the lower bevel on it. At the same angle, we set up a tilter and a tracing saw with a sprinkle on the end of the rear screen SCOS.
Wooden material is good at work that you can always use its trimming. In our case, you need to cut 3 inserts, where the width of each is 25 mm. They will divide the sides of A. To do this, their deployed side is put on the table for carpentry work, with the help of the clamps, they fix the back part of the rack B on them, after which it is transferred from them tags, we note its finite length. After removing the clips, we cry back the back to the desired size.
It will be interesting for you: Loft furniture: Making your own handsIn the grooves of the rear part b, we applied glue, tighten it with side sides A, aligning the lower ends, after which the entire gluing is fixed. What do you need all the manipulation data, you can look at the detailed drawing above.
Note! To make a flooring with your own hands smooth and beautiful, in the hole for a while you need to insert bolts or studs. This will allow to align the sidewalls. To install the back detail as best, it is necessary to press clamps, and all work should be carried out, starting from below and moving up.
In the upper bar, the holder cut the tongue with a size of 10 mm.
Drawing of the cross section of the bracket
The saw disk exhibit at an angle of 13 degrees, after which we spawn the long part of the top strip for the length, which is indicated in the review detailed drawing above. Now I exhibit the slope of the disk by 16 degrees and sprinkle a short part of the top plank, oriented on the same pattern. Aligning the ends of the inspired parts, we glue them to the side sides of the holder D.
We make the foundation
The basis of the product is also made of wood with their own hands. From the material (19 mm thick) weeping:
top bar f;
Upper back detail G.
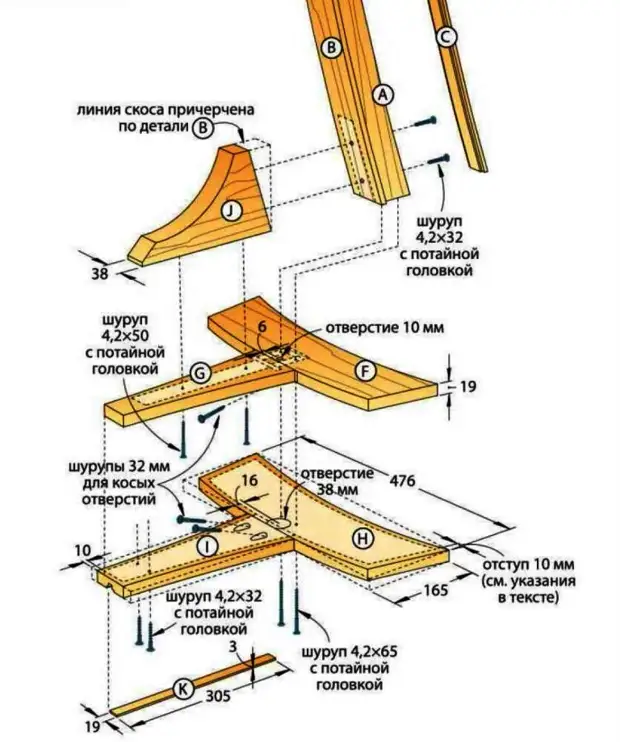
Scheme connection details
By doing the blanks of the lower parts, we take into account the following nuances:
The bottom bracket H is done on 3 mm wider and 6 mm is longer than the dimensions listed in the figure;
The bottom rear I is made by 3 mm wider than the specified sizes.
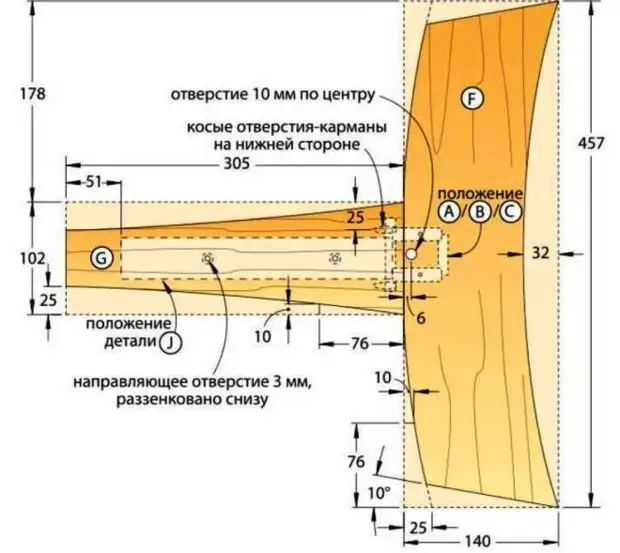
Having retreated 25 mm from the edges of the top back, we make oblique holes. The item itself is glued and fixed by self-drawing to the upper front blank.
To make an outdoor floor lamp, with your own hands, a fully functioning subject of the interior, you need to think about whether electricity will come to it. Therefore, as shown in the figure below, at the bottom of the central part of the bottom rear workpiece I, we cut the spool (groove) 10x10 mm - it will be a place for an electrical cable. After that, in the center of the filled opening, we make another groove 3 × 19 mm.
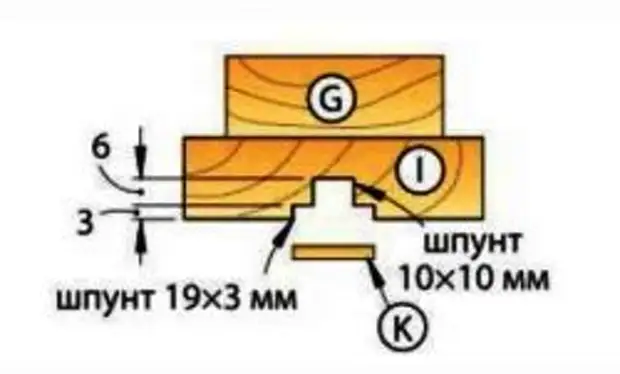
PAZ for laying an electrical cable (wires)
Focusing on the drawing below, we drill oblique holes, making from the edges of an indent of 25 mm. Now, the result of work is glitched and fixed by self-drawing to the lower billet N.
Click to enlarge
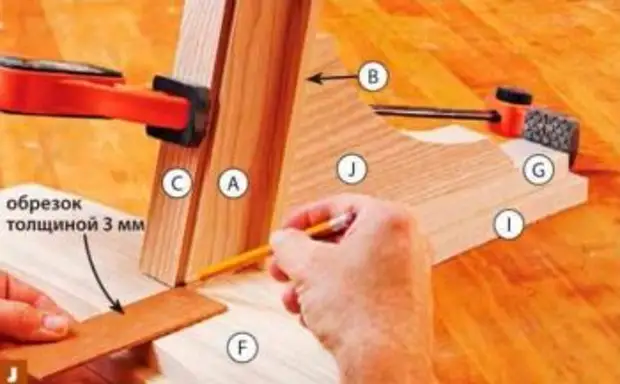
Place the shape of the top layer of the base F / G, cut down and grind. These billets are placed on the lower H / I, aligning that the end of the top back G turned out to be shifted by 10 mm in relation to the end of the bottom rear I.
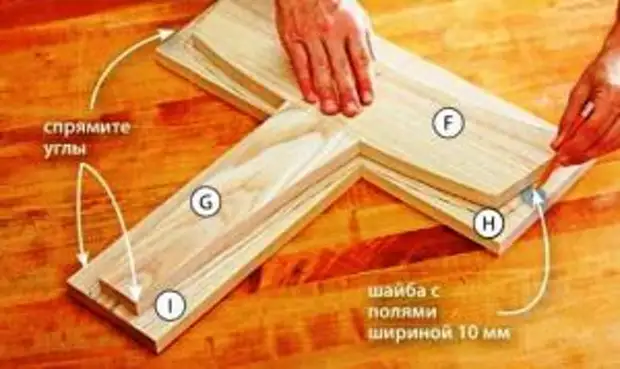
To mark the contours of the lower layer H / I, we supply the top blanks F / G (photo above), making the allowance of 10 mm. At the same time, instead of the roundabilities on the corners, direct lines. In the details of the lower layer, we drill holes for the subsequent screwing of the four screws. Drilling places process the zenker, after which we disconnect both layers of the base.
Focusing on the base scheme above, we make holes:
in the front of the top f and the bottom n details of 10 mm;
In the lower front part H - 38 mm.
After that, we drink the bottom layer H / I on the markup.
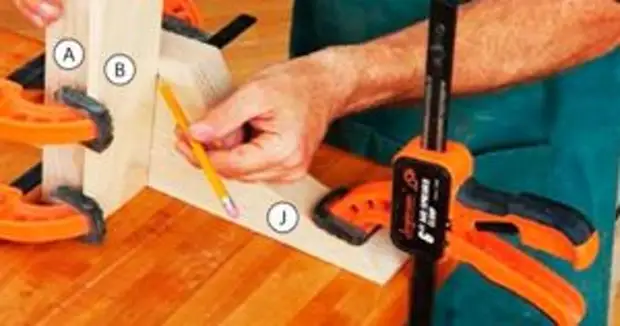
We cut the jack J, leaving the edge of the rectangular shape blank (without a long bevel).
It will be interesting for you: the poker table with your own hands - in the game Yes, people learn on the road
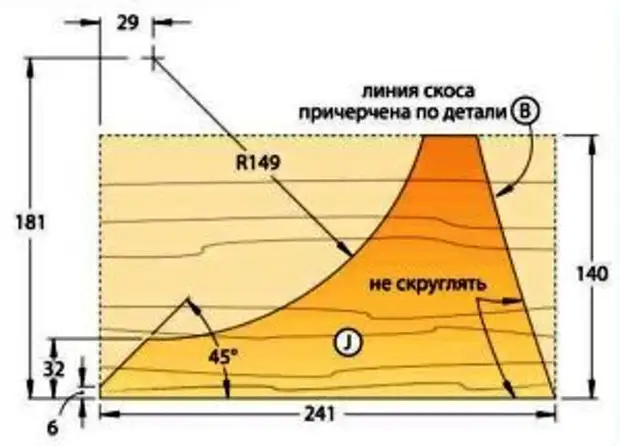
Fix it with clamps, after which we pressed to it prepared previously part of the Rack A / B (its lower part should be seamless to the table for joinery for convenience of the connection). Now we transfer the markup of the back of the rack in and cut the desired workpiece. After that, it is polished, and sharp ribs process the sandpaper or a joiner with small teeth.
Detail J is glued and fixed by self-reserves to the top layer of the F / G base. Then we glue and secure the assembled billets of the lower layer H / I.
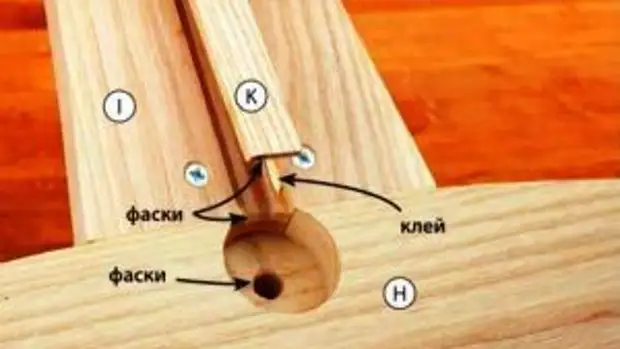
We cut the bar to (it will close the power cable), we grind it and gluate in the groove, as shown in the photo.
Fresh rack to base
Click the rack to the troop. In it, through the back of the rear of the racks we drill the hole and screw the screws.
On the top front of the base f, there are the location of the Rack A / B, after which it is removed. We drill through the basis of f and k holes. Then the holes from the bottom need to be divided.
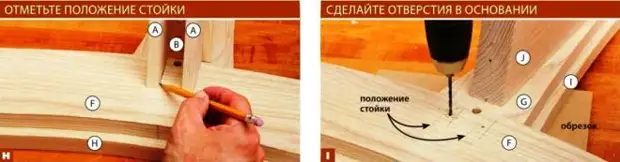
The j, we glue the A / B rack, then amplify screws. In the side sides of the rack, through the holes made at the base, we drill the guide auxiliary holes. Fix the rack based on self-draws. To the sides of the A, which are included in the fold, with the help of the clamps we press the front part of the rack C, taking the angle of the bevel at its lower end, after which we remove the clamps and fill the SCO. Restraining the workpiece into place, its lower beep is pressed to the base and the transfer of markup from the side of the sides, we mark the final length. We differ in the nearby bar and brapping to the side sides of the rack.
Install the holder
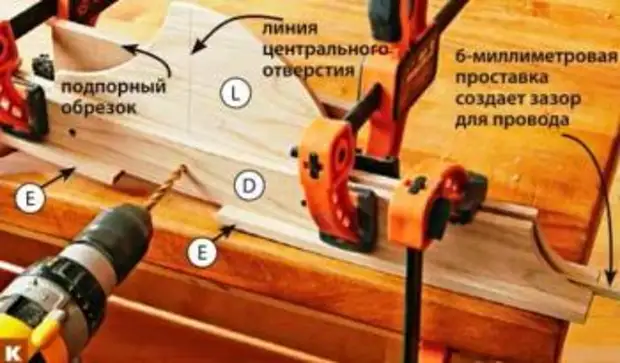
Place the shape of the hinge plate L and the place where the central hole will be located. By a label, we cut the workpiece, pollinate it along the contour.
Turning the D / E holder, put it on the table for joinery and between the side parts D insert the intermediate part, the cross section of which is 6x6 mm. They put a hinge plate on it, aligning the hole markup made on it with the sidewall central hole. Using clamps, attach a subtle trim to the side that is located on. In the hole of the side that is located closer, insert the drill, then across the entire plate we drill the hole. We take it out, polish, fix between the side sides of the holder, using furniture screeds for 25 mm (2 pcs.).
The collected holder D / E / L is inserted between the side sides of the rack A and fix the screed for furniture by 50 mm. Horizontally install the end of the holder, then fix the long trimming.
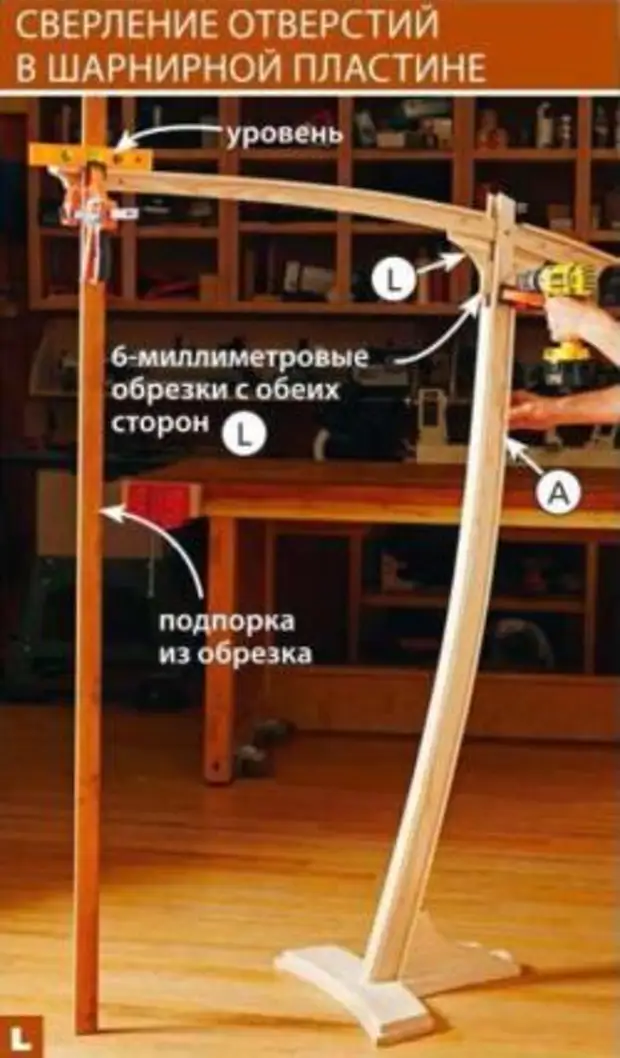
To the hinged plate L on both sides we press the cutting clamps with a thickness of 6 mm, and one hole drill. We raise the end of the holder D / E / L by 130 mm and the rear plates are the second. The last hole drills after the design is raised by another 130 mm.
We make the head M:
On trimming, a thickness of 13 mm is placing a circle (in diameter there should be 25 mm);
In the middle of the circle, we drill a hole for 6 mm;
The billet around the circle is cutting down and grinding sandpaper with grainy 220.
From the rod of steel 6 mm, we cut a blank with a length of 76 mm. We apply glue on it and insert into the head M (the tip of the rod should perform 6 mm). After drying the glue into the holes of the plate L and side of the rack and insert the shut-off rod.
You will be interested in: a few tips for fastening the shelf to the wallAdd abazhur
The plander for the manufactured lamp can be any. It can be bought in the store or search among old things. The product will look more original if you show your fantasy and make a lamp shade for a ladle with your own hands. In addition, the frame for the lamp is made quite simple.
For the manufacture of the components of the holder - the bar N and the plate O - from the material with a thickness of 20 mm, we cut the billet, the size of which is 6x305 mm. Returning from the two ends of the workpiece by 5 mm, we make the groove, as indicated in the drawing. We cut off from each of the ends on one bar n and fasten them using double-sided tape. Drill the holes D5.5, and on the items until they are not disconnected.
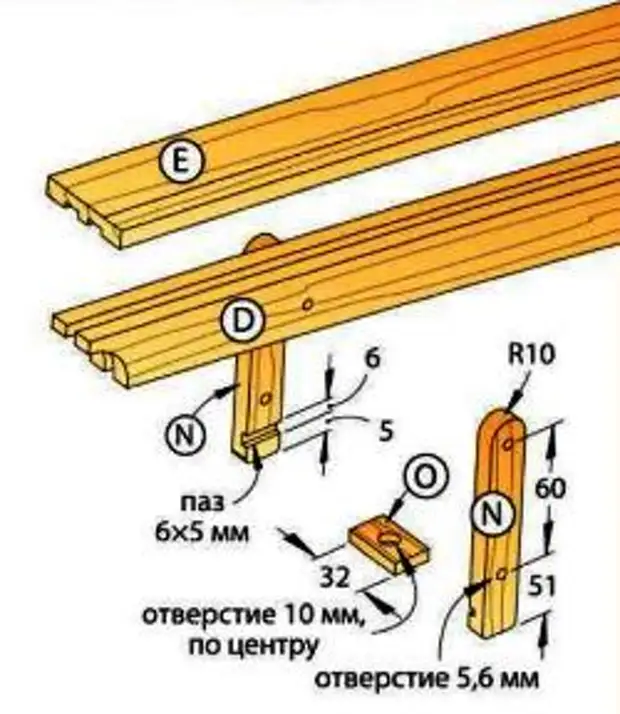
In the remaining part of the workpiece divide the width half and in the middle we drill the hole D10, retreating from one of the ends of 16 mm. We cut off the segment with a length of 32 mm (the hole must be drilled). The resulting fastening plate is glued to the plackets n and fix using clamps.
We remove all the accessories, carefully all grind and apply the finishing coating.
We collect the product
We collect all parts of the product except the n / o mount. We produce a network cable through the basis of the F-K and the Rack A-C, rubbing it around the hinge plate L and through the D / E holder. We leave the end of about 90 cm long, which we wear:
sleeve with internal thread;
nut;
Fastening N / O;
decorative sleeve;
Part of a tube having outdoor threads.
All fix on the mount plate O, using a bushing with internal thread.
In the lamp to the mounting hole, we wake the tip of the wire and add two nuts. Tightening one of them, fix the lampshade, the second leave a little movable. In the patron base for two light bulbs, we produce the wire, and the cartridge itself is fixing the sleeve with internal thread (fixation is carried out on the tube with an external thread).
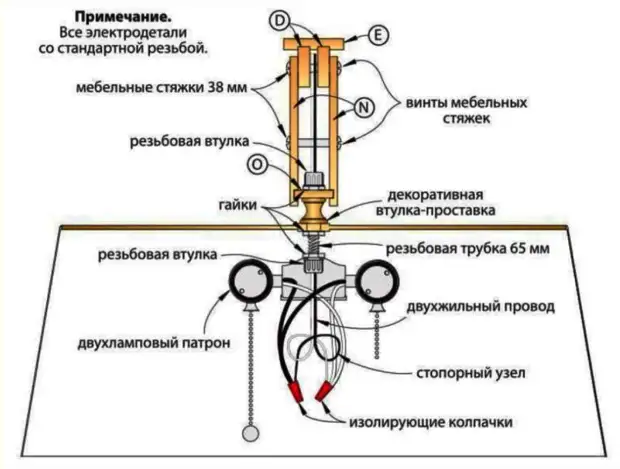
Click to enlarge
Tie the ends of the wire into a special node and connect them with the cartridge wires. Pull the excess part of the wire back and close the design with a lid.
To the sides of the holder D with the help of screeds for furniture on 38 mm Freakim. N / O holder. After that, part of the wire stretch through the stand of the product and put the network plug.
The product will not work if the lamp is not inserted into it. In our case, you will need two light bulbs. Screw them in the product and check its performance by inserting the plug into the network.
Following the recommendations given above, it becomes possible to make a lamp with your own hands at home. The finished product will excellently complement the interior and will allow you to read any magazines with sufficient lighting.
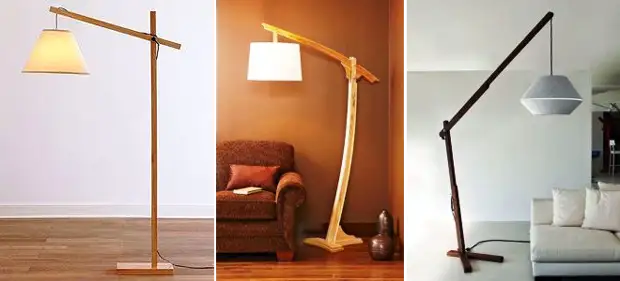
Examples of lamps