
We will share with you four ways to sew gum. And for those who have a modern machine. And for those who have an old manual grandmother's Singer, and even for those who do not have a typewriter, tell me how to put the gum manually.
- Purpose method of uniform elastic stitching (for those car without a zigzag line).
- Zigzag method of sewing gum (without pulling it in the process of sewing, but only after sewing).
- Cracking method of stitching gum (for any typewriter).
- The horizontal method (will help to enhance the rubber thread on the usual sewing machine).
- Manual way of stitching gum (for those who have no typewriter).
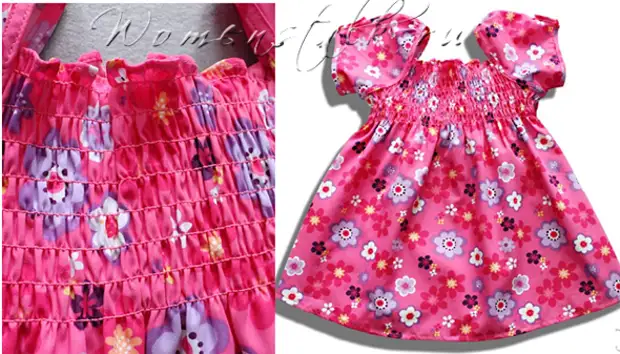
Before we proceed directly to our lesson, we want to inspire the beautiful patterns of clothing models with the use of rubber bands. In all these clothing models, you can enhance the cutters on the lessons from this article.
So let's love, and therefore we will learn.
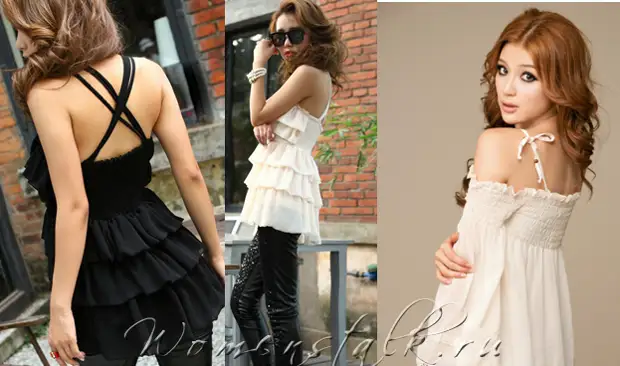
Elastic on shoulders
This is the most common application of gum on tunics and dresses with open shoulders. The pattern of such a product is always a modification of a truncated pattern when the shoulder line is cut and the top of the octal sleeves.

Elastic on hips
It serves to provide a small allowance of a free flowing fabric over the linen of the hips and the waviness of the fabric under the linen of the gum.
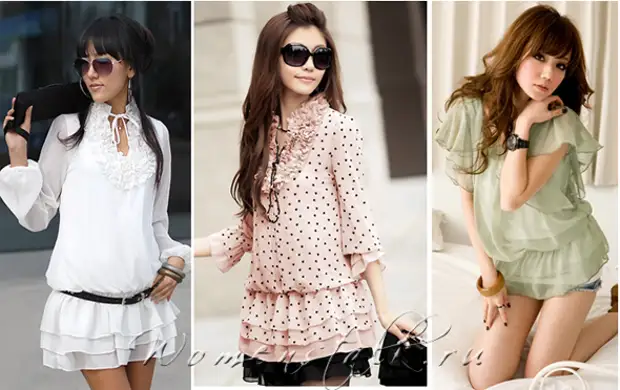
Elastic on the waist
It is used when it takes without a belt to gear the product, while retaining the richness of the folds both from above and from the bottom from the gum line.

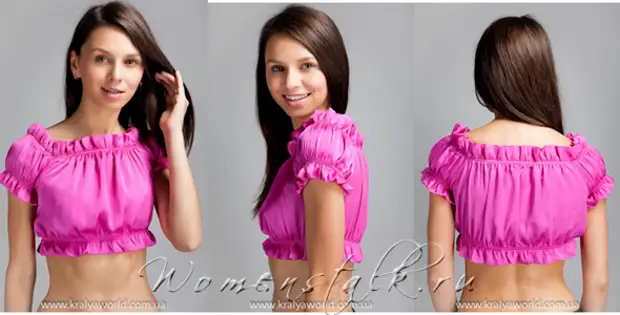
Breast gum
It is often found on loose magnificent tunics and serves to emphasize the breast, while retaining freely flowing puffs in all other places.

Elastic on shoulders, waist, sleeves
Creates a delicate image of the peasant air blouse.
Eraser sewn vertically
Ideal for creating horizontally directed drapes.
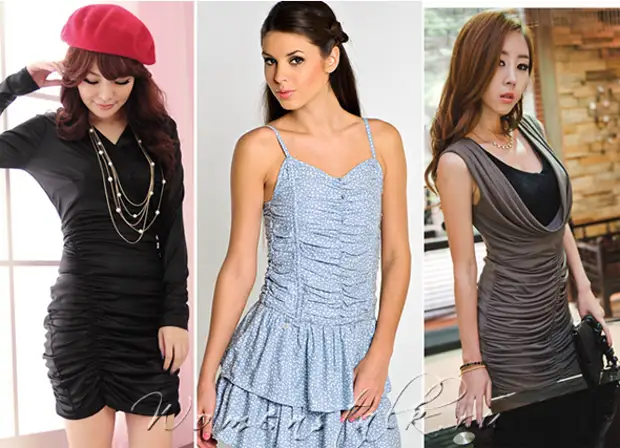
Gum on chest
Most often, it discerns the entire top of the tunic both in front and on the back.

Rubber on the back
Or sometimes the elastic thread is treated only the backing zone and (if any) sleeves.
Rubber on sleeves
We also cut down and partially sleeves for decorative purposes in the area of the cuff or shoulder.

And, of course, sometimes in all the above cases, fashion designers can replace the gum by the usual inelastic twine drawn into a simple scene.
The fabric will also give up, plunges, but elasticity such an assembly on the twenty will not give.

Well, now I will proceed directly to our master classes on the sewing of the gum.
We will often simulate a tunic, dress, panama or swimsuit, in which there will be an elastic band. And we will need to sew it. There are two types of gum ...
2 types of rubber band
Ordinary elastic tapes (that is, simple lurking gums). They are different: tight and soft, with lace or rushech, Figure, etc.
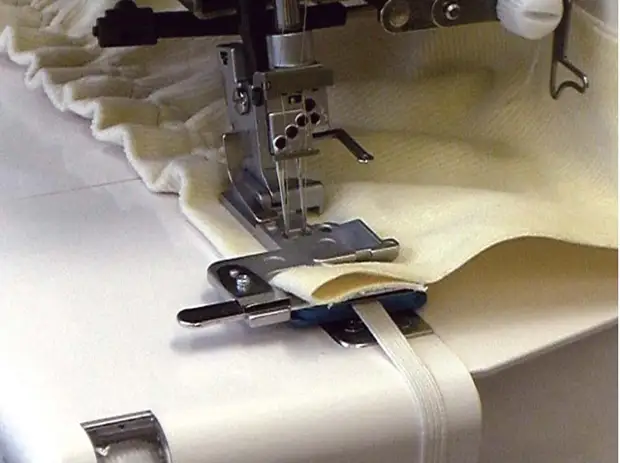
Elastic ribbons can be sewn or on a typewriter.
Elastic threads (rubber threads) - sold coils (as threads). The thread itself is rubber fiber, wrapped on the helix x / b thread. Such rubber threads can only be sewn on the typewriter. Although ... if the tissue is in a small hole, then they can be sewed in the dress even with a conventional knitting crochet. Or manually turn through holes.
Whatever gum and we do not carry, in any case, we will need to follow 2 rules.
2 Rules of sewing rubber:
Rule 1: When you sew a gum, you need to try not to break the needle rubber bodies inside the elastic tape. Otherwise, the gum can deform and over time to lose its elasticity.
In order for the needle to minimize the rubber bodies of the gum, we must try so that it goes through the possibility between the rubber veins of the elastic ribbon.
Or a stitching zigzag - it is more sparing, because Stitches are jumping through the central elastic fibers of the gum.
Rule 2: An elastic band must be sewn with uniform tension over its entire length of the sewing. Otherwise, we can work out that in one place the dress is strongly assembled, and in another only a couple of folds.
How to ensure uniform tension of the gum along the entire length of the sewing? There are several ways. We are now and consider all these ways of uniform sewing gum into clothing.
Pickle method
The method is suitable for those who have a simple stitch or for those who will sew a gum manually.
This method is called "note" because we share a gum and a dress on the same sections, and each section of the gum will be shown along the edges to its area on the sewage line - it is necessary for a uniform sewing gum.
Display this method in the picture so that everything is clear. The entire stage of work on the example of this dress with a rubber band on the waist.
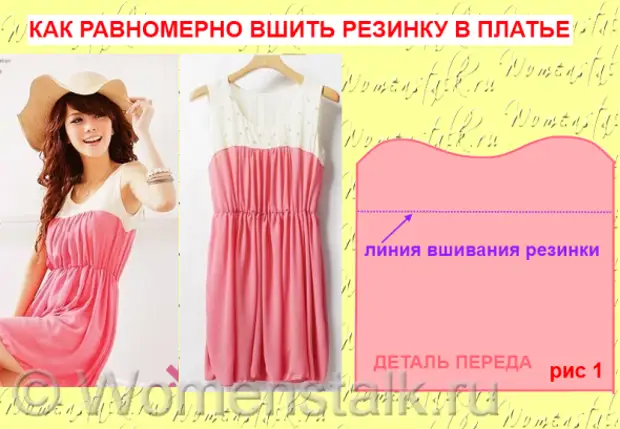
You see, in a free-free dress at the waist level, rubber band. Not in a very tight stretch, but to give a pad soft folds. On the flowing fabric it looks beautiful. Detail of the dress (pink part of it), into which the rubber band is seized in fig. one.
Now we will see all the stages of the work on the uniform sewing of the elastic dirt.
Step one - Draw a line of sewing gum.
We find a line of sewing gum and draw it directly on the fabric with a shallow or pencil (Fig. 1).
Step two - We find the desired length of the gum.
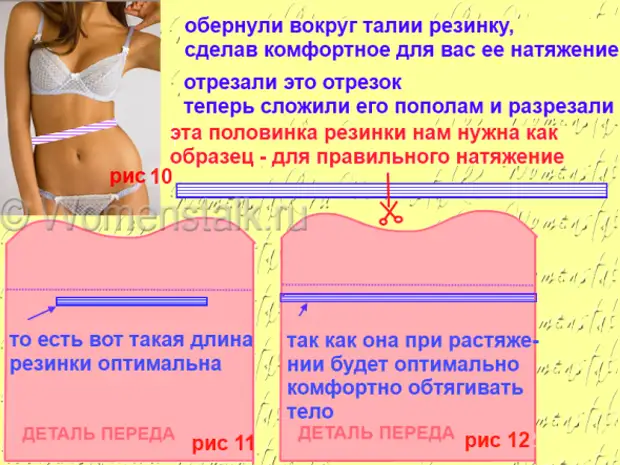
We take the gum and turn it around it around our waist lantya. Not a tight stretch, but comfortable to pressed, but did not comprehend. Cut this piece of gum.
And immediately divide him in half - half pricks to the details of the transfer. The second half - to the details of the back.
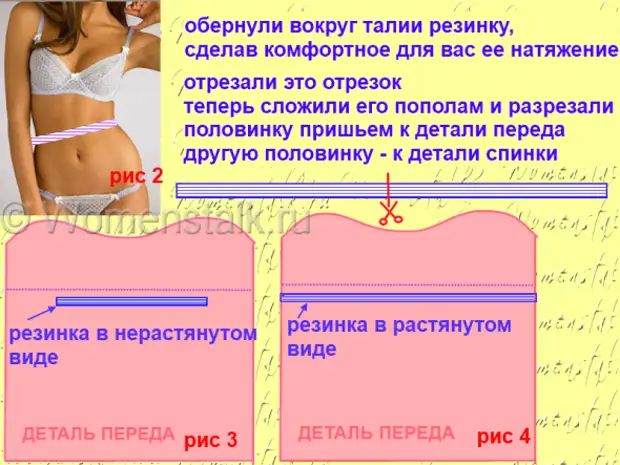
We see (in fig. 3), that in a relaxed form, the gum is much shorter than the line of its sewage. So it should be. Because we will sew it in a latitude of it (Fig. 4), after the sewing it will be squeezed and drove the fabric into uniform assemblies.
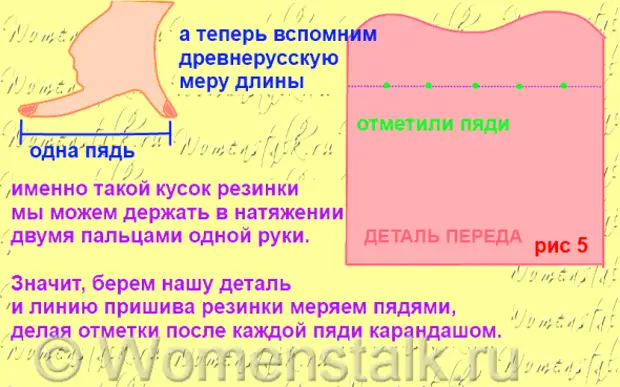
Step Third - We divide the line of sewing to the plots that are comfortable to keep your hands with two fingers.
And now let's remember the ancient Russian measure length - a span. This is the distance from the thrown thumb to the index. It is so such a two-chain way we will stretch the gum under the paw machine when we sew it.
Therefore, we are a line of sewing a future gum on Delim dress on Pyd. Straight by hand, we step by spans along the line and the melts mark the borders of the span.
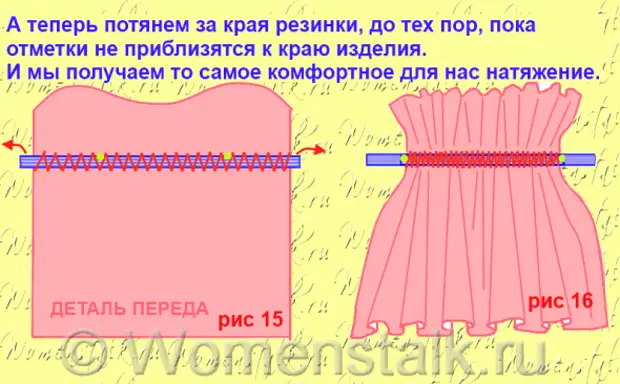
Step fourth - We carry the marks to the tensioned gum.
Now we pull the elastic band next to our sewing line and transfer the same pencil marks on it. It is convenient to do this on the carpet: one edge of the gum to press the heel of the legs, the second edge of the gum is delayed with his left hand, and draw a pencil with the right hand with a pencil.
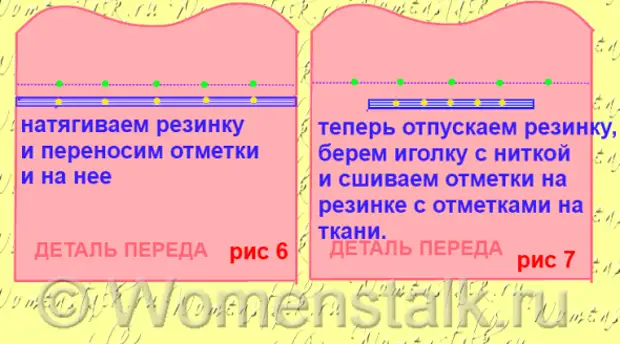
Pitch fifth - Send labels on a rubber band to labels on the dress.
Now gum with marks are already released. We sit on the sofa and calmly sew a rubber band to the line of sewage in places of marks, that is, manually needle with a thread fix 3-4 stitches mark on an elastic band with a similar mark on the dresses line.
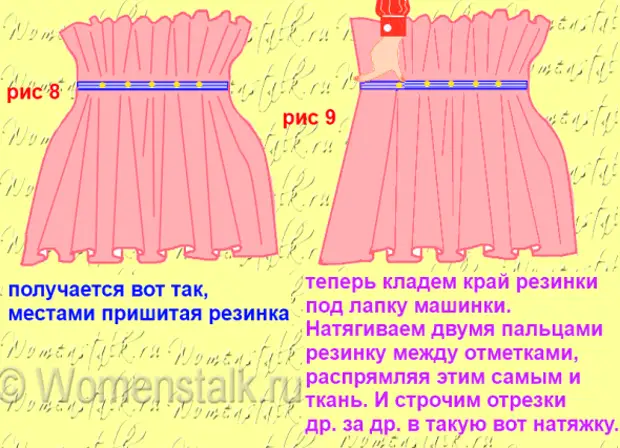
Step Six - We admonish a rubber band to the sewage line.
They accomplished all the marks and now you can already put the product under the paw machine. We stretch with two fingers of the right hand. The first segment of the gum between the marks is leveled, the rubber band in the tension - and a stringent row or a zigzag line.
One segment was shot - they stopped the typewriter, the needle below in the womb and the paw is lowered (in order not to shift from the line) - they pulled the next segment of the gum and they were told again.
Purchase method of sewing gum manually (without machine) - dirt on the edge of the table.
Yes, yes, the gum can be sewn even manually, if the fabric is a variest or book-beyond, that is, it is not afraid of stitches curves for the reason that they are simply noticeable on it. Moreover, after the sewing of the rubber band, the fabric in the sewing place is very wrinkled and all stitches (whatever curves they were) will hide in wrinkles.
Zigzag fashion
This is the easiest way. It is suitable for both ordinary gum and a rubber thread.
This method is generally the easiest for those who have a stitching zigzag on the machine. And can even be done manually, because the zigzag line can be made in hand
He is wonderful that even the usual lounge gum will be sewn evenly and do not need to make any labels-fixations.
As it happens, we will show in pictures.
Step one - Create a sample of the perfect segment of gum.
We start with the fact that you turn around the gum around the waist, picking up its optimal tension for us. Cut this rubber girth. And we will break it in half, but we will not sew this half. She will serve as a sample later. Now you will see and understand.
Step two - Strictly a wide zigzag behind the edges of a long gum.
We take a new segment of gum the same length as the width of the product or longer.
We put it under the panel of the typewriter and select such a zigzag stitch so that the zigzag step is enough and the needle has never been concerned about the gum itself, and the zigzag discharged, the spice fabric is a few millimeters from the gum - Figure 13.
That is, as you have already guessed, we need a gum freely moving inside the zigzag.
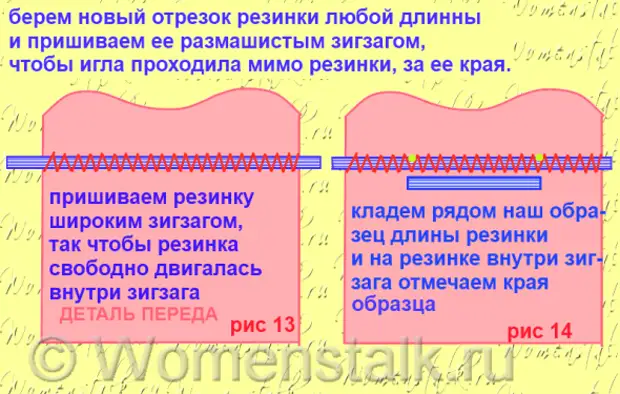
Step Third - We try a sample gum to a gum under a zigzag.
And when all the rubber band is under a zigzag, we apply our sample next and make 2 marks on a rubber band under a zigzag at the same distance as the edges of the sample segment - Fig. fourteen.
Step fourth - We drag the fictional gum to the desired length.
And now I pull for the ears of this "plug-in" gum until the marks are near the edges of the product. There they must be fixed and fixed, that is, manually sew to the edges of the product with several strong stitches.
All is ready. By the way, you can perform such a zigzag and manually - very comfortable and fast.
Under such a zigzag, but with a smaller, of course, the step of stitches can accommodate elastic threads. Also a stroke of an elastic thread on the line of sewing gum. And in the same way cover it from top of the zigzag line, without piercing the elastic thread itself. Then pull up a rubber thread inside this zigzag to the degree of the degree of tight.
You can also place a gum not under the stitching zigzag, but under a specially nasty strip of fabric - that is, Kuliska.
Couch fashion
Very simple and suitable for any typewriter.
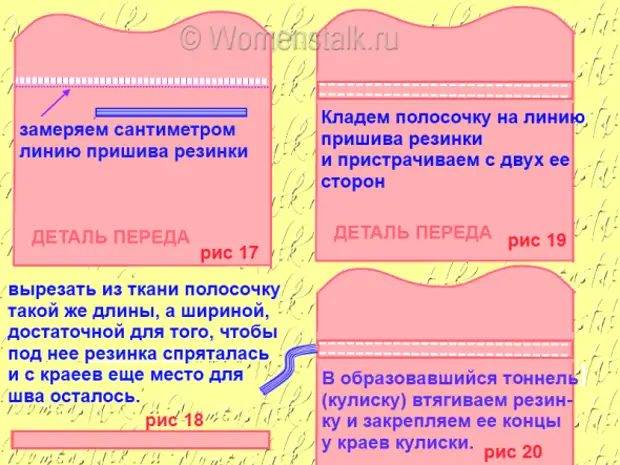
We measure the length of the length of the sewing line of the rubber (Fig. 17). Measure the strip of fabric (Fig. 18) the same length. The width of the strip must be sufficient to ensure that our elastic band hid into the future stem, that is, the width of the elastic band + the seam allowance is equal.
We sew a scene to the line passing the future elastic band - rice 19. And they draw in the resulting "tunnel" - that is, the Kulisk is our gum.
Tighten with the help of the English pin - they laughed at one end of the gum and stretch, tugging his fingers a pin inside the scenes, pushing it forward, the fabric along the pin. The pin is slippery and goes well under the cloth, and pulls the gum.
In order for the rear end of the gum, it was impossible inside the scenes, it is better to first sew to the inlet edge of the scenery. And then, when the coming tip of the gum will appear on the other side of the scene, it will also need to be dried to the outlet hole of the scene.
Then the gum will be firmly fixed at both ends of the scenes and will never pop up.
Powering method
We sew thread-gum on a regular typewriter with a simple string. This method is suitable for any typewriter. Need a coil of ordinary flavored threads and a coil of thread rubber bands.
We wind the gum on the bobbin with a slight stretch (then with a tightener already on the line, if necessary). And on top of refueling the usual thread and make enough relaxation in its tension. Practice on a piece of fabric, we need to pick up such a tension of the upper thread so that it formed small loops on the wrong side. That is, the thread-gum from the shuttle will not be pressed into the tissue of the upper thread, and freely lie inside the loop.
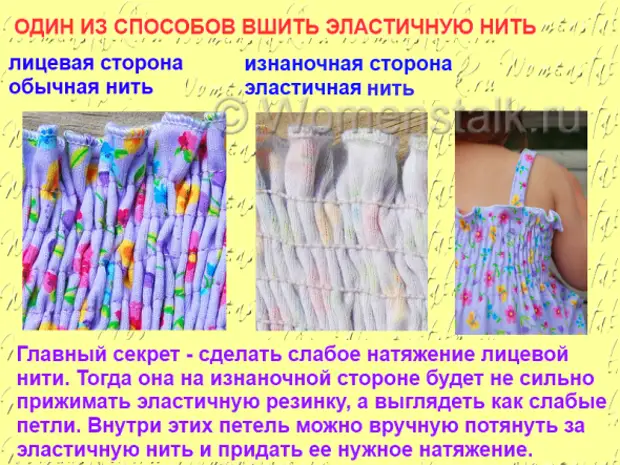
When the stitch is passed from the edge to the edge, you can safely pull up a rubber thread to the needy there. It will calmly move within the plated loops of the usual thread.
As you can see, there is a bunch of ways to quickly and easily, and most importantly, to put the gum into your product.
Successful to you sewing.
Author of master class Olga Klishevskaya.
Source ➝