
Want to make bright colors in the room of children? Or maybe add new notes to your own workplace? Or do you adore everything connected with the East, where for the first time and were invented lighting devices from paper?
In any case, familiarize yourself with this material - it will not hurt. We will try to tell how with your own fantasy and ordinary paper fill with magic any room in your home. And the fact that guests will be chopped with you, where you can purchase such splendor is not subject to doubt. However, informing them that they did everything themselves, you risk being interrogated with addiction. They will certainly ask how all this can be made.

How to make a chandelier paper
Today, the chandelier is not just a lighting device. She is one of the indispensable attributes for decorating the room. And with an independent manufacture, the design will give the room by a note of individuality and will demonstrate the breadth of fantasy and the skill of its creator. Naturally, all this is not easy, because the process requires accuracy and perpetuity. But on the other hand, all these difficulties pay off with a feeling of complete moral satisfaction.
What is needed for this
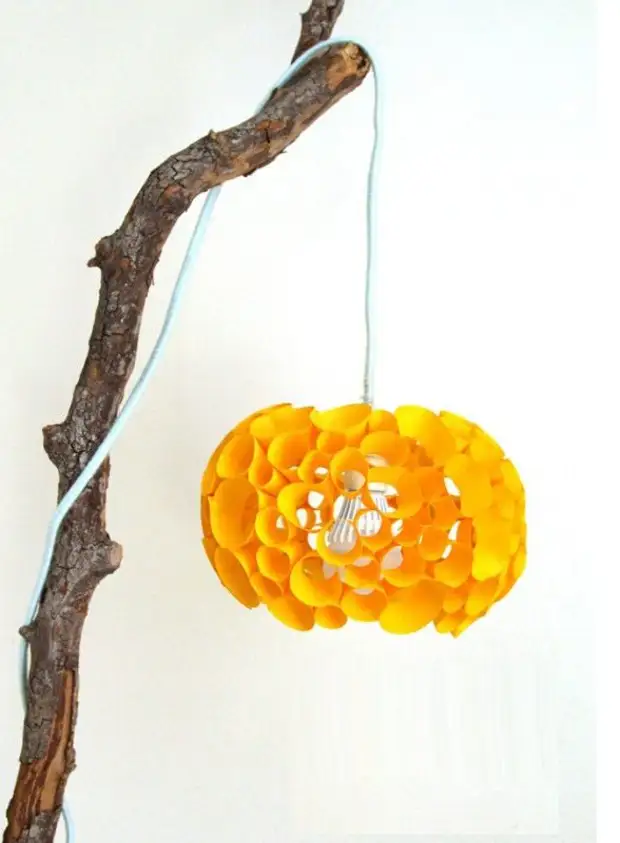
For the personally, the creation of such air creation on a paper basis is required not so many materials. It is necessary to change this list - it depends on the exceptional on what fantasy comes to your mind. In our example, consider the lamp "Coral Fantasy".
For the manufacture of this masterpiece you must have:
- any color paper (at your discretion);
- paper glue (better PVA);
- Stationery clips;
- compass;
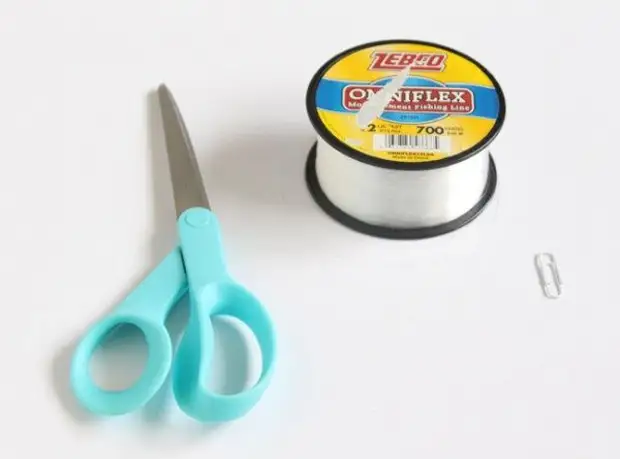
- scissors;
- fishing line;
- Colored threads;
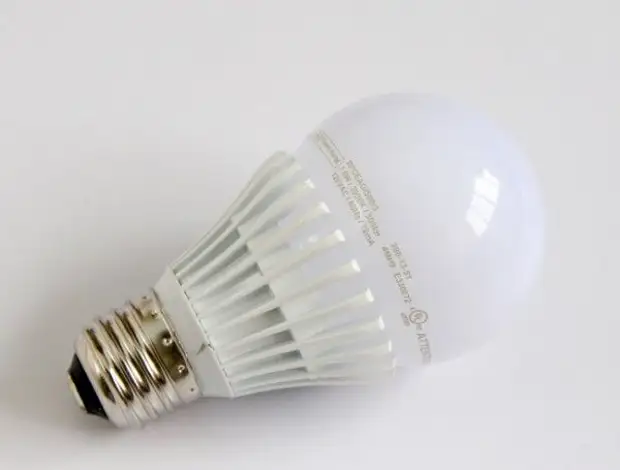
- LED lamp (the main thing is not to install the incandescent lamp, which highlights a lot of heat);
- Wires and switch.
Step-by-step manual instructions
Consider the process in stages.Stage First
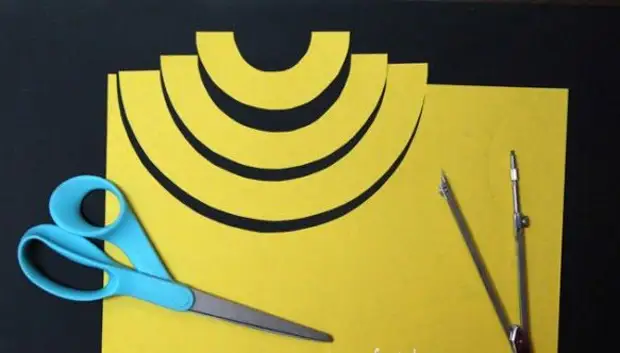
We take a sheet of colored paper and a circulation with a semicircle, the width of which is equal to one centimeter. Conducting each new line, the diameter of the semicircle should be done more. It should be noted that the sheets of paper will need a considerable amount. After all, it is necessary to cut the strip in the form of a semicircle and cut it into segments of two or five centimeters.
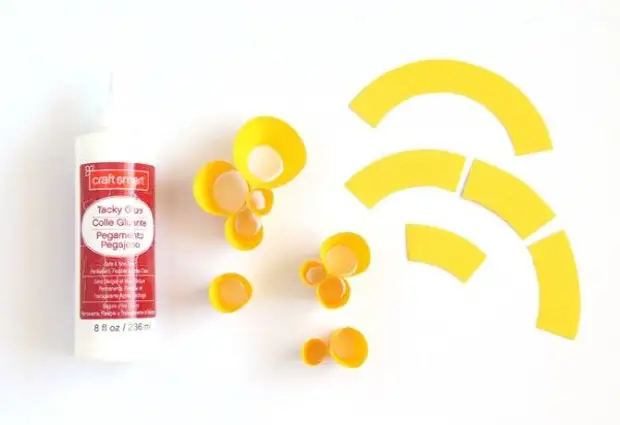
Stage two
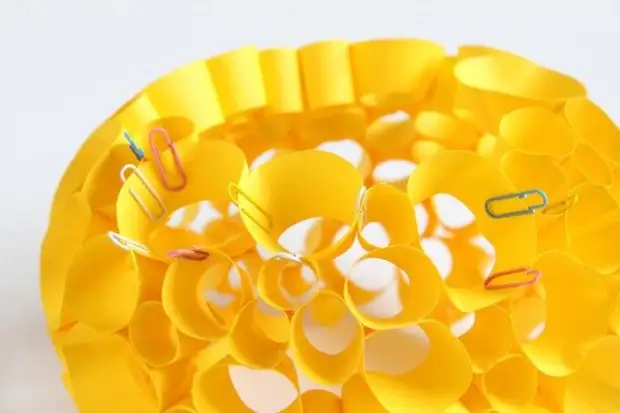
The obtained bands need to be collapsed and glued, while one of the sides should be larger than other - so we can easily connect them to each other in the form of the dome. Then we apply glue on them and glue five pieces. Continuing to glue the obtained clusters with each other, fix them with paper clips to allow adhesion to dry. We continue to glue until we form a circle having a small hole - a lamp will be inserted here.
Important. Showing your own creative potential, you can create a construct completely unlike the example given.
Stage Third
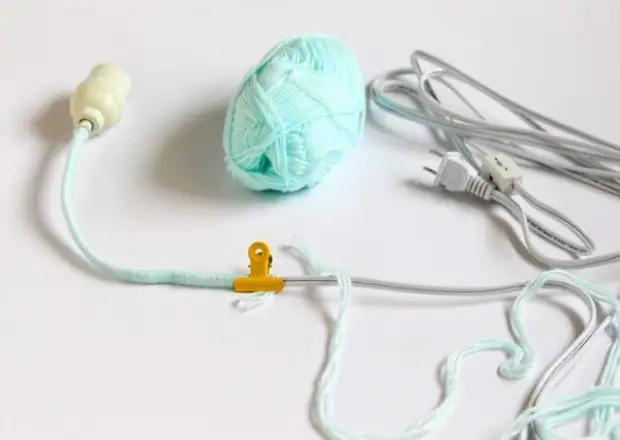
As long as we painfully wait for the moment until the glue is dry, you can decorate the wire. To do this, we need yarn, absolutely any color - we will slowly wipe it with it. When you get out the new turn on the previous one, watch there no irregularities.
Reference. To keep the yarn better, it is possible to smoke it with glue.
Stage fourth
Now you need to build a holder on which the LED lamp will be recorded. It is possible to make it, if you tie a line with harvested strips from three sides (it is desirable that from all sides it was the same distance), the free ends of the fishing line will fix on the clip, which you first need to bend as a triangle.
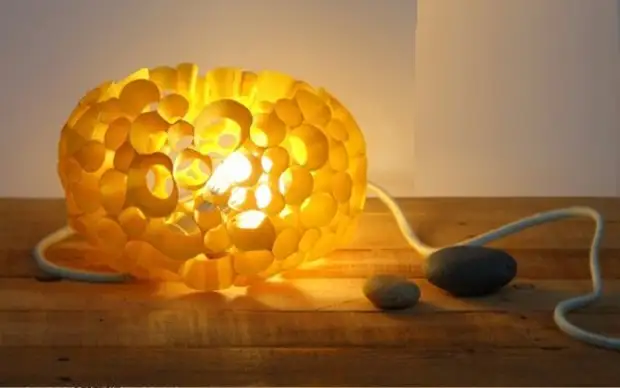
You can already take a deep breath on this, as most of the work remained behind. Now placing the lamp in the circle and connect the wire. The lamp obtained by our efforts can be used independently or invent the composition using an unusual branch in its form.

Chandelier do it yourself from paper flowers
Most often you can meet homemade chandeliers, decorated with paper flowers or butterflies.
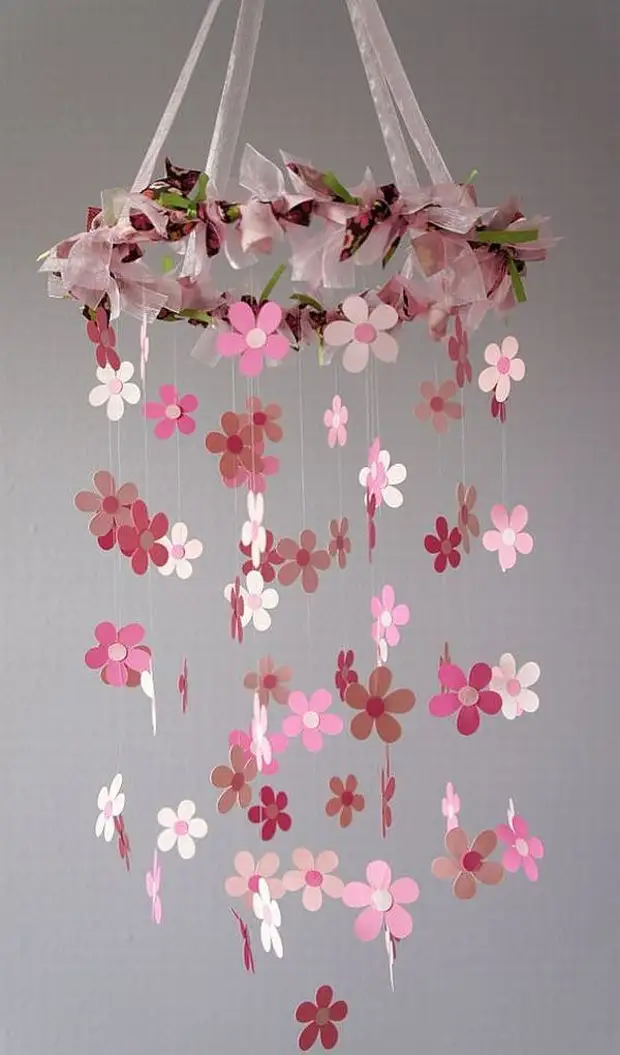
In fact, it is completely no coincidence. Such a design looks quite richly, unusual and notice. However, at the same time, you do not need to load yourself too much and spend a huge amount of my own time to make it. Work on the creation of such a chandelier is quite possible to turn into entertainment, inviting the participation of the child in it.
Manufacturing technology:
- To start working on creating our masterpiece, you will need to find an old chandelier somewhere. But if you have already thrown out, it will suit any similar framework. If even this is not possible in the house, then use the hoop from metal or wood. If everything is completely bad, it will completely help the thick wire, from which you need to take two or three wines to get a circle.
- Take a pattern with flowers and cut out the blank. Using such a stencil, you need to adjust it to the desired size of the colors. It will be nice to look like a few different sizes of colors (but all this is exclusively if desired). We carry the contours of the colors on paper, take the stationery knife or sharp scissors and cut out. The template is better to do from something dense, resistant to pollution. Velvet paper is better not to use for these purposes. Dust accumulates in it and it will be necessary to clean it very often.
- With the help of the Capron thread or the fishing line, our flowers are dripping. You can do this in two ways: you can stretch the thread through every flower, and you can use the glue on silicone base and stick the flowers directly to it.
- As soon as the garland billets will end, they must be attached to the frame, after which it can be decorated with decor.
- You can make another unusual option. Take the wire and make a ball from it. As the basis for it, suspension from the old chandelier is used, on which several flowers are located.
As you can see, there is nothing complicated in the creation of paper lamps. The main thing is to show a little fantasy, stocking of patience drip and find some free time to work. By connecting all this in a single creation, you can get a product that will be not just a decoration of the room, but also the subject of pride. After all, such a chandelier is not anymore. This is a real exclusive.