

( Olga / Gorbushkin Products / From St. Petersburg)
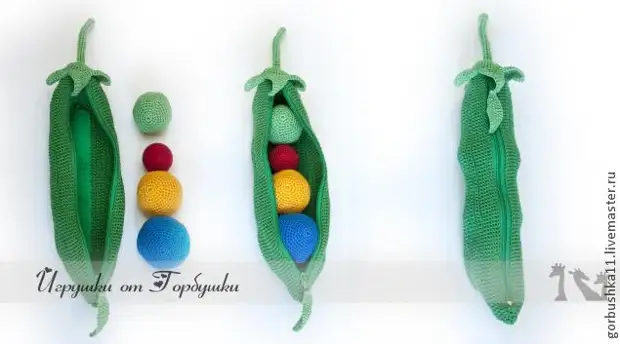
"I propose to tie together a simple and very useful toy for our babies, which will develop fine motility, tactile sensations, sound and color perception and ability to manipulate objects.
The idea is known, sharing my way.
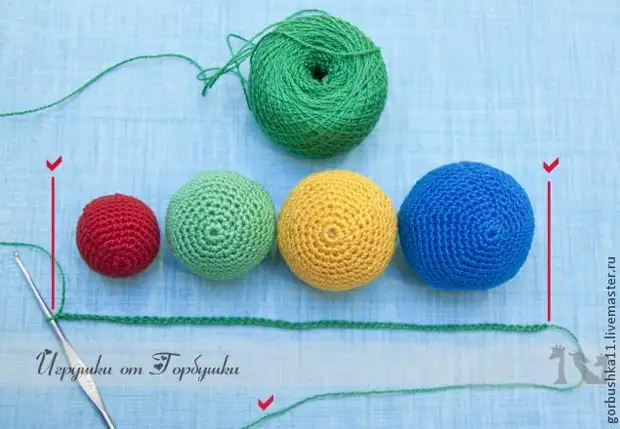
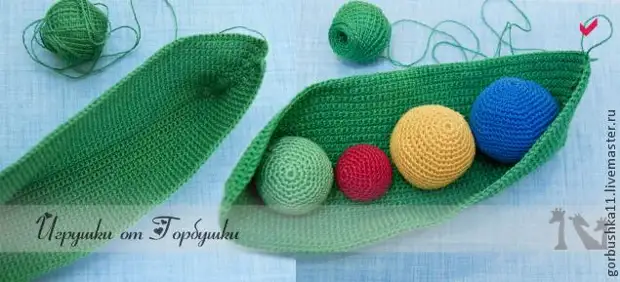
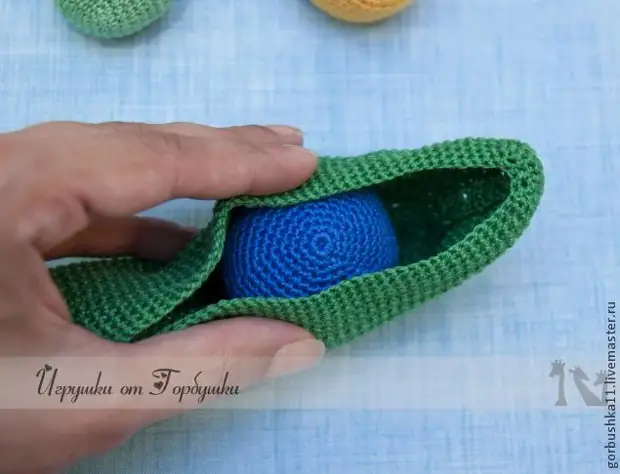
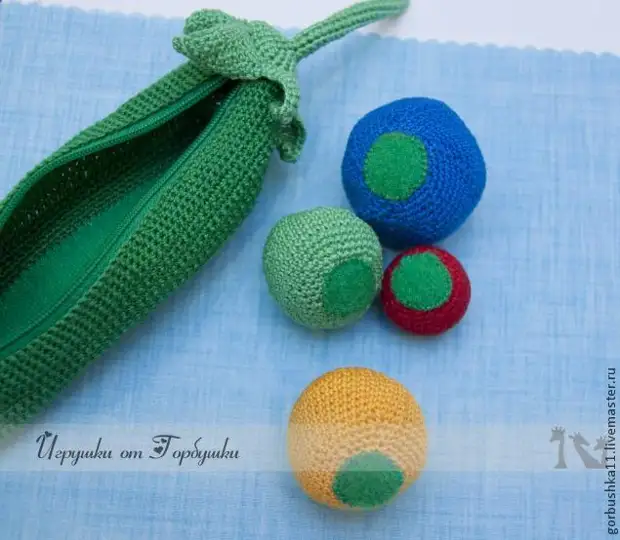
4 Makers are different in color and size, sound and softness are hidden and fixed on the velcro in the pod on the zipper. Kids are interested in opening the lock, dig, get the pea, rummet and sneak.
The peas from 2-4.5 cm in diameter, the length of the pod 20-25 cm.
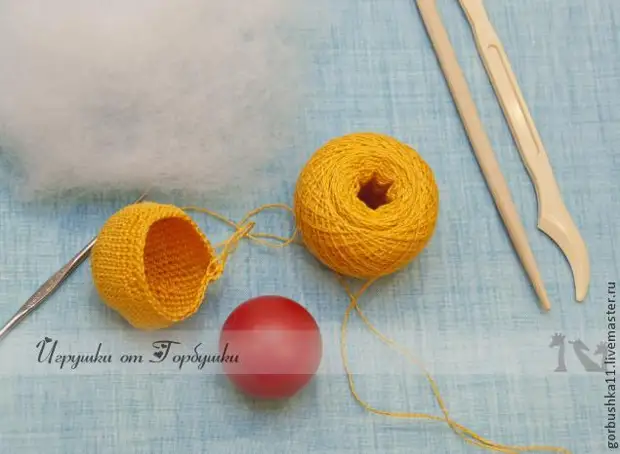
What do we need:
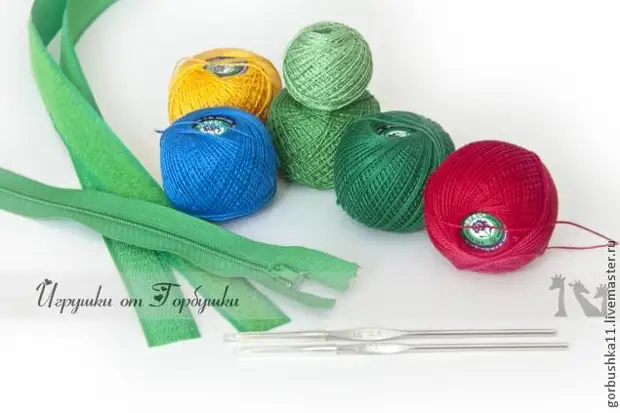
1. Threads cotton iris 5-6 colors at your discretion (I chose the main colors to explore-color, yellow, blue, green)
2. Lightning 20-25 cm - 1pc
3. Sticky tape (velcro) 2 cm wide and about 15-20 cm long - 1pc
4. Knitting hook №1 and №1.5 (or 13.6)
For filling the skins I propose to use simple materials:
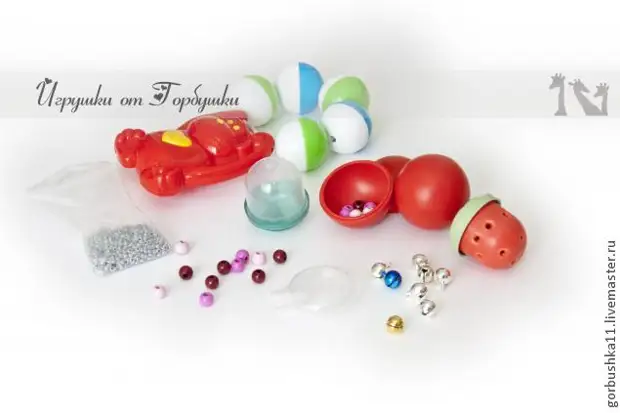
Containers from Bahil, balls from rattles of different diameters, which are probably there, you can use special godrels for toys or squeakers.
What is used in the master class:
5. Container from Bahil - 1 pc.
6. The ball from the rattle is small and large - only 2pc.
7. Rustling package - 16 * 16 cm
8. Singry procession for filling.
9. Beads are a large and small beaser for different noise effects.
10. Bubrentes 8-9 mm - 4-5 pcs.
I do not advise Use for filling cereal containers, as the toy after washing will be unsuitable for the game.
What is useful from the theory!
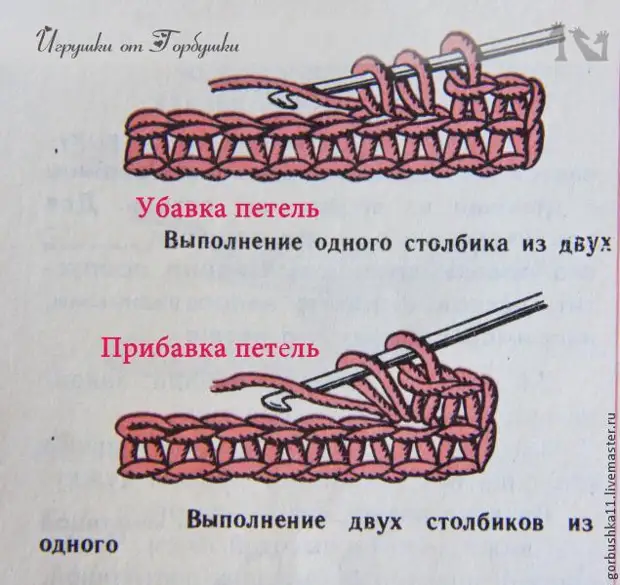
The overall wish - knit peas tightly so that the filler will later fail to get out.
The first pea yellow - Soft, 4 cm in diameter. For her A plastic ball with a diameter of about 3 cm was used, with large beads inside, it will be a loud sound. You don't need a lot of beads, they should jump freely inside the ball.
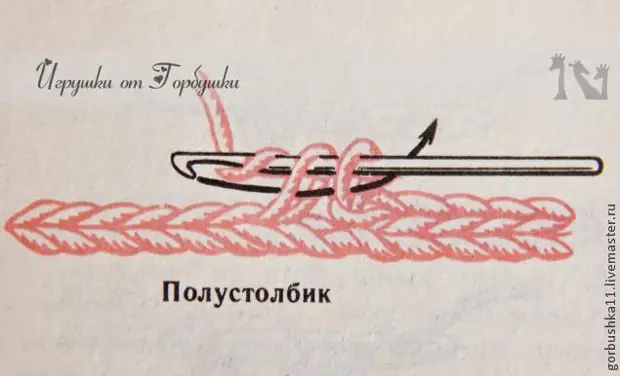
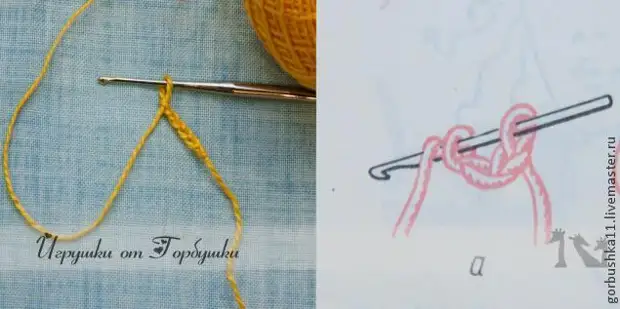
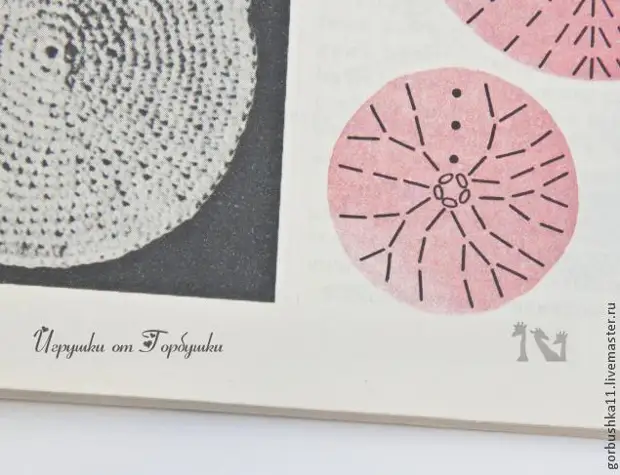
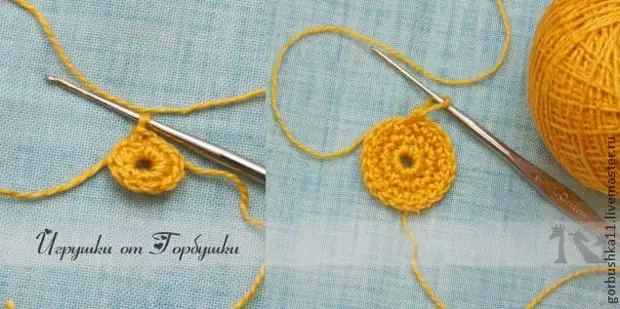
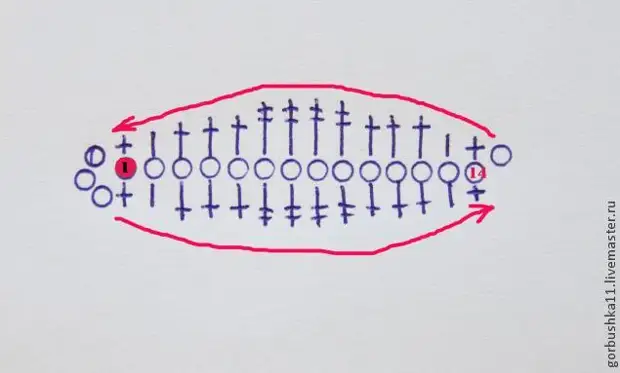
We use the hook number 1. Knit a simple circle: We recruit 5 air loops, and closer to the ring (knitted in the old man, like grandmothers in books).
Next, go to knitting circle according to the scheme.
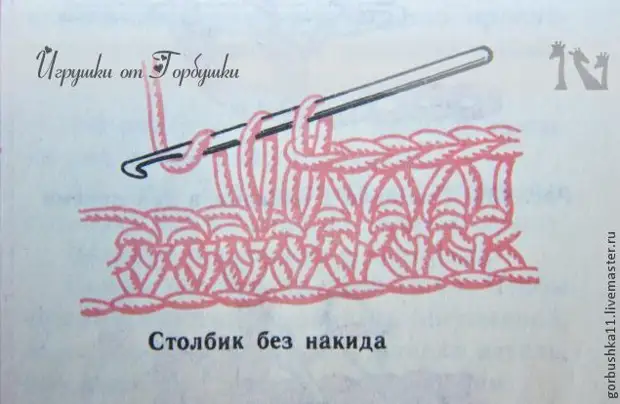
2 rows - Ware. Lifting loop, then 1 column without Nakid (st .b.n), gain, - alternate until the end of the row. (14 loops in the row)
3 row - Ware. Lifting loop, then
2 st .B.N, gain, - alternate until the end of the row. (19 loops)
4 rows - Ware. Lifting loop, then 3 st .b.n, gain, - alternate to the end of the row.
Those. With each subsequent next to 1st.b.n. Before adding is the principle of knitting a simple circle.
5 rows - Ware. Lifting loop, then four St.B.N, gain, - alternate to the end of the row.
According to such a principle of adding loops, you need to knit as many rows as it takes, in order for the ball with "fitting" as follows:
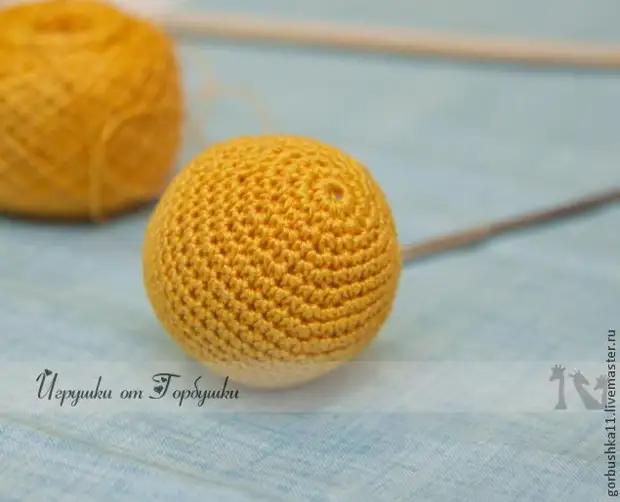
I got 8 rows (that is, 8 row is an alternation - 7 st .B.N, gain)
From that moment on, we begin to knit rows simply from Art. B.N. Without forgetting at the beginning of each row, the water loop of the rise. Knit and try on the ball.
That's what should happen. I have 7 rows (without add-ons)
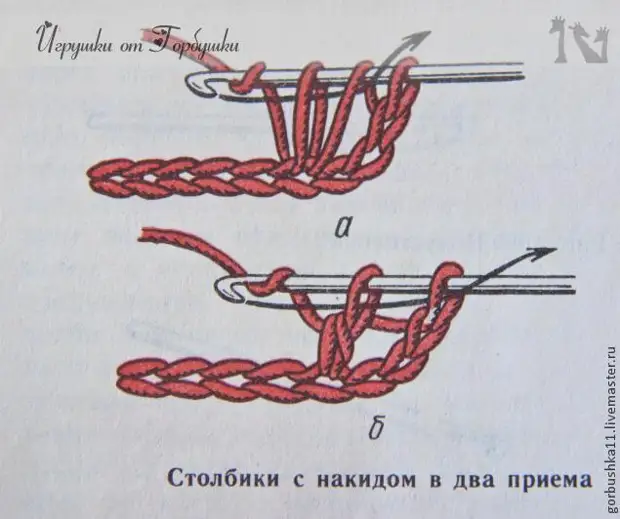
After that, we proceed to the loopes and the bulb rounding. Loop reduction - on the reverse principle of increases, i.e. With each subsequent next to we reflect 1st.b. (Ubaulk - in line from two columns one, as in Fig. At the beginning of the master class)
For example, if our last row with additives was alternating 7 st .b.n. - Rank, start to knit alternation 7 st .b. - Ubavel.
Next range - 6st. B.N.-Rubage, alternate to the end of the row.
Then 5 st .b.n. - Ubaulk, alternate to the end of the row.
And then to the end, in the last row it turns out all the loops with a gravel

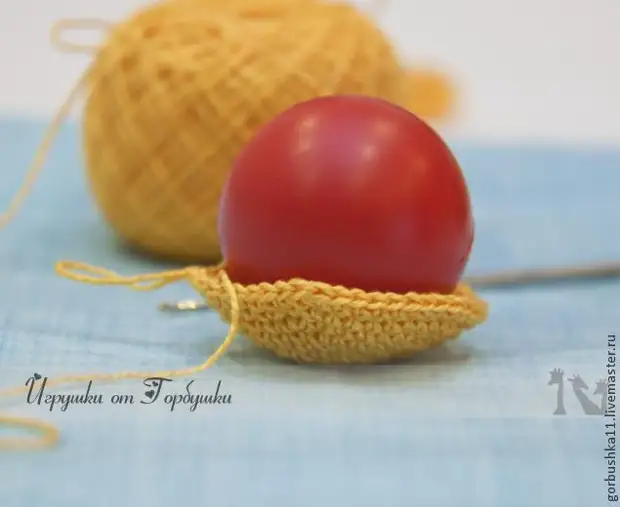
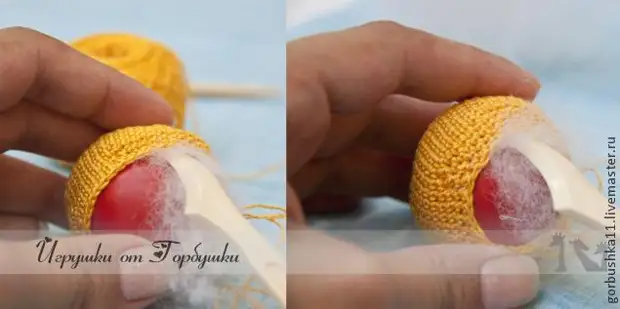
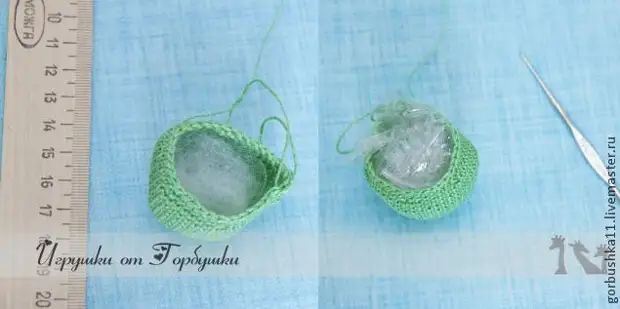
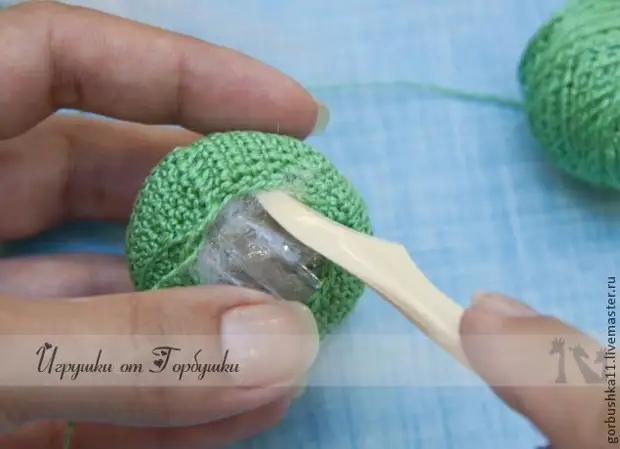
Knit 2 - 3 rows with a gravel and begin to fill the pea. Prepare Sintepon.
It is necessary to put a little sinteration at the bottom of the six-minders, put the ball and add a synthet board around the edges to give softness, forming a round shape. To do this, you can use a knife for plasticine or a wand for sushi.
Singing a few rows with grazing and gradually add Sinypron's edges.
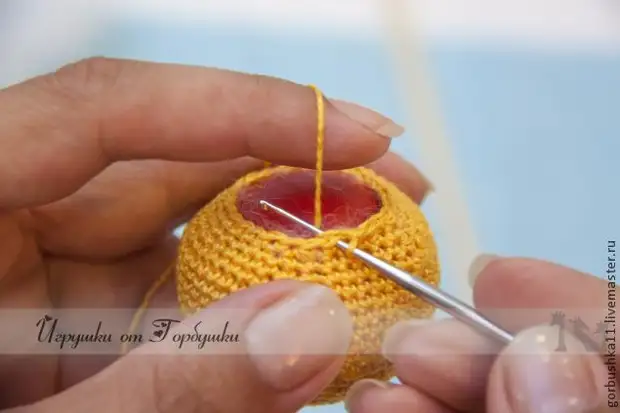
We continue to subsoine a loop, adding a sintepon in the top. Goroshina is ready.
Second peas - red - The smallest 2-2.5 cm in diameter. Hard. For her A plastic ball from rattage with a diameter of 2 cm with small beads inside is used, it will be a little scattered sound.
Knit on the same principle as the first pea.
Here is the first fitting (photo below), after which you need to knit the ranks without additives. The ball must be rid of almost tight. Singry procession do not put it - it is a tough pea.
I got 5 rows with an increase, 6 rows of st.B.N., 5 rows with a gravel (the whole ball of only 16 rows)
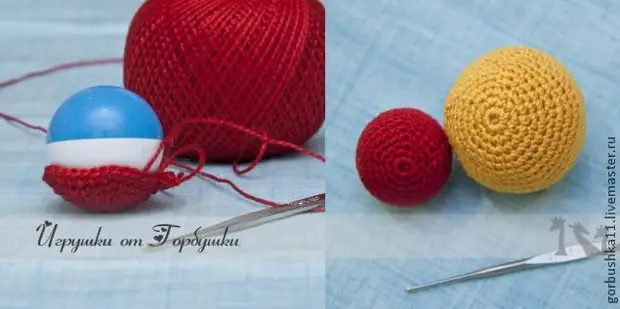
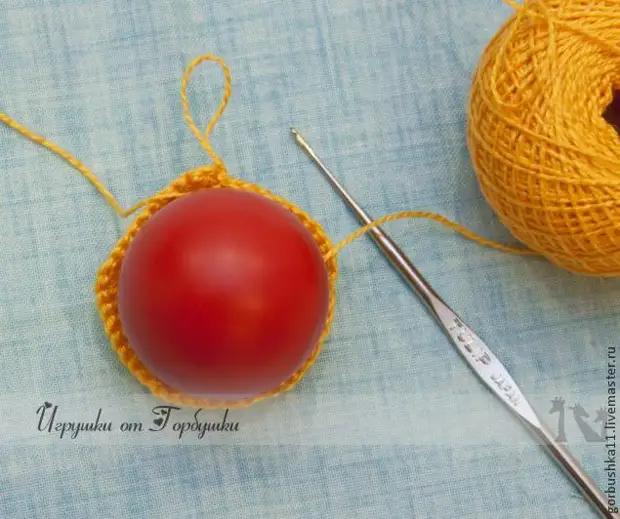
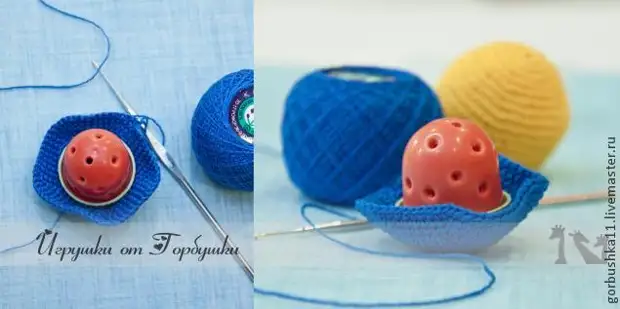
The third pea is blue - The largest 4-4.5 cm in diameter. Soft. For her A plastic container from the bohyl was used, inside the buboans 4-5 pcs., It will be a ringing, ringing sound. For a better sound effect in the container, you need to make several holes all over the perimeter (I made them thin screwdriver).
We start knitting on the already familiar principle. We make "fitting".
I got 12 rows with additives. It looks strange, but it is necessary.
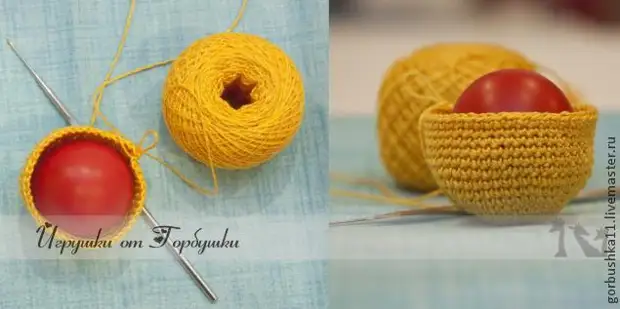
Next, knit the ranks without additives (I got 4 rows) and get it:
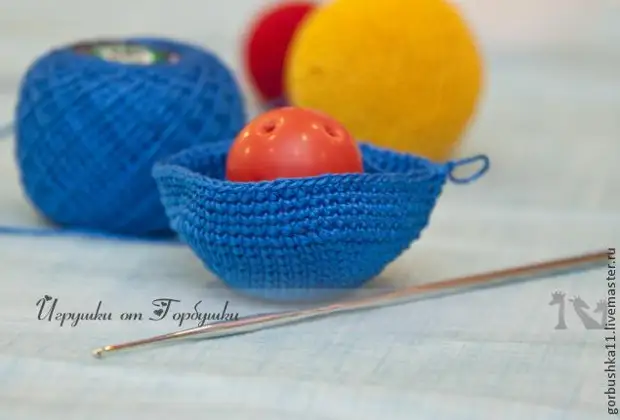
Knit 2 -3 row with a gravel and begin to fill a strange pea.
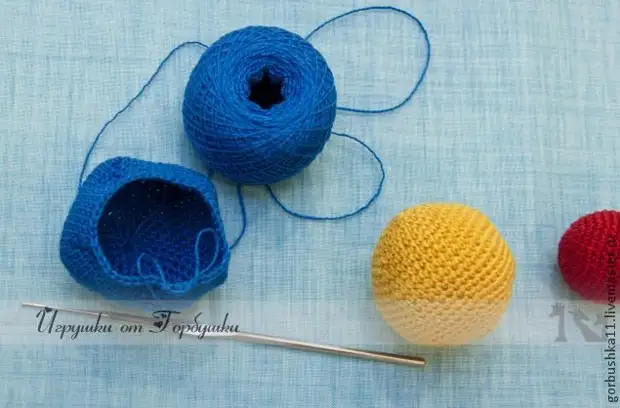
We put some synthesis on the bottom of the pea and the container with a cover down. We add a syntheton around the edges, give the shape of the ball.
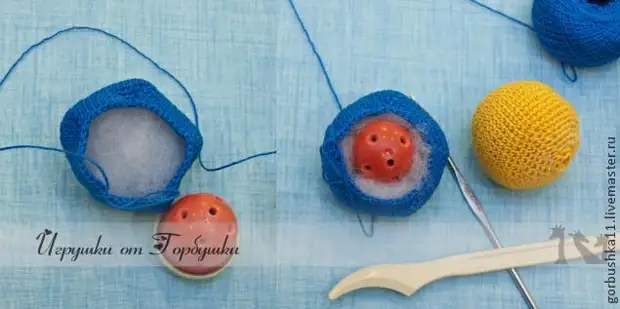
Knit a few rows with grazing and gradually add synthepsong. We try so that the synthetone does not get into knitting.
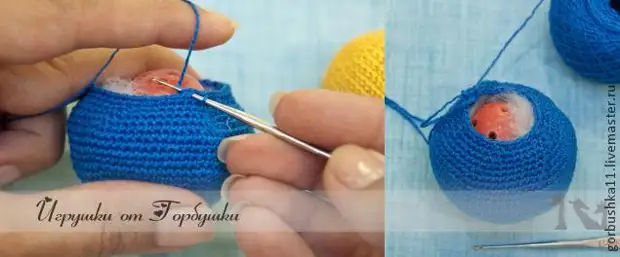
Goreshina is ready!
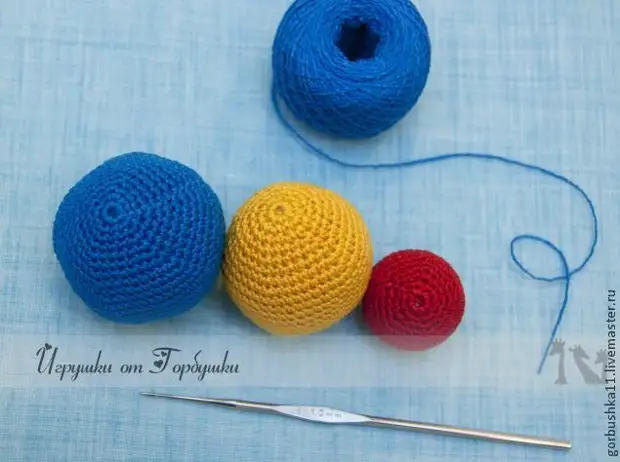
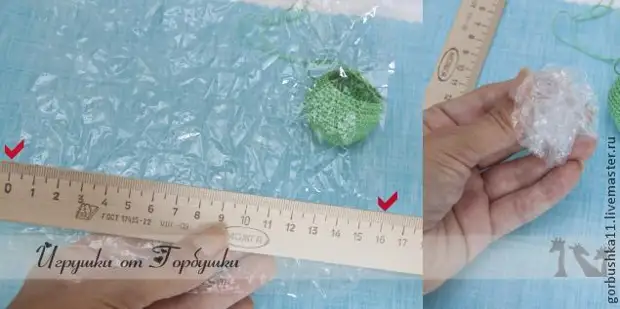
The fourth pea is green - 3.5 cm in diameter. Soft and rustling. For filling A polyethylene package was used, which loudly rustles. (But you can make an option with a cooking)
My pea:
7 rows with an increase, 7 rows of simple st.B.N., 7 rows with a gravel (the whole ball of only 21 row)
We put a little synthesis on the bottom of the Maker for the volume.
Cut the square from the package of approximately 16 * 16 cm in size, ferment and put in the pea.
Knit rows with rods and add synthepsion at the edges. BUT! You don't need to add a lot of synthesis, otherwise the package will not "crunch" and rustle, inside there should be a free air volume, i.e. The pea must be loose.
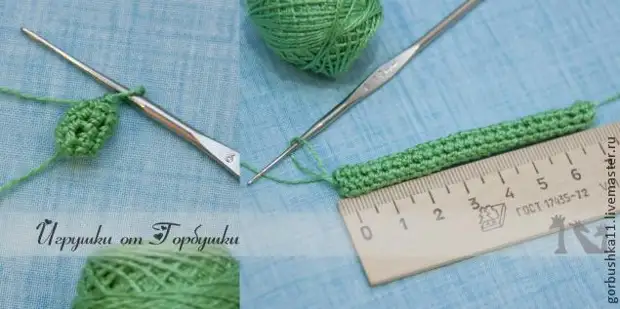
Pod. We use hook №1.5 (1.6)
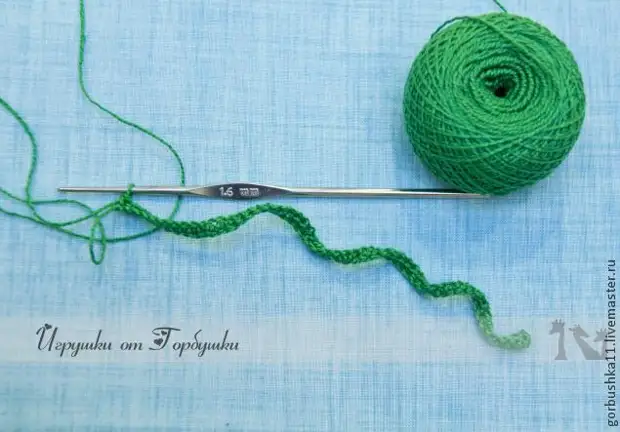
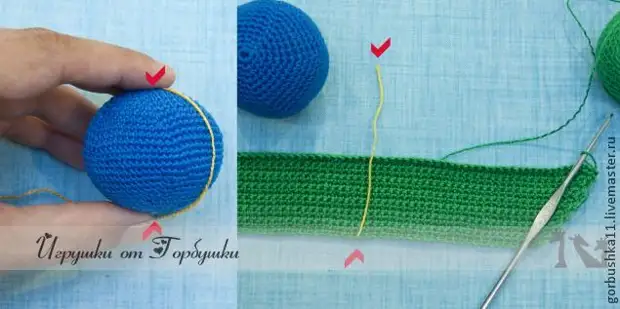
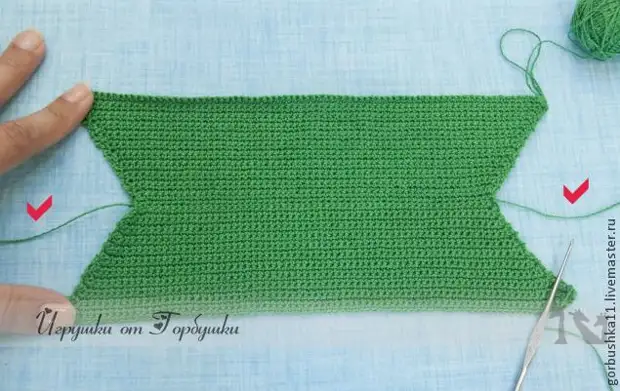
We recruit a chain from air loops about so long (photo below).
Important! Leave a long tail of the initial thread (~ 50 cm)
I got about 58 loops, but it is not necessary to consider it completely.
Knit 1 row only st.B.N. (At the beginning of a series of air lift loop). It turns out such a snake.
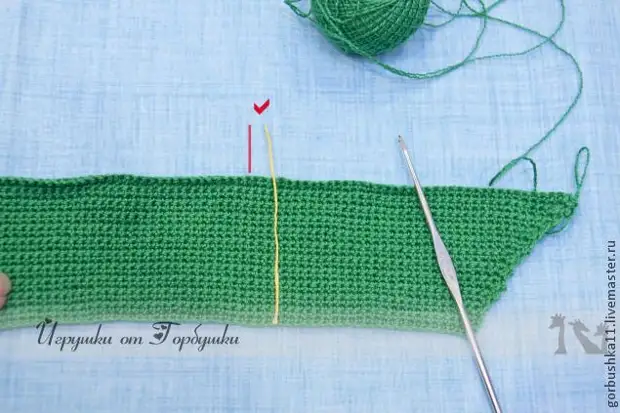
Next, turn the knitting and begin to knit in the other side (as an ordinary rectangular sample). But at the beginning of each row, we make a lift blower and one Raising (two hinges we encounter from one). Then at the end of the row, too, do one Raising in the last column. It turns out an increase in the canvas on both sides.
We make such a fitting with a string (half of the circle of the ball), and continue to knit with add-ons at the beginning and end of each row.
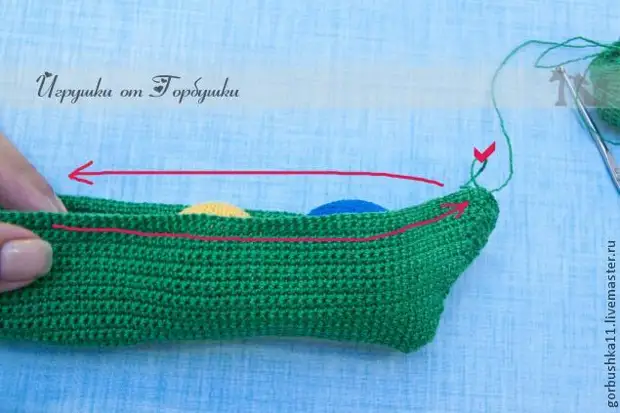
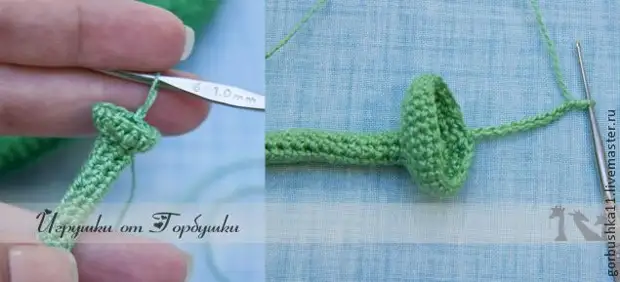
When visually remains so much (photo below) to the end of the yellow thread, stop, cutting and fix the working thread. The first half of the pod is ready! I got only 22 rows.
Next we will knit the soul mate. I turn over our finished sample to the bottom up (i.e. the bottom side), and from the side where there is no tail, we begin to knit the second half. To do this, fix the working thread in the first loop, and Important! Leave the tail (~ 50 cm)
Knit one row only st.B.N. And further as the first half, in each row at the beginning and at the end of the row we make one increase. This is what should be obtained.
Here is the end result, our canvas with two tails. The working thread is not fixed!, But for now we leave with the glomer.
Fold in half ...
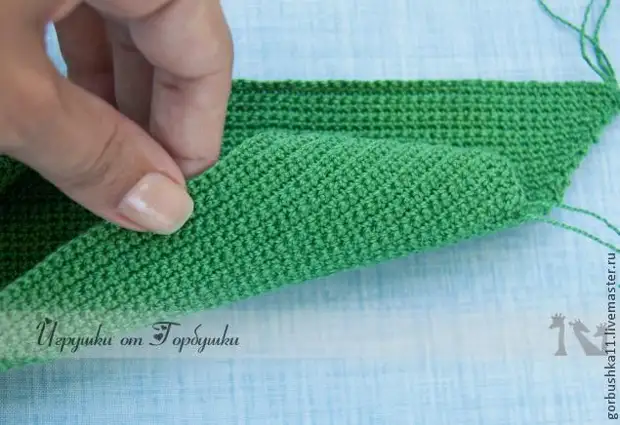
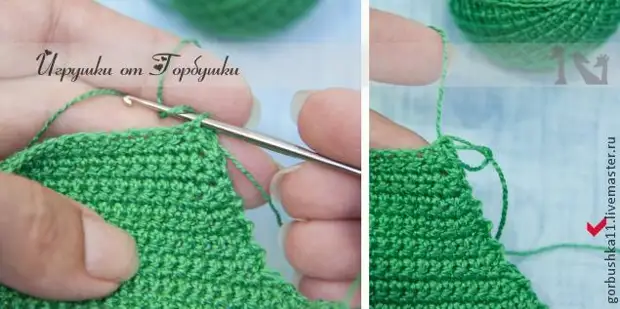
And we begin to lie the edges of the columns without a nakid with the help of left (50 cm) of the tails, from the bottom up.
It turns out a pigtail around the edge. Pickles fasten and hide in knitting, they are no longer needed.
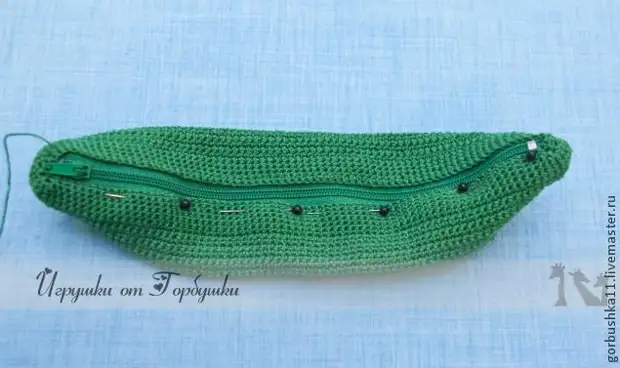
Soak our knitting, so the boat turned out, now we take again for the working thread.
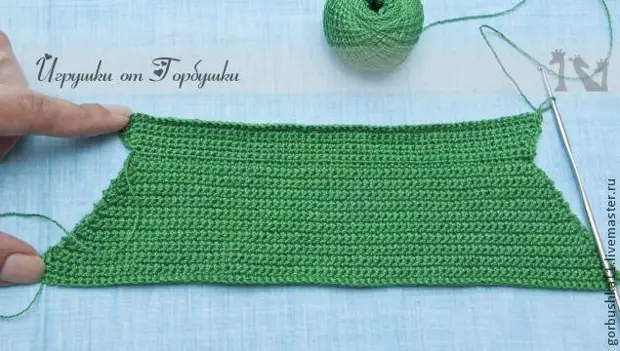
Next we will be tied in a circle of our "boat".
1 and 2 rows knit just st.B.N. (Do not forget about the lift loop at the beginning of each row)
3 row - st.B.N., but we make 4 slugs on each side "boat" symmetrically (photo below)
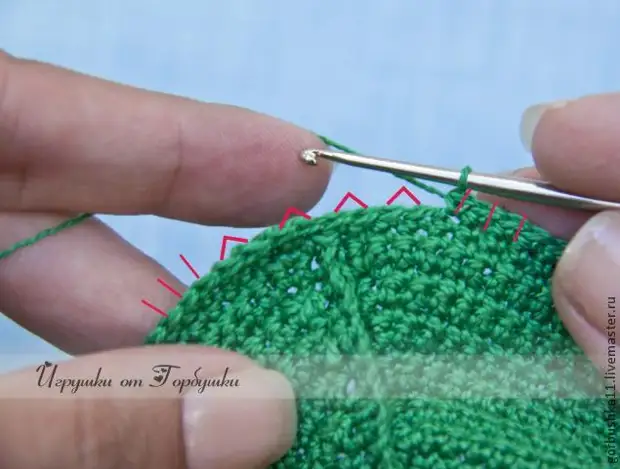
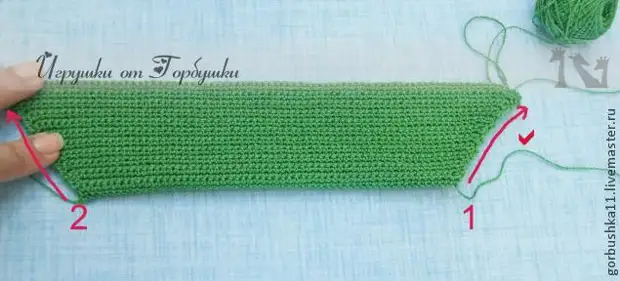
4 row - st.B.N., but at the edges we make 1 grade, knit 2 st .b.n, we make 1 gravel, symmetrically from 2 sides. We try the lightning. Next, you can check another 5 and 6 row just st.B.N., because There is an empty margin for lightning. I passed only 5 row.
We try the biggest pea. And if you see such a picture (photo below) - finish the pod!
If the pea is not enough enough, then there are additionally a number or two simply st.B.N. Fix the working thread.
We leave the tail from the working thread more, it can be used for stamping lightning.
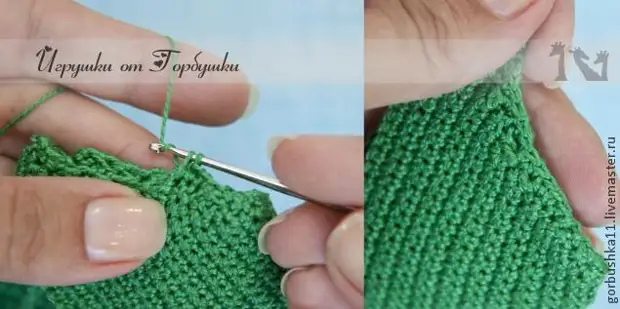
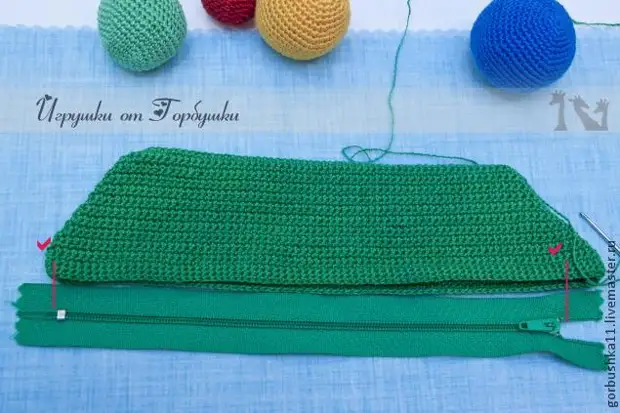
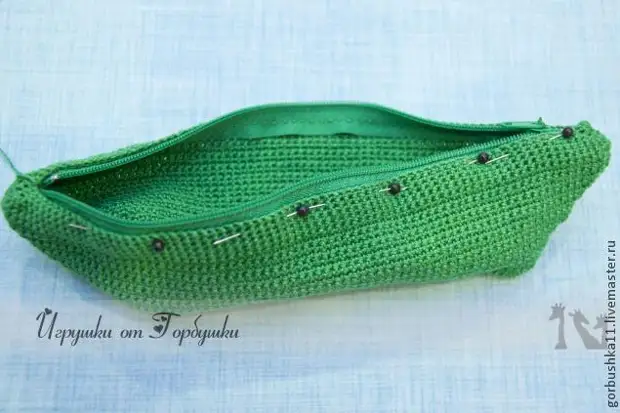
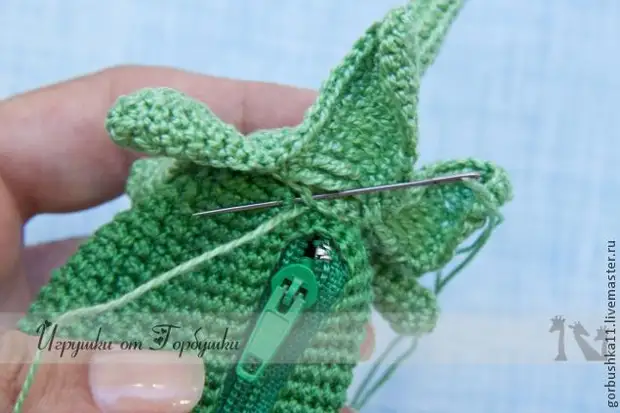
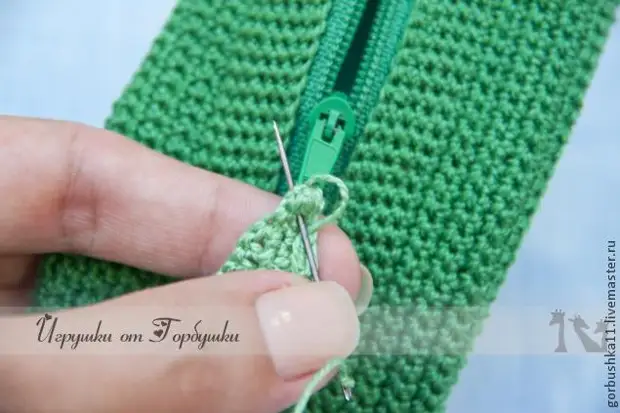
We sew zipper.
I immediately say that I do it in my own way, as it is convenient for me. If you know the way better - use it.
I fix one side with the help of a pin and begin to sew the lightning with small stitches (1-2 mm not through the edge), right to left, the same threads, whatever the pod knit, in which case the stitch face will be invisible.
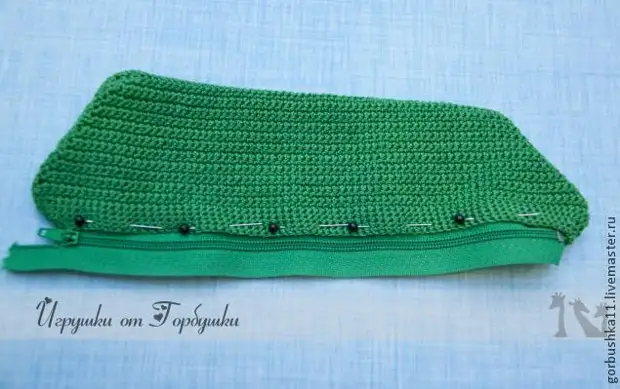
After one side is sewn, fasten the second side by the pins, it is better that lightning is closed, so there will be a skew.
After everything fastened, we open the zipper and sew this side.
Knitting Tail for pod.
We use the hook number 1. We recruit 4 air loops, connect to the ring.
1 row and subsequent - only 6 st .b.n. In each row, it turns out such a laugh, measured, knit to the desired length. I tied about 7 cm.
Next, start gaining:
1 row - only add-ons, i.e. From each column, we encounter 2 loops, it will be 12 columns.
2 row - 1 st. B.N.-Add - alternate until the end of the row, we get 18 columns.
3 row - 2 st .b. - Priphering - we alternate until the end of the row, we get 24 columns.
Knit petals. We recruit 10 air loops + air loop. We introduce the hook to the second loop of the pigtails and knit according to the scheme:
1 semi-solitary, 1 tbsp., 3 tbsp. with one nakid, 4 tbsp. With two camids, 1 tbsp. With three nakid.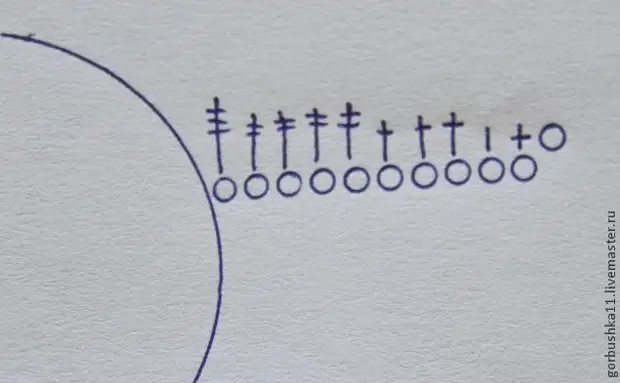

After the petal is connected, we introduce the hook in the 5 or 6 loop of the row and make the connective loop.
Next, we again recruit 10 air loops and knit the next petal along the same scheme.
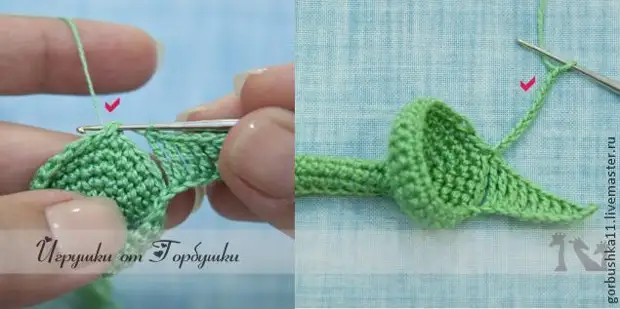
There should be 5 petals. After that, for strengthening, we bind the petals around the perimeter with two rows of st.B.N. We fix the working thread and leave the thread-tail, for sewing to the pod.
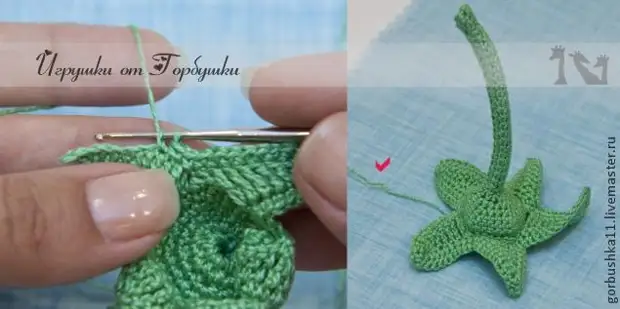
Send tail with petals to the pod.
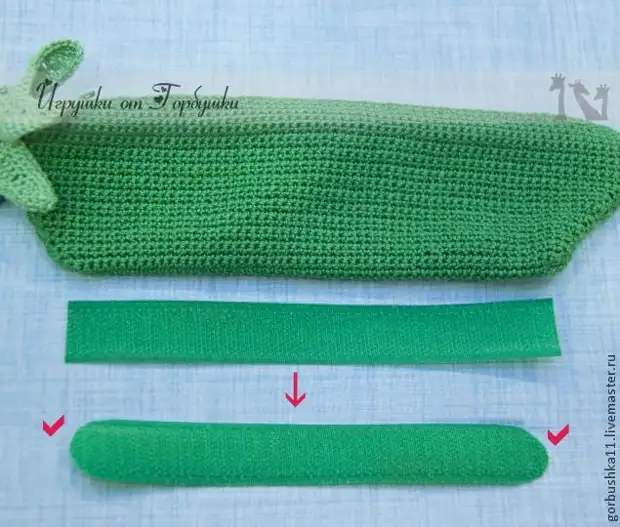
Now sew sticky tape. Cut off the length of the length at the bottom of the pod and the edge is spinning so that there are no sharp corners.
Inside the pod, we sew a rigid part of the velcro with hooks, and cut out on the peas and sew a round fluffy part of the velcro.
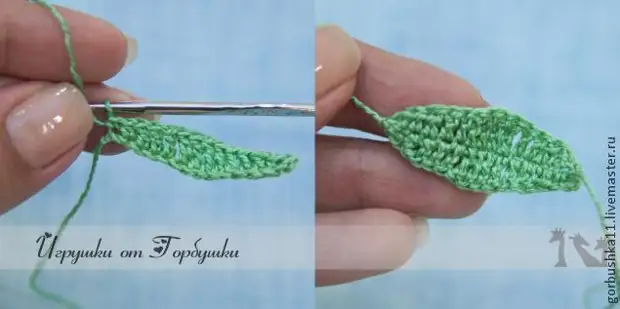
Knit the last element - Little leaf.
Hook number 1. We recruit 14 air loops, then air lift air loop, 1 semi-solitary - 1 st .b.n. - 3 tbsp. For one nakid - 4 tbsp. With two Caidis - 3 tbsp. With one nakid - 1 st .b. - 1 semi-solitary. It is ready to half a leaf. Then we score 3 air loops and begin in the opposite direction. For confidence, I drew a scheme.
Send a leaf to a dog in a zipper so that the baby is easier to open.
Hooray! Our creation is ready!
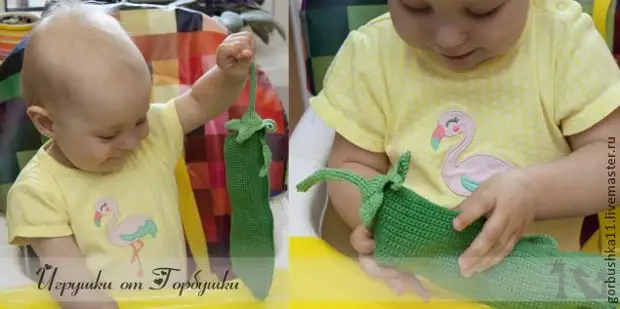
Enjoy the work done along with the baby. :) Do not forget that this toy can only be played under the supervision of adults.
All creative success and happy kids! :) "
A SOURCE