
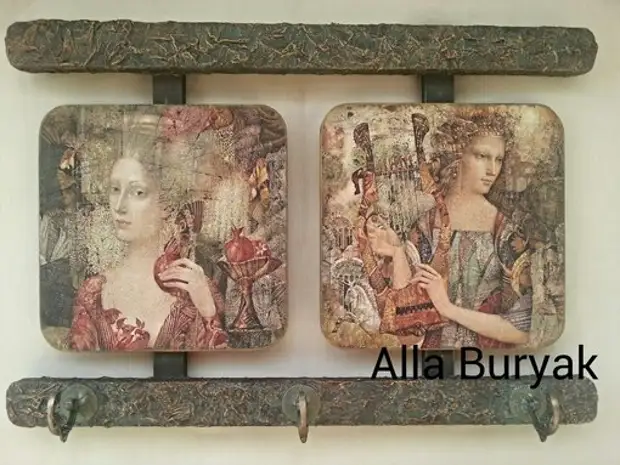
In this MK, I will tell you how to achieve an effect effect, make gilding as well as how to use a napkin to imitate a textured surface.

So!) To work, we will need:
1. Preparation (I already have with crochets)
2. The print on the laser printer (the works of the artist A.Sigova were used)
3. Grunt acrylic
4. Cool for decoupage, PVA glue
5. Three-layer shall
6. Brown brown, copper, turquoise
7. Patin "Gold"
8. Akrylovy Lak, Talc (Children's Paw).
9.Fine varnish varnish.
")
Immediately make a reservation, I removed the phone, so I apologize for the quality of the photo!
1. Ground the surface under the motive, align as a skirt. After drying, we apply glue for decoupage and stick a pre-clumsy printout. I did not force her, because it will close the entire surface. Rolling the roller or spatula, immediately cover with varnish and leave to dry.
")
2. Announced three-layer napkin Rwe into arbitrary nails. Napanese: From perforations on the sides of the napkin, it is better to get rid of the napkin that is ripped and not to cut. PVA glue (I add a little varnish into it, it gives the density of the invoice) is abundantly applied to the keystap, and begin to put the napkin (creating a texture), it is pre-bugging it and in the process you need to visit it. Avoid your brushes moistened in the glue, it is very convenient to visit the reverse side of the brush. If you take one layer of napkins, then the convexities of smaller sizes are obtained.
")
Leave to dry at night.
3. Install the desired paints. For sides of squares and central planks, it is green with the addition of white, for brown planks. Krasim, dry.
")
4. Apply to the upper and lower strap acrylic lacquer, we dry. Weching the paint of oxidation color (I have blue with green = turquoise), add water to it (it should be alone, but not so liquid as for the lesing), we apply where we want to see the tracks of oxidation and immediately remove the excessive wet cloth. Envy. We pass a semi-dry brush with brown paint.
")
5. Varnish abundantly and, without waiting for drying, sprinkle in some places with Talc. Talc will give some accuracy in the depressions (as if the age-old dust) and muffle the brown color. We are waiting for drying and smile with talc hard brush.
")
It will correctly cover the talc with a shellah varnish, then it will remain in the deepening. I forgot about him, I will say honestly, it covered simply acrylic from what Talc washed over more than necessary. But I did not have the goal of achieving the effect of century-old dust, so I did not redo it, because I had an easy accuracy)
6. The turning brush with copper paint goes along the relief. An antique patina with a finger with gold, alternating with copper, as if creating overflows.
")
7. Do not forget about hooks: they are intense them intensely, we apply to the entire hook green color, then leather, leaving greens only in the recesses, a semi-dry brush we pass by brown paint and appreciate the gold.
")
8. Do not forget about the back of the product. All paints, lachm. On the glue, I glued squares with images (previously covered with three layers of acre)
")
9.Fine varnish varnish. It is matte, so it is impossible to suit better.
Maybe something missed. Ask, I am pleased to answer all questions.
A source