
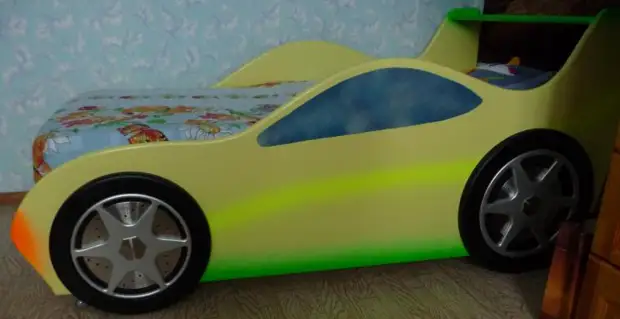
Today I want to tell how to make a bed machine for a child with a place for storage.
Passing shopping, we did not find a cot suitable for our kid. I wanted safe, and distinguished, and with a place to store things and toys. In addition, the bed was needed very small due to the lack of place in the room.
Therefore, we decided to make the crib themselves.
Mastered two weeks in the evenings after work.
Materials for the manufacture of beds:
1. Sketch - downloaded from the Internet and the printed picture of the sides of the machine or the printed project from the program of the PRO100.2. Two watmans or old wallpapers - for a sketch of a template in full size.
3. Birch plywood - expectant for bed 1530 * 740 with a sleeping place 1400 * 700:
- 18-20mm - 2 sheets (1550 * 1550) + We had more remnants, how many exactly I did not know;
- 10 mm - 2 sheets.
4. Self-tapping screws 4 * 50 and 4 * 30.
5. PVA glue joiner.
6. Putty wood.
7. Acrylic Paint of WGT Snego-white and kickers according to your choice. Acrylic paints in the baloniers are not prevented - reflective and ordinary.
8. Acrylic varnish for parquet glossy.
9. Furniture wheels - 4 pcs.
10. Metal discs with holes and beautiful bolts for wheels - optionally, can be replaced with plastic lining from the auto parts store.
11. Cardboard or thin plastic for headlight template, windows.
Instruments:
1. Electrolzik.
2. Hand mill with a set of cutters.
3. Grief machine or sandpaper.
4. Clamps 2-3 pcs.
5. The table for the logs and the mill, the old unnecessary or made from the wound.
6. Drill or screwdriver to taste, drills and nozzles for a screwdriver.
7. Brushes and / or paintopult.
If anyone has the opportunity to project the bed in Pro100 and Phaneur to cut into the workshop on the machine with the CPU - then we skip part of the description from the sketch to the milling.
But we did everything manually. All sizes in mm.

Sketch using the coordinate grid to increase the desired size on Watman or a piece of unnecessary wallpaper. We try so that the lines are smooth - you can use the pattern or flexible ruler.
Cut the paper template. We put it on the Fanora of 10mm, fix the clamps and neatly the electric bolt cut out the template for the sidewalls of the bed with a small allowance for alignment, ferroering and grinding. We do not throw a paper pattern - it is useful for us to fit the sizes and the size of the "window" when painting.
Then the plywood pattern we apply 20mm on the phane, fix and cut the sideline of the bed with an electric bike. The second sidewall is cut into the same plywood "Valet".
From plywood 20mm drinking more:
- the front and back of the bed, we had 700 widths and a height of about 200 and 400, you caress under your carved side bed;
- Bar supports for plywood shelves under the mattress;
- Brochi-amplifiers of construction (to enhance the fastening of the bottom to the sides);
- Shelf-spoiler - 700 * 150 - if you have on sketch;
- The bottom of the bed - 700 * actual length of nose sidewall bed minus the width of the front and rear;
- Wheels - 4 identical or as we have different 2 pcs: Front d = 320, rear D = 400.
From plywood 10mm cut out:
- 2 shelves 700 * 700 under a mattress with knobs-holes or recesses;
- Decorations at will: Radiator grille and discs (d = 240 and 300). The grille can be drawn, and the discs can be replaced with plastic lining from the auto parts store - then the wheel size cut more diameter of the lining.
Millet, equalize the upper edges.
All process the grinding machine or hand with sandpaper to a smooth surface.
Drill holes for assembly. We collect, sinking the seams of PVA glue, fasten with self-draws. Wheels do not put.
If irregularities appear - then they are spoiled.

Sharpen irregularities, we had covert and self-tapping screws - the crib turned out to be unnecessary.
We put furniture wheels.
For convenience, we set the crib on the inverted old stools and stain.
Prayer sides, in front, shelf and back first snow-white paint (ground), dry, then paint caliera and paint color paint, each layer of drying no less recommended for your paint time.

Color wheels in black, discs in silver.

Then from cardboard or plastic cut the headlight patterns and side windows, paint paint from the balonpers. Also the balconum with reflective paint we apply drawings - stripes, waves, transitions.
The crib, shelves under the mattress cover 2-3 times, dried by each layer. Wheels are not covered with varnish - imitate rubber.
We screw the decorative wheels.

We screw the already colored or draw the radiator grille.


We put the shelves.
It remains to put the mattress. We ordered children's mattress Coconut + Latex 140 * 70 * 12cm. But you can save - buy a ready-made rolled mattress, shorten it to the desired size and tinker.

And it will not hurt to sew the sheets on the gum: the usual, then the kids slide.


A source