
These ideas will be suitable for both beginners and recognized masters. The first will train on "cats", the second - look for inspiration and earn millions. Well, as they say, no one would be the second.
1. Puf of tire and rope

You will need:
- tire,
- Rope (twine),
- plywood,
- adhesive gun
- Lobzik,
- knife,
- drill.
Operating procedure:
- From plywood using jigsaw cut the circle of the desired diameter, sanding the edges.
- Tire brush from dirt, fat and dust.
- Next to the tire to laid the Phaneur, make holes for the screws, attach the Phaneur to the bus.
- Starting from the center of the circle, twist the rope to the edges of plywood (in the form of a snail) and then down, to the base, missing each twine glue with a glue gun.
- Cut an excess rope with a knife, secure the edge of the bracket or thread.
- Cover the pouf varnish or moisture-proof impregnation. Let dry.
2. Hooks or handles from natural stone

You will need:
- bolts
- The simplest furniture handles,
- A variety of stones.
Operating procedure:
- Liked stones, bolts or ready-made furniture handles clean from dust and fat.
- Stick stones (can be glue "moment") to bolt hats or pens. Let dry. Ready accessories can be used as hooks for hangers or decorative furniture handles.
3. Pillow decorated with marker for textiles

You will need:
- pillowcase,
- stencil,
- Textile marker.
Operating procedure:
- Spread the pillowcase on the smooth surface.
- Using the stencil and marker for textiles, apply the text of the message, the winged phrase or the wishes of calm sleep.
- Let dry.
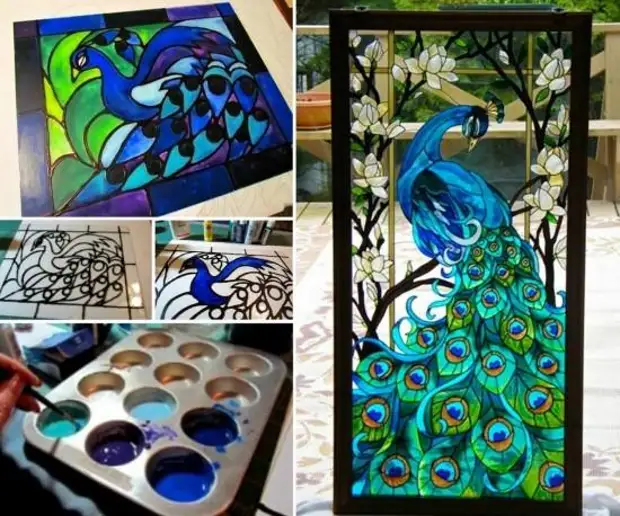
4. Picturesque stained glass

You will need:
- self-adhesive stencils with stained in paints,
- glass.
Operating procedure:
- Color the stencil paints (a special film with a picture of a drawing and a separated surface), let's dry.
- After drying, the drawing on the film separates from the base and stick to the glass, first clearing it from dust and fat.
- Wipe the film with a rag, kicking air bubbles.
5. Decorative Panel "Heart"

You will need:
- canvas on a subframe or a piece of plywood,
- paint spray
- nails
- a hammer,
- pencil,
- Threads.
Operating procedure:
- Draw a heart, along the contour of the nails.
- Apply paint from the canvas, let's dry.
- In chaotic order, pull the threads between nails, secure the edge.
6. Paper chandelier

You will need:
- Chinese lantern,
- White paper,
- Adhesive pistol.
Operating procedure:
- Make bulk figures from a square sheet (remember child fortune telling).
- With the help of an adhesive gun neatly glue them to the surface of the Chinese lantern (in a circle, starting from the top or bottom point of the flashlight).
- Let dry.
7. Original bathroom shelf

You will need:
- wooden plank,
- Lobzik,
- drill,
- Automobile clamps of different diameters (size depends on the diameter of cans),
- self-tapping screw
- screwdriver,
- Banks.
Operating procedure:
- Cut part of the boards of the desired size, sand edges, clean the surface from dust.
- Cover the board with varnish, let's dry.
- Make holes in the board and in the clamps, with the help of self-tapping screws, attach the clamps to the board.
- Insert banks into the clamps, tighten the necks of hopefully.
8. Armchair from barrel

You will need:
- barrel,
- Electrolovik,
- sking
- varnish
- plywood,
- Wood chips.
Operating procedure:
- Choose a barrel of desired size, remove iron rims from it.
- On the barrel, draw the contour of the back, moving in armrests.
- Lobzik spire an unnecessary part, sanding the edges and irregularities.
- From plywood cut the circle (it will be the seat), sanding the edges.
- At the bottom of the barrels, pour the wood chips, align the surface, lay the plywood circle on top.
- All parts of the chair are treated with varnish. After the lacquer dries, the chair can be decorated with decorative pillows.
9. Rugs from cable ropes

You will need:
- Round rubber rug
- cable rope
- knife,
- liquid Nails,
- Scotch.
Operating procedure:
- Twist the rope (in the form of a snail), starting from the center and to the desired diameter of the rug (orient to the diameter of the rubber rug).
- Secure the edge of scotch.
- Apply liquid nails to the twisted rope.
- Top to put a rubber rug, press the cargo.
- Give adhesion to dry.
10. Garden decor "Ladybugs"

You will need:
- cement,
- sand,
- water,
- Form-hemisphere (or old soccer ball),
- plastic bag,
- Ceramic ceramic tiles, black and white color (possibly inclusion and other colors),
- Grout for tiles.
Operating procedure:
- Prepare a cement solution (mix 1 part of cement and 3 pieces of sand, water to the condition of thick casher).
- Fill in this solution to the hemisphere laid out from the inside by a polyethylene package.
- When the mass is frozen, turn the shape, irregularity with a solution of tiled glue, sand and cement. Let dry.
- Corvet the main "elements" of God's cows (eyes, wings, stains).
- Coline the tiles to pieces, then put them on the tile glue.
- Apply from above with a gray grout, wash out the surplus of the grout and glue.
A source