
To work, we will need:
- plastic ball collapsible d12 cm;
- sphere of foam of 10 cm;
- paint or soil for plastic;
- Textural paste Tair thin;
- Acrylic paints: blue, blue, white, orange, skimming, focus yellow;
- glue varnish for decoupage;
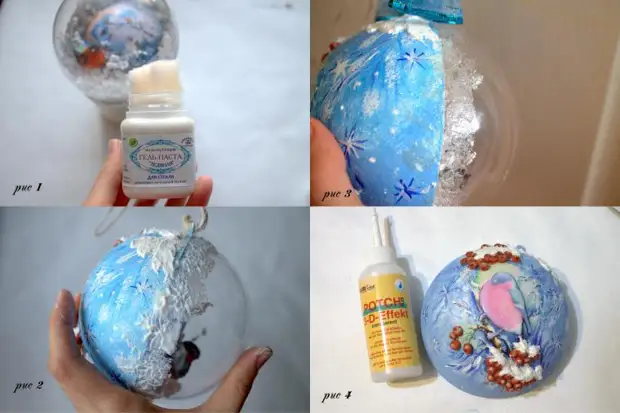
- modeling gel paste "Ice";
- Pasta for modeling, selfless;
- half-timed varnish or glossy for finishing coating;
- Decaped card, thermal, brushes, scissors, scalpel, sponge
- medium for smooth transition of acrylic colors;
- Mounting Glue "Moment";
- twigs of any fluffy grass and another decor (which will be found until you walk in the nearest square);
- Decorative bird, ribbon, microbistant.
So, begin.
1. Born the outer side of the ball with a suitable soil, only one half by 2 times. Tightly without lumen.

2. Choose a picture, I have a part of the decapiguble card.
3. Soaked the map, removed the excess water with a paper towel.

4. We glue the picture, first lubricate the card with glue, then the ball, stick, stick the square to the ball, I will not work without loss, if anyone knows the secret, how can it be done, share :)
I just remove the extra cast pieces as shown in the figure (Fig. 3), the task to keep the bird and berries, the background is always easier to prick than clear parts and main parts of the picture. The motive above passes through the same glue lacquer.

5. We begin with a sketch. Paints can be any, mainly light blue, dark blue and blue. Theoritically, you can do the Blue and White. First, wean a spontaneity overall light blue background, then add accents behind the layer, somewhere lighter, somewhere more blue. Drawing sprigs with a thin tassel, before drawing, having dipped into the medium of a smooth transition of colors, then one edge of the brush in a dark blue, the second in white and rice twigs, the twig will be thinner where you will end the line. If you took a lot of blue, tide over the line on the line, it turns out a snowy twig. So that the background does not look empty, you can make a spray or like me snowflakes and snow cuttings with a tassel.

6. Create a volume of berries and snow. For berries we will need a selfless mass, an extreme knife or scalpel and a rug for cutting.

From the mass of riding a sausage, cutting into small parts and riding the berry, the berries make a deepening of the knife with the tip, in the form of a cross, such as on real berries rowan, sticking to the mounting glue, the time of drying paste and liquid nails is about the same, so there will be no conflict of materials They will clarify both the design will hold well. The place of fastening of berries with a plane should be slightly soaked so that the berries are not strongly protruding and have a large clutch area with the surface.

7. Painting the berries in their natural orange color, such as he was in the photo. Do not forget about the light shadow. In the deepening on the berries, the male tassel gently dripped with a diluted medium Umbrane's paint, it will deepen and distinguishes the recess (Fig. 2). According to the idea, the sun is on top, so the berry is lighter from above, riveted with a diluted medium with a light light, a small strip 3, then in this strip even less than a white droplet. We get reflected light, berries look more natural (Fig. 4).

8. Add snow to berries, for this we use Tair's texture paste thin, the microbistant added to it, the Mastehin delivered. The microbistant added to the top.

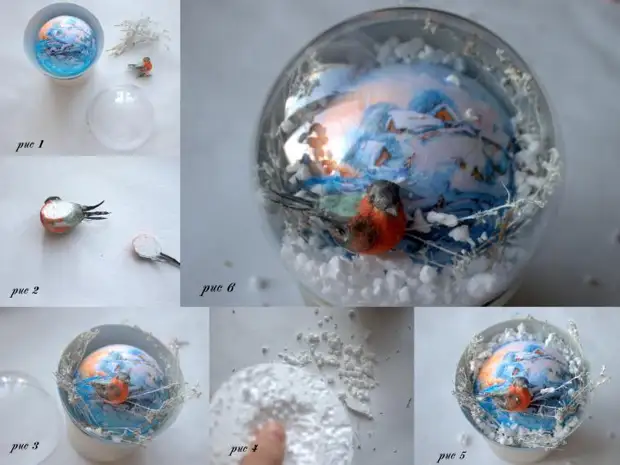
9 will be engaged in the inner "decoration" ball. For this, the foam sphere, with a diameter of 10 cm cutting in pressure, pre-recoverable one half of the sphere and glue the thermopystole into a reorganized half of the ball.

10. Delave the twigs collected along the way home into small parts of 3-4 cm and painted in white, dried.

11. The bird was obviously not from the breed of bullfding, it was necessary to paint it. An example of painting took from the picture on the ball.

12. I stick the twigs on the thermopystopistol on the sides of the sphere, the bird is a bit blasting and sticking to the sphere, the second part of the sphere crossed the circles, which will serve as snow, it glued it to the twigs, and the part freely fell asleep into the ball, which then closed tightly.
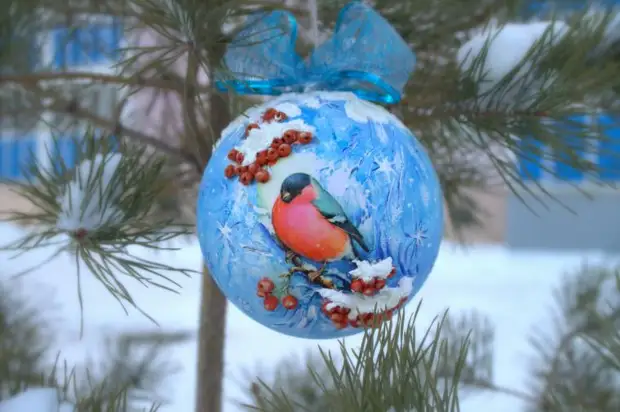
13. Finishing details. I do the frost on the transparent part of the plastic, caused a "ice gel" (Fig. 3), which is similar after drying to the icing glass (Fig. 2). I highlight the bird with a 3D gel (Fig. 4), after drying, I nano on the decorated part of the acrylic varnish, I have glassy. He is a dense, 3 layer is enough, you do not need to grind. We make a bow and rope and photograph.
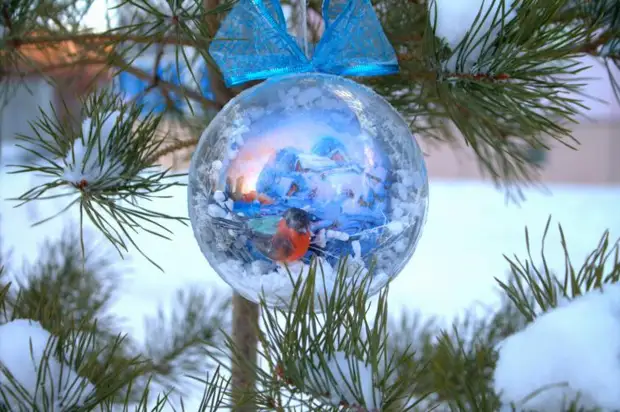
We admire the ball on the other sides.

Copying and publishing a master class is allowed only with the permission of the author!
Thank you all for your attention!
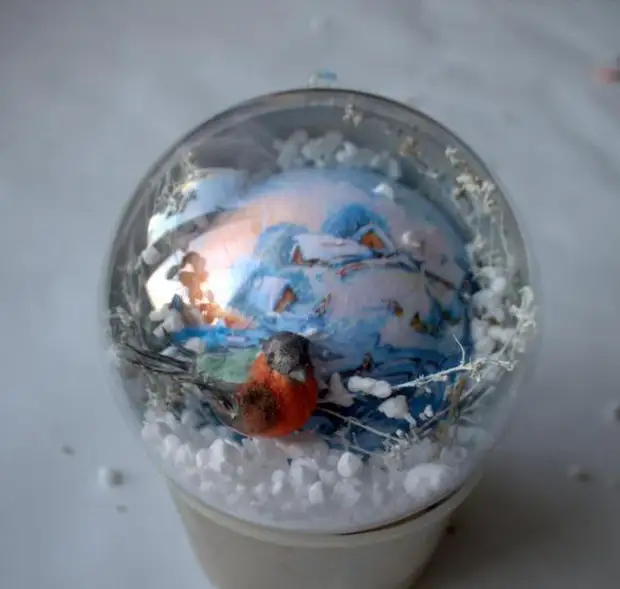
It seems to me that this photo is the best way to do, you can see what decor inside. The idea was to make a perspective. Back plan Cozy houses, on the front bullfinch on snow-covered twigs, and the snow if the picture is "live".
A source