

In the example of the British, in a convenience of which the phrase "God, the queen, is often freedom", a considerable part of our compatriots is ready to confidently wish this for IKEA, because thanks to the Swedes, many residents of major cities of Russia have the opportunity to purchase European quality products at highly affordable prices.
Moreover, where one thing is made, in this case the role does not play: Ikeev standards are the same all over the world ...
But there are a couple of moments that are sometimes confused by potential buyers (and perhaps you personally):
- First, the reverse side of the popularity of the brand is visiting the neighbor (buddy, relative), you can find the twin brother of your sofa (chest, cabinet, chairs, etc.);
- Secondly, the most attractive prices are found on 2 groups of goods (not counting discounts and shares) - (1) from the untreated tree and (2) from white chipboard with smooth facades and a very modest view.
But we all love originality, but also - save funds (or at least they have to gain as much as possible items for the allocated budget)! In this guide we will share ideas that will satisfy both of these desires at once. Moreover, the "bright individuality" of updated items will be noticeable to you immediately, and how to actually save, we will tell in each particular case.
If you already have such (or similar) furniture, once purchased in IKEA, - you will learn how to create a new outfit for her - on the occasion of the occurrence of summer or in order for it to become more attractive.
An old banquette of the quoted Troll table:
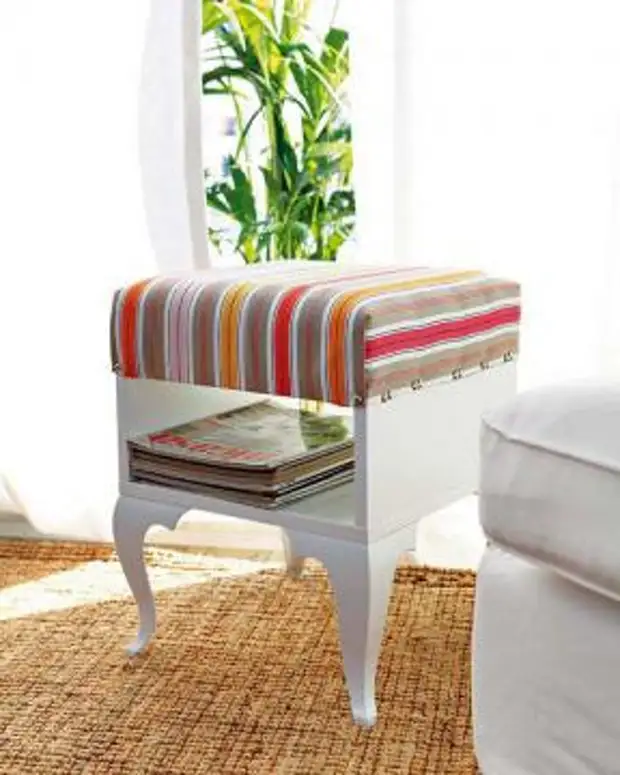
The object for the update will be the peer table of the troller (38x38, a 40 cm high), the model started in the 2012 catalog, is interesting enough for IKEA shape of the legs - in the old Gustavian style. In this guide, we will show how to turn it into a spectacular bench (sizes are optimally suitable for this).
If you have a couple of such tables, the first one can be left in the usual form (and roles), and the second is to update the set of complementary objects, one of which will find absolute individuality.
required:
- In the source guide, it is recommended: a white table of trolsta, cloth 63x63 cm (more about it see), hard foam size 38x38 cm and a height of 10 cm, centimeter, scissors, decorative furniture cloves with a large hat, hammer, furniture stapler, plow type , flat brush;
- Our additions: foambone instead of foam (for soft seating), fabric - also from IKEA, depending on the interior or the desired impression (Berit, Barbru Rand, Wetela (cotton velvet), Britten Nummer;
- Our variations: Instead of white, you can choose a lilac table of the troller, with two last types of fabric, it will look boldly and exquisite, and if you want to purchase an order of magnitude cheaper, - as an object, use the bedside tube ras from the pine mass (52x30, 40 cm height , Cost 349 rubles).


how to do it:
Mix glue the top of the table top, glue the foam. Sample the fabric, aligning its center with the center of the table, fix the pair of the pin.
On the side of the table, which will be above the open part, attach the fabric to the furniture stapler, having previously turned the edge, pull the tissue and do the same from the opposite side. Free edges of the fabric on the sides of the tabletop are overrun and attach with decorative cloves.


The kitchen table-island Beckwem becomes more practical:
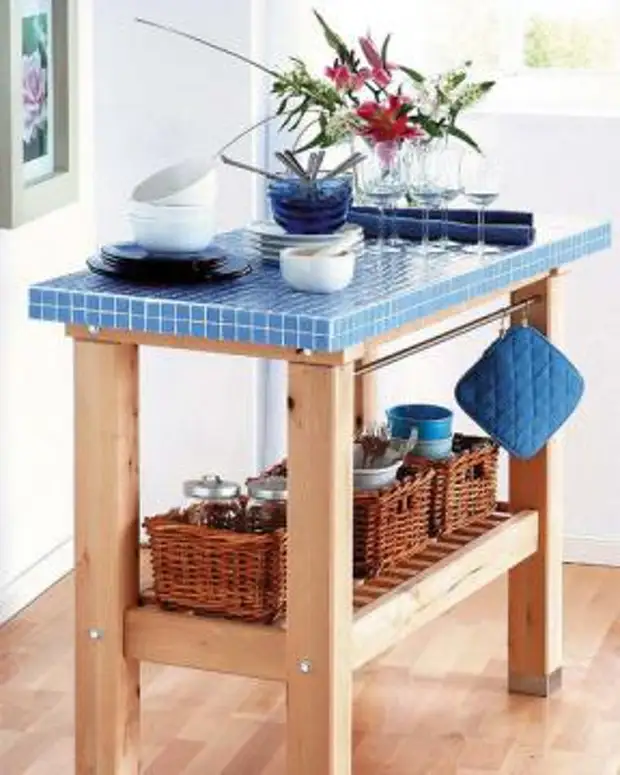
And here the update object will be a kitchen island on 2 wheels of Beckwem (60x50, 85 cm height) from a birch massif, a comfortable piece of furniture, which can be moved by the kitchen depending on the needs. This is the most economical model from the entire Ikiev line of such goods, but to preserve the appearance, it is necessary to regularly process with special oil for wood and protect from excessive moisture.
We will show how to make such an island more practical, give individuality, as well as to add a color accent into the kitchen.
required:
The kitchen table-island of Beckwem, 4 standard (30x30 cm) sheet of mosaic (in the original manual - blue), ready glue in the tube (suitable for mosaic), white grout, tape measure, spatula, sponge, cutter.


how to do it:
Apply glue to the worktop, distributing it with a thin layer with a spatula. Apply to the edge of the table top 1 whole sheet of mosaic (paper up), combining with one of the corners of the table, press, surplus remove the sponge dipped in water. Do the same surgery with the second sheet, I joking it with the first side of 60 cm, following the seams combined.
From the remaining two sheets cut the missing elements to cover the entire surface of the table top, as well as the end parts. Stick, watching the coincidence of the seams as described above. Make sure that the mosaic was glued completely, then wet a wet sponge protective paper (remember that it is attached to the front (!) Layer of mosaic) and remove it, if necessary, use the spatula.
Apply grout, after drying, wipe the surface with a damp wool cloth to leave the grout only in the seams. Do not forget to do the same with the ends.


Our advice: Maximum savings when buying a mosaic will be released if you purchase it in traditional "basin" tones (blue and white) and one ton of testers. A little more than a mix of these tones will be released. Even more expensive - other color shades, but if a certain color is important to you (for example, red, yellow, turquoise or chocolate) - prepare to pay more.
Bright outfit for modular cabinet Rezot:
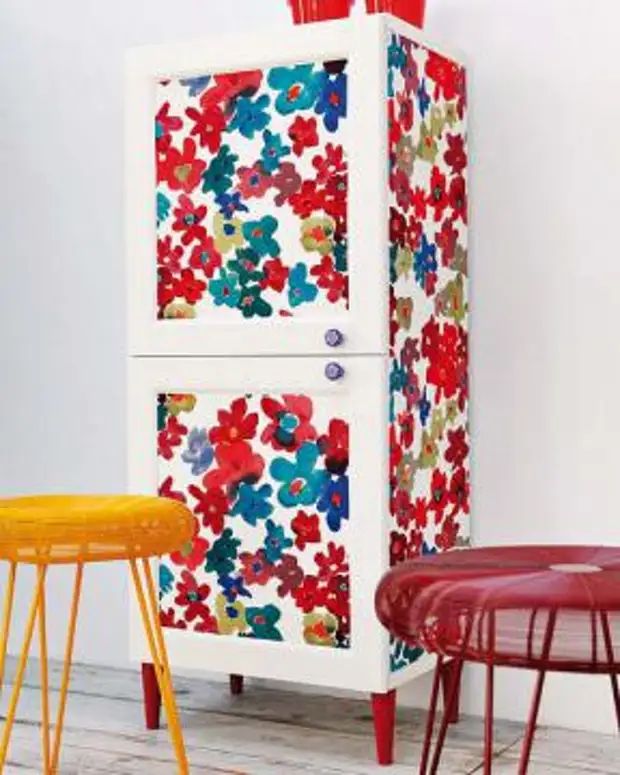
In this case, the object will be the section with the doors from the series of modular furniture of the raid (60x40, 128 cm high), for which significant discounts are declared in the 2012 catalog compared to the previous one. It can be turned into a separate cabinet with shelves for clothes, books or put inside the boxes / basket with handicraft materials. Also very pretty it will look in the girl's room - a small or teenager, if the hostess is prone to romance.
You will need:
- COMBINATION FOR STORAGE RELATIVE (SIZE CHEX), 2 VASSBO doors (60x64), fabric (see), glue (not damaging fabric, better - in aerosol packaging), scissors, centimeter, 4 Wooden legs in the shape of a truncated cone , 2 beautiful handles in one of the tones of the fabric (possibly - with a floral pattern, here - from Zara Home, but you can choose something easier), red paint (suitable for wood), narrow brush, drill, screwdriver;
- Our fabric add-ons: We recommend paying attention to different floral fabric drawings from IKEA, in the manual it is "Solrun", if you are against excessive brightness - pay attention to Gullalan Fruit, and if you like large drawings - on Frederick.
A small savings will turn out if instead of two doors of Vassbo acquire one (60x128). If you are interested in more substantial savings, and the depth and width are not critical, instead of the renewer, you can buy a famous Billy rack (40x28, 106 cm high, cost in white color 990 rubles) + door Billy Olsbo (cost in white color 1200 rubles ).


how to do it:
Water the inside of the door, excluding the frame profile, take a 0.5 cm point on each side, cut the fabric and glue it, adding the edge. If the glue is spray, splash it on the wrong side of the fabric. Printing fabric, move from top to bottom, avoiding the formation of bubbles. If you are not sure that it is exposed exactly to the cloth at the edges, - lay the irons with an irrigate side.
Plush the cloth also solid (!) Side as a cabinet. Color legs and screw to the bottom of the cabinet. Make the position of the handles on the door profile, drill holes, screw the handles.


A source