

Note. The article uses conditional terminology.
By purchasing a finished house, the new owner in all cases deals with a cat in a bag. And it doesn't matter, new this building or renovated old. Builders take and repair cottages and private houses in fantastically short time, which always affects their stability and durability. Regardless of the causes of the appearance, the crack is a frequent and faithful satellite of stone buildings and structures. It will be about the most difficult cases of these unpleasant and dangerous defects - structural cracks, which serve as signals about the appearance of mobility of carrier elements. To stop the development of the crack, you should stop moving and fix items, and then repair and "disguise".
Note. The crack in the finish does not always mean the presence of defects of the material of the wall. It is necessary to make sure that the carrier material is damaged, deleting part of the finish and exposing the defective area for observations.
Let us leave the theory and consider the three most common cases of the advent of the mobility of the elements: the collapse, the blockage and separation of an extension.
Collapse
In the case of collapse, the walls and angles have a visual deviation from the vertical outward, sometimes waving. Walls can also be waveled or deflected by the entire plane. In most cases, this is accompanied by the appearance of cracks in the upper corners of the door and window openings.
According to the degree of coverage, the collapse can be:
Full. All carrying outdoor walls are deformed in varying degrees.
Incomplete (partial). Some walls are deformed.
In both cases, even if there is only one wall collapse, we recommend applying a preventive screed from all sides to prevent the development of movement on other walls.
Depending on the degree of collapse of the walls, various measures are used in depth. We conventionally divide the degree of collapse into three categories - light, medium and strong, and tell me what to apply in each case.
Light collapse
Signs
The walls of the walls are noticeably deformed on the site to 1/3 of the wall height (without the height of the foundation). Cracks in the corners of openings in 50% of cases. The remaining parts of the walls and foundations are normal (without cracks, deformations).
Cause
It occurs because of the unreliability or absence of Armopoyas, the overload of the roof, when erecting the attic floor on the old walls.
Note. The most common mistake leading to the roof overload is unrecorded snow load.
Development method
In this case, for the screed of the walls, it is reasonable to apply steel monocoise (hereinafter - rope) on corner stops. At the same time, as in all cases of applying various bars, the thrust will pass outside the facade of the bearing walls standing in the form of a rectangle. Sometimes it is necessary to make technological movements for the craving in the walls of the attack.
What will take:
Steel corner 100x100 mm (minimum 75x75) - 4 m.
Pipe 1 inch - 1 m.
Stud with a thread 20 mm - 4 m.
Nuts and washers under the heel.
Circle (steel rod) with a diameter of 20 mm or a bar 40x4 mm - a perimeter length of the house.
Welding, coloring.
Note. It is unwanted to apply fittings for the thrust, since it is not designed for external work and is subject to corrosion.
How to make an angular stop: on a steel corner 100x100 mm long, equal to the distance from the vertex of the wall to the top of the window openings, plus 20%, the cuts of a pipe of 150 mm are welded.
The number of stops is equal to the number of angles (4).
Order of work:
The rods (stripes) are welded into two solid leaves long on the walls of the house minus 200 mm (on the course of the tightening).
Then the studs with a free end of 200 mm are welded at the ends.
The studs are tuned in the tubes and the screens are welded among themselves in the middle.
The whole design is assembled on Earth and fixed at the necessary height.
A tightening of nuts is carried out to the voltage state.
Attention! Using steel clips and screed, remember that they are designed to fix walls. An attempt to return the walls to its original state can turn into trolms and sectors.
The design of the steel rope can vary. For example, in the case of wave-like deformations, you can apply a channel as one, several or all four cras. Installation will be more difficult, but all the load from the wall will evenly distribute along the hard skewler.
Middle collapse
Signs
All signs of light collapse apply to a level of 50% of the wall height (excluding the foundation). The probability of cracks in the corners and the boundaries of the outlook - 80%.
Cause
Weak Armopoyas. Lack of bonds of angles and masonry in the material of walls, high wear of the material, overload.
Development method
In these cases, a solid corner will be used. It is arranged similarly by monocoise, but at the entire height of the wall and has more screed belts. With an average collapse, it is recommended to arrange three belts.
In all cases, the circle can be replaced with a steel strip of 10x40 mm.
Attention! Welded seams must be a good quality (they keep the load). Twist - 250 mm.
Strong collapse
Signs
All signs of medium and light, but at the level of more than 50%. In the overwhelming majority of cases, accompanied by the appearance of deep, sometimes open, cracks on the walls and the foundation.
Cause
Most often deformation of the base or foundation in combination with the causes of light and medium collapse. May be accompanied by partial destruction of the foundation.
Development method
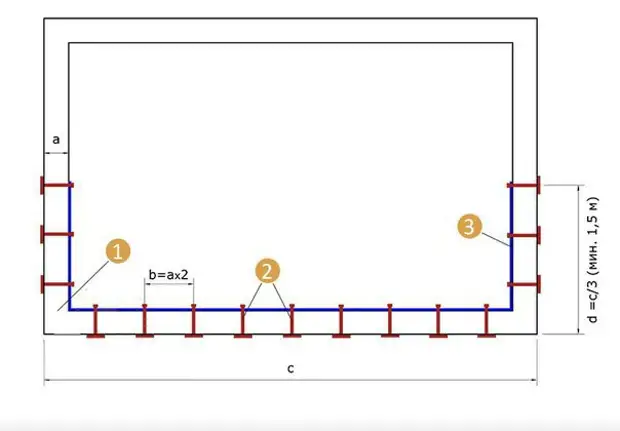
For repair, a solid angular clip is used and the retaining wall (sub-standard) or the subtle belt of the foundation.
The retaining wall or sub-part is part of the gain used on a deformed area.
Substand belt is a repair structural element designed to enhance the existing foundation walls throughout their length. It is used if necessary to strengthen the foundation. Material - reinforced concrete.
Subject device. Consider on the example of the corner area. The solid belt is satisfied with the same way.
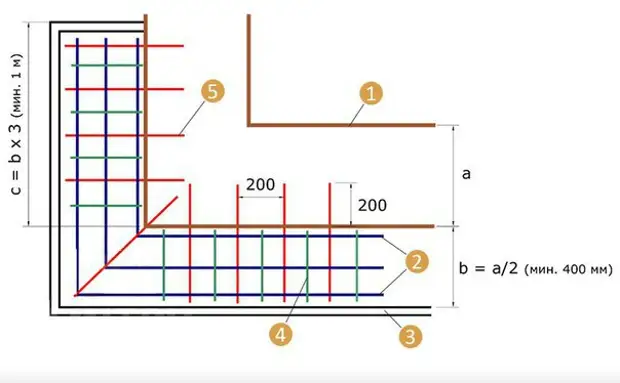
First you need to determine the dimensions of the backpage. If we had to resort to such radical measures, it means that the load calculation is late, especially since the existing foundation remains on the spot. Therefore, we simplify the calculations in the direction of increasing the safety stock. The thickness of the subsoil should be 50% of the wall thickness of the foundation, but not less than 400 mm. If possible, the bottom of the subsoil and the foundation should be at one level. The optimal ratio of the above-ground part to the underground is 1 third above the ground, 2 thirds under the ground.
Attention! Pruts of reinforcement at angles should be solid (curved at 90 °). The minimum side of the corner backpage is three thickness of the sideboard.
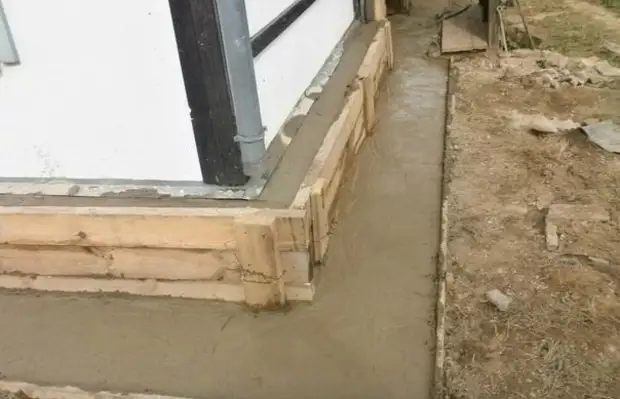
Order of work:
We roll off the damaged area and we clean the trench. We clean the wall of the foundation from oils and organic, waterproofing residues.
We feed into the wall of the foundation of the hole with a diameter of 18 mm into a depth of 200 mm in a checkerboard in a step of 200 mm.
We drive the reinforcement pins with a diameter of 16 mm and a length equal to the thickness of the backpage plus 200 mm (driven into the wall) minus 40 mm (protective layer).
We bind the knitting wire to the pins the working fittings with a diameter of 16 mm in a step of 200 mm.
We make 10 mm from the reinforcement of 10 mM P-shaped clamps in size of the beam frame (back position) 600x360x600 mm (the length of the workpiece is 1600 mm) and install them in a step of 200 mm.
Install formwork in size.
We put concrete (factory or cooked around) with vibration.
After grapping concrete (3 days), we remove the formwork and apply waterproofing.
We produce backstage of soil with tamping and spray.
Salt
Walls are littered inside the building. May be complete or partial (incomplete). In different degrees of deformation (light, medium, strong), one stop method is used.
Note. For repair, it will take welding work inside the room, which is most often associated with the overhaul of the entire building. Take care of fire safety.
Full chamber
Sign
Three and more walls are littered into the building (in varying degrees).
Cause
Weak armoomas, material wear, violation of technology during construction (weak solution, no reinforcement of angles, etc.).
Development method
Hard spacer self-supporting steel rope (frame) on the end-to-end mount.
What will take:
Perforator with a brown 18-20 mm.
Schwell 50x100-150 - length equal to the perimeter of the walls to be strengthened.
Steel plate 200x200x3-4 mm (up to 300x300).
Armature 16 - 3 Wall thicknesses for each mongon meter frame.
Good welding (voltage), coloring.
Operating procedure:
We determine the perimeter of walls to be strengthened. If necessary, we break through the technological holes (for channel) in partitions.
We divide each wall to steps close to 600-700 mm (but no more). From each angle retreat ½ step.
Drum through holes 18-20 mm.
The steel plates perpendicularly weld the reinforcement pins long, equal to the wall thickness plus 100 mm.
We establish the resulting anchor into the opening of the plate outward.
After trying on from the inside each channel, placing it under the holes.
We burn the welding of the hole in the chaserler under the reinforcement.
Strace the outer shelf of the serrated sheller (it will lay down to the wall).
Install the channel on the pins into the holes.
Write up pins in holes.
In the same way, we establish the continuation of the chavell.
When the entire perimeter is installed, weld the channel among themselves on the junction and make welded overlays from the reinforcement 16 - 2 on the joint with a fastener of 300 mm.
Enhance the angles in any way (for welding).
The ideal option for such a robbery is if it is then closed with a suspended ceiling. Then you can arrange diagonal thrust. If the suspension ceiling is not foreseen, the tire is closed by a box.
Attention! Plates outside and welded to them fittings, passing inside the wall - a strong bridge of cold and it will destroy the wall by condensate. Be sure to insulate the plates, and the whole wall is better.
Partial slant
Sign
One or two walls were littered.
Cause
Walls are located close to the animated roadway (with tram). Washed atmospheric waters.
Development method
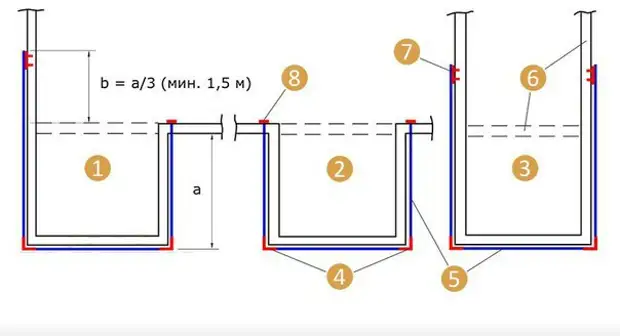
The device of partial closure according to the principle of solid. The part side of the interrupted angle is equal to one third of the length of the wedged wall, but not less than 1.5 meters.
With combined breakdowns / breaks (when the walls are diverted in different directions), the inner frame is used (first of all) and the outer screed (in the second place) together. In severe cases, all the enhancement options or a combination are used.
Department of extension
Consider the most difficult and at the same time the popular case is combined.
Sign
Through the inner corner or an extension joint with a major building with an average or strong outer wall collapse.
Cause
Lack of binding to the wall of the main building during the construction of an extension (in 90% of cases). Weak foundation under the walls of the extension. Overload an extension (superstructure, balcony).
Development method
Combination of through, semi-consuming or anchor cage and backrest:
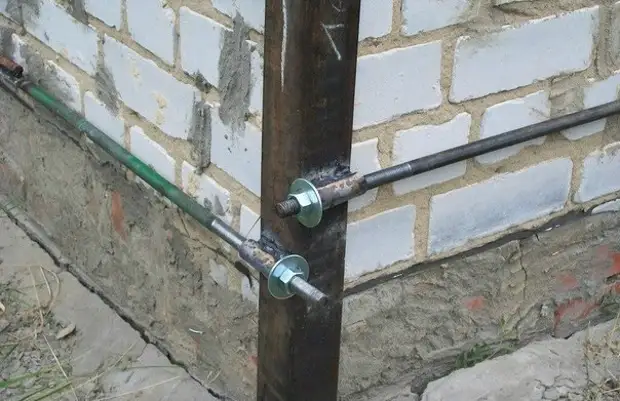
The through clip - thrust pass through the carrier wall and fix (nuts, welding) on a thrust tire or plate located on the inside of the wall.
A semi-slip court is one side of the type through, the second is fixed outside to the mortgage detail.
Anchor cage - thrust are fixed to mortgage parts arranged on anchors in the walls of the building.
You can arrange any of these types using the instructions above.
The rules of the device anchor tag:
The stubborn tire or plate, located inside the building, should not fall on the top of the doorway.
Mortgage parts in the walls are arranged at a distance of 1/3 of the length of the wall of the extension deflected from the joint of the walls, but not less than 1.5 meters. For meaning 3 points diameter from 12 mm, the depth 2/3 of the wall thickness.
With the number of anchor loads of more than 2 hours, with a breakdown in length in 1 meter.
The walls of the main building should not have deformations and cracks.
The sideboard can be both separate (under the outer wall) and along the entire length of the foundation of an extension. In this case, the armature is clogged into the foundation of the main building at an angle.
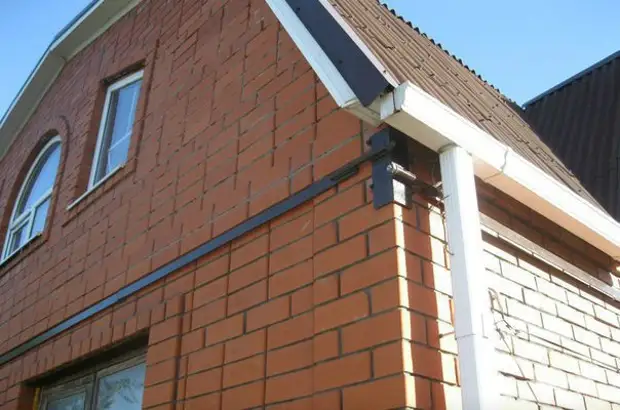
Most often, the species described above occur in houses from Mergel or brick, laid in clay. Even in the case of the initial stage of deformations (the appearance of small cracks), we recommend to apply the preventive screed of the house on the corner lobs. Remember that any metal passing through the wall into the room is the cold bridge and will negatively affect the wall of the wall, if it is not thermally insulated.
A source