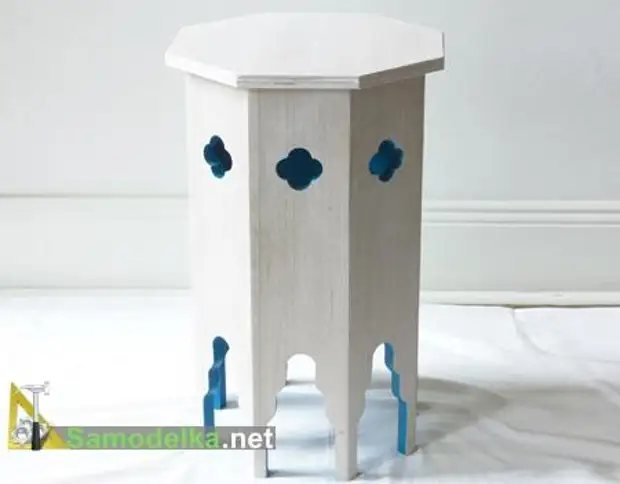
This table veneered oak tree with a height of 620 mm is made based on the style of Moroccan furniture.
As is known in the traditional Moroccan style, a simple design with bright color and decorative cutouts is used.
This style has become popular in the 1970s and is still widely used especially in fashionable boutiques as well as hotels.
You can take to work Conventional or moisture-resistant chipboard, organic or paneur. If you place a table outdoors on the terrace or in the garden, it is better to moisture-resistant. If there are no plywood, we yourself get natural wood on the blanks.
Here General scheme drawing of the Moroccan table with dimensions
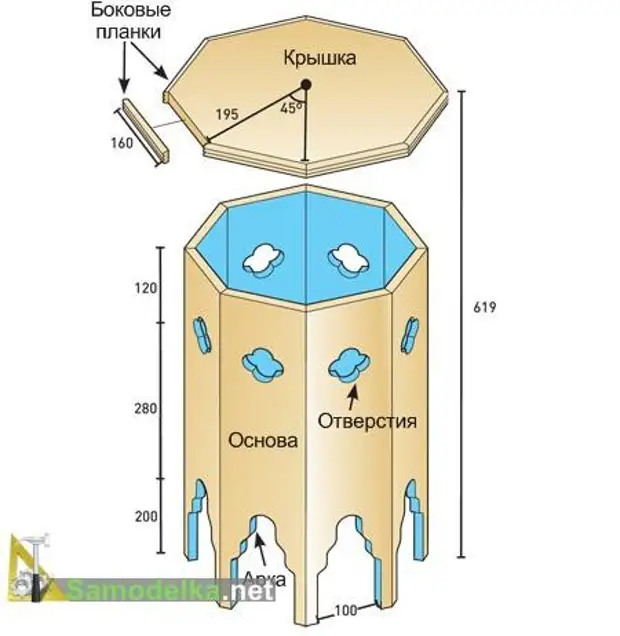
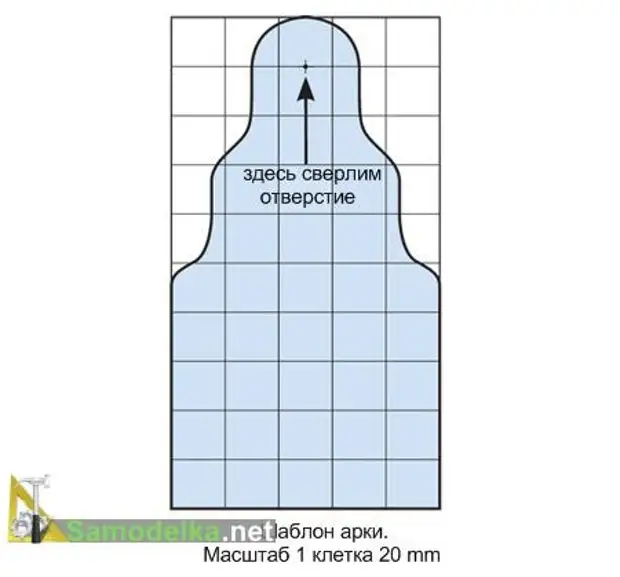
When working, we need two templates. The first for the manufacture of the arches is at the bottom of each basic panel.
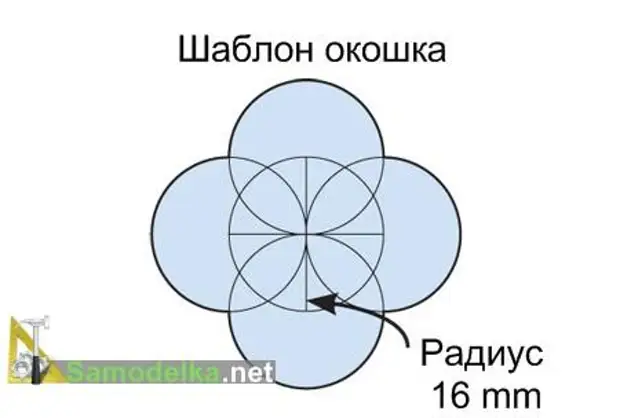
And the second for drinking the windows in the top of the walls.
From materials / tools will be needed:
PVA glue
Strapboard or Rake for Kant Cover
3.5 x 30 mm screws
Sand Paper with Grain 180
Acrylic paints
Pussy
Sticky paper painter tape
Drill and borants for 32mm and 38mm
Lobzik or Circular
Roulette and pencil
Compass
Clips
19 mm chipboard, organic or plywood for the foundation
Pine or oak for veneer
Manufacture
Remove chamfer from panels
In order to make an octagonal shape, the main panels are connected under 45 º for this, on each side, the chamfer from the edge under 22.5 º is removed. And for this you need a circular with an adjustable angle, or the jigscription with the ability to set the desired angle of inclination.
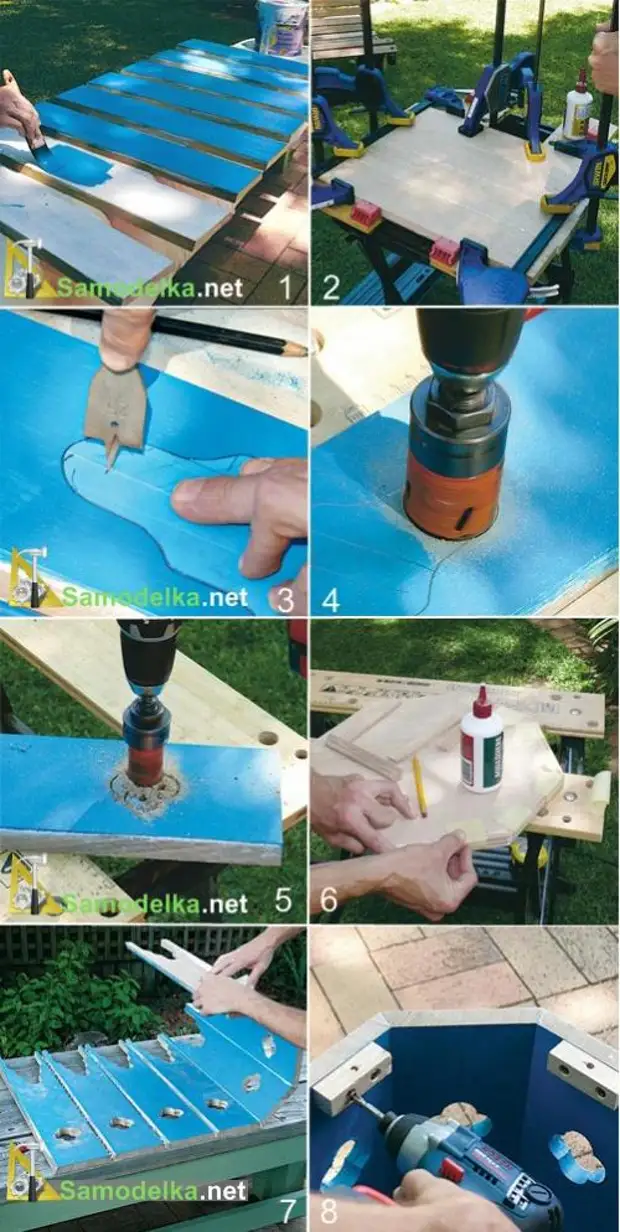
1. Pre-painting and preparation.
First you need to paint the base panels, if necessary, you can slightly walk with sandpaper. Paint - blue acrylic is applied in two layers (let it dry everyone) on the inner side of the panels, avoiding hitting the beveled edges.
2. glue veneer.
I turn over the workpiece upstairs not painted by the sides. Majm PVA and stick a veneer of natural wood. It is decorated and bringing the table to the "natural tree" is not a mandatory step when it works with plywood, and the chipboard can be primed and painted, so what is being done at will.
Veneer presses large clamps, excess glue erased to dry, under the panel on the grounds of the gaps put paper tapes to avoid sticking.
3. Place the arch.
To make the arches take the given pattern and translate it to the bottom of the panels. To the upper part of the arch was smooth, we use the drill to the blade by 19 mm by setting it to the correct point specified in the template.
4. Cut the Arc
We use the car to 38mm, cutting the hole at the top of the arch. After receiving the opening, the rest is cut by the jigsaw. The edges are whisch, soil and tint. Leave to dry.
5. Cut the windows
On each panel, retreat 120 mm from above, and draw a line, we find the center of it and then draw the circle with a radius of 16 mm and four more circles as shown on the second template. Then a 6 millimeter drill drill holes in the center of each circle and 32 brown begin to drill the windows. But, without reaching the end, you stop, turning the panel and chose on the other side, focusing on the holes. So we avoid chipping. The same technique needs to be applied and when cutting the arches.
6. We make a countertop.
We draw from the center of the workpiece eight lines at an angle of 45 degrees of a long 194 mm. We connect the ends and get an octagon.
Cut the octagon with a jigsaw or circular saw. If you need, we glue the cover with a veneer ...
Cut out from the stroke slices with angles of 22.5 ° at the ends, fit and glue the worktop in a circle. Leave to dry.
7. Collect the base of the table.
We take the base panels with unpainted sides outside, connect them with a sticky ribbon. On the other hand, with smear glue the bevelled edges, then we turn the blanks in the form of an octagon, we are tightening the ribbon in a circle and let dry. After drying the seams, we proceed with sandpaper.
8. Krepim countertop.
The countertop will be attached on spikes. (You can fasten it and on the screws from the inside through the fixed strips)
To do this, on the 4 panels (after one), the bars with a drill bit drilled by 6 mm drill holes for the spikes (or smaller diameter under the screws - not to split when twisting into the cover)
Tabletop put on glue, remnants wipe where we need to polish.
The table is ready - almost Moroccan!
A source
