
In this project, designer ideas were embodied by the works of Chorlzo Renny Makintosh. A wonderful view of the terracotta tiled roofs, which opens from the windows of the Florentine hotel, added picturesque strokes.


Rings for napkins in Bargello technique

Product Size: 5.3 x15.7 cm
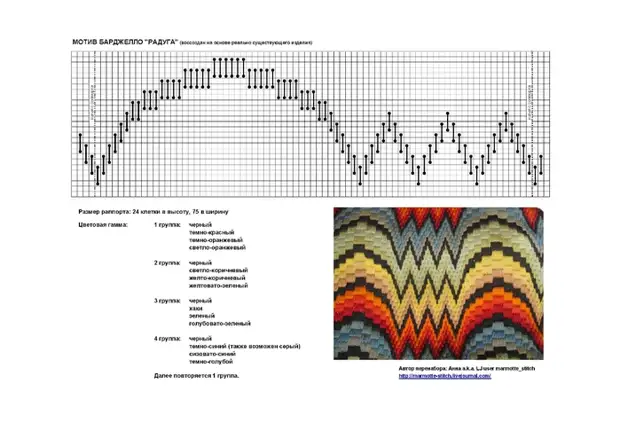
Pattern size 37 per 111 cells.
Tools and materials White Canva Zweigart №18, 20.3 x 10.2 cm for each ring for a napkin. It is better to perform patterns of both rings on one piece of canvas, leaving the distance between them sufficient to then cut the rings and fill their edges. To perform two rings, you will need a square piece of canvas of 20.3 x 20.3 cm; For six tracks - 20.3 * 45.7 cm. Lining fabric; Tapestry needle number 22; small stretch frame; sewing threads; Threads Cotton Threads Mulino Anchor 1 Motch each color: A: 341, 1045, 341, 1045, 361, 341, 1045, 361, 888, 886. Single cotton threads 1 Motch each color: A - Brown, in - Dark green Thread thickness Cotton threads Mulino Anchor: In 6 additions. Single cotton threads: in 2 addition
Completing of the work
- Attach the canvas but the frame.
- Mark the center of the canvas, measuring the distance from the corners.
- Find the middle of the rapport using the arrows in the diagram.
- Starting from the middle, perform the pattern in the transverse direction of the canvas, if necessary, smoothing the stitches with the tip of the nail, so that the stitches are smooth. Repeat rapport how much you need.
- Check out the availability of errors and the unforgettable ends of the threads and remove the embroidery from the frame. Small products do not need to stretch.
- Cut the canvas around each embroidered pattern, leaving 6 mm at the edges. For each ring, cut a piece of lining fabric of the same rimmer as embroidery.
- Fold the embroidery and lining the front sides inside. Sewing canvas and lining along the long edge, performing seams as close as possible to embroidery. The tip of the iron scream seam by making it flat.
- Sewing canvas and lining at short edges.
- Remove the product and swallow the seams by the iron by making them flat.
- Over the unprotected edge, wrap the carvings inside and take them carefully to the lining.

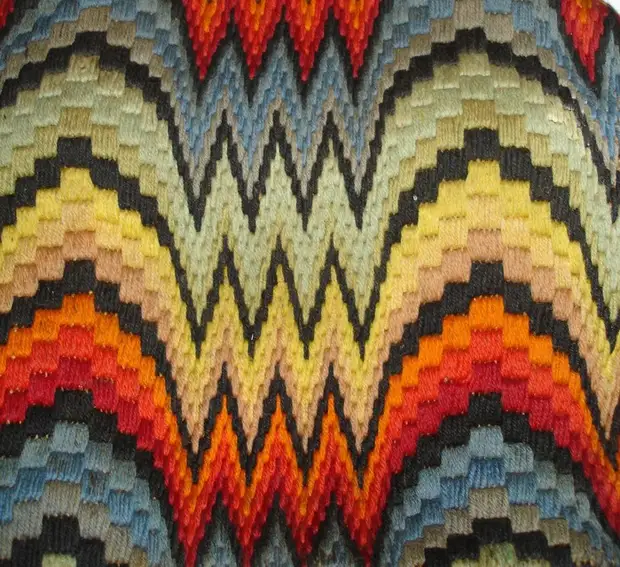
Pattern scheme for napkin №1

Ring number 1 for napkin

Pattern scheme for napkin №2

Ring number 2 for napkin
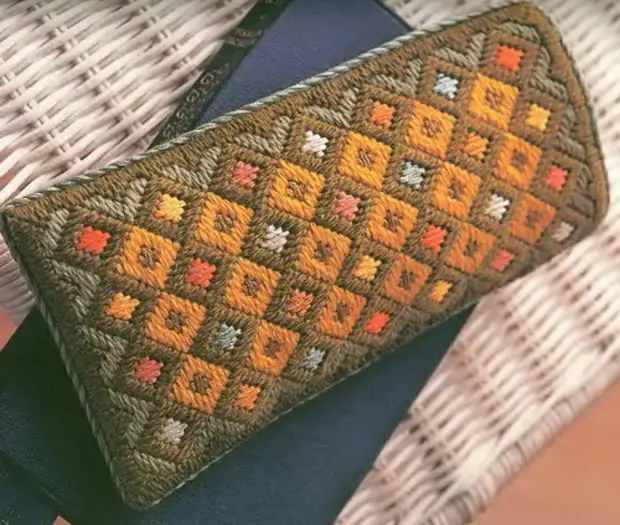
Case for glasses in Bargello technique
Product Size: 9.5 x 18 cm
Pattern size 56 x 1O6 cells
Tools and materials
- Canva Zweigort Antique NQ 15, two pieces of 18 x 25.5 cm
- Tapestry needle number 22
- 2 pieces of fabrics for lining
- Small stretch frame
- Cotton sewing threads
- Poterno woolen threads 1 Motch each color: 511 (gray-green), 701 (yellow-brown), 643 (khaki).
- Cotton threads Moulin Anchor 1 MOTKA: 853, 884, 307, 326, 859, 309, 227.
Thickness of the Night
Woolen threads PATERNA: in 2 additions
Cotton Threads Mulina Anchor: In 6 threads folded in half (provides a more dense coating of a product intended for frequent use).
Completing of the work
- Attach the canvas to the frame.
- Mark the center of the canvas, measuring the distance from the corners. Find the middle of the rapport using the small arrows in the scheme 1. From the middle of the pattern, perform an olive rhombus, then yellow, trying to embroider in accordance with the seams direction in the diagram.
- Perform olive rhombus, then hang light green corners. Fill the middle of yellow rhombuses 227.
- Starting from the upper left corner, fill in diagrams of rhombuses using the following sequence of colors: 853, 884. 307, 326, 859, 309.
- Follow the second part of the corresponding size.
- Check the operation for errors and the unforgettable ends of the threads, then remove the embroidery from the frame. Small products do not need to stretch. Cut the surplus of the canvas, leaving the allowance of 1.25 cm, and wrap them down two long sides and one short.
- Scissors Soot the angles under 45 °, leaving the allowance of 1.25 cm. Connect the two parts with the withdrawal sides and sew the seam of the semi-fold on two long sides and one short. Leave another short side unimposed and wrap the excessions inside.
- Cut two pieces of lining tissue 11.5 x 20.3 cm. Sustain the same as the embroidery, but the front sides inside. Cut the seams, leaving the allowance of 1.25 cm. Wrap the unpripted edge on the wrong side, but 1.25 cm
- Insert the lining in the pocket of the embroidered canvas and take from one side to another, leaving a small hole. Cut three threads 859 for 2 m long.
- Insert one end of the cord from above into the hole between the lining and embroidery and the trick of the thread of 859 cord along two long sides and one short, fixing the end of the thread at the top corner by the knot.
- Cut the cord surplus, fill the second end into the hole between the embroidery and lining and squeeze the hole.

Scheme of case
Stackers under cups are decorated with traditional Bargello patterns. For each, a special color scheme and a rapport, which was repeated 4 times, turning it, but 90 ° to get an ornament that resembles a children's kaleidoscope. This idea can be used to decorate a sofa pillow, increasing the rapport or repeating one motive until the entire surface of the canvas is filled.

Stacked stands with their own hands
Pattern size: 8.6 * 8.6 cm
Pattern size: 62 x 62 cells
Tools and materials
- White Canva Zweigart NQ18, 30.5 x 30.5 cm
- 4 Ready Transparent Stackers
- Tapestry needle number 24
- Stretch frame
- 8 square cardboard cards of medium thickness, 8.6 x 8.6 cm
- Sewing threads or bilateral scotch
Thicks
- Cotton threads Muline
- Anchor
Thread Thickness: Cotton Threads Moulin Anchor - in 4 additions.
Completing of the work
Attach the conve to the frame. Mark the center by spending two lines at right angles. Mark the center of the center on each received square. Find the middle of each rapport using small arrows in the diagram. Pattern each square. We suggested 4 different color gammas, but you can embroider all patterns in one gamma.
Check the robot but the presence of errors and the unlike the ends of the threads and remove the embroidery from the frame. Small products do not need to stretch.
Cut the embroidery by the marked lines to divide it by 4 squares, and cut the excess canvas, retreating from the edges of each pattern of 1.25 cm.
Take 4 cardboard cards, if you need to cut them along the form of supports (so that the edges of the canvas with the embroidery are flexing for the edges of the cardboard), and let the canvas with embroidery on the back side of the cards. Or glue bilateral scotch strips along the edges of cardboard cards. Remove the protective paper from the scotch and turn the edges of the canvas by sticking them to the tape. Spread well. Skash the corners under 45 degrees to reduce the layers of fabric.
Put every card with an embroidery face down. Take the remaining 4 corton cards, if necessary, cut them on them to fit tightly to the stand to the stand, put on top of the inserted work and cover it with a transparent base of the stand.
The following are Bargello schemes.

Scheme 1. Supply under a glass in Bargello Technique №1

Fig. 1 Stand for a glass in Technique Bargello №1

Scheme 2. Supply under a glass in Bargello technique №2

Fig. 2 Stand under the glass in Technique Bargello №2

Scheme 3. Supply under the glass in Technique Bargello №3

Fig. 3 Stand under the glass in Technique Bargello №3

Scheme 4. Supply under a glass in Bargello Technique №4

Fig. 4 Stand under the glass in Technique Bargello №4