
One of the good advantages speaking in favor of installing sliding interroom doors is their fast and relatively simple installation - the whole thing in the absence of loops, complex in assembling the door frame and no less troublesome installation. In general, if you understand the sliding doors thoroughly, you can identify a lot of advantages thanks to which they are preferred. In this article, together with the dVeridoma.Net site, we will deal with the question, how to make sliding doors with your own hands and tell about how easy it is and just old swing systems are converted into more comfortable sliding.
How to make sliding doors do it yourself: 5 steps
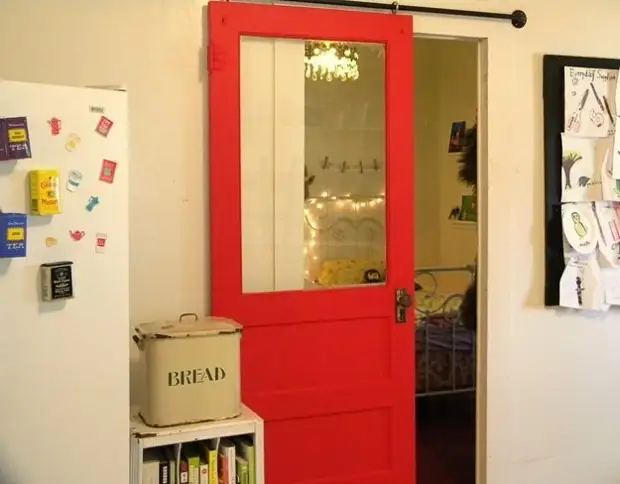
Sliding doors or partitions, agree, a very practical solution for many parameters, both for small and large apartments.
Zoning space, savings area, the ability to arrange furniture in a certain way - this is one of the main advantages that should be mentioned. However, for the majority, all the advantages come to not when it comes directly about the cost.
We will try to refute the opinion that the sliding doors are too consistent, and we suggest you to make them yourself.

For work you will need:
- Door canvas without fittings,
- wheels
- Metal cornice (remember the length of the eaves - it should be at least twice the door itself),
- Metal loops,
- paint,
- nails, screws,
- drill.
Step 1: We process the door leaf, grind, paint in your preferred color.

Step 2: Using screws, screw the wheels to the bottom of the door in two places.

Step 3: We screw the metal loops on top, which should be free to slide freely in the perspective.


Sliding doors do it yourself: go shopping
Before you go to the store for everything you need for the manufacture of a sliding interior door with your own hands, you need to take a roulette and make some measurements. In particular, it will be needed to know the width and height of the existing doorway - the height is usually standard and is 2000mm, and the width can be 600, 700 or 800mm. Knowing these sizes, you can already acquire everything you need. And if you can be specific, then you will need to buy the following.
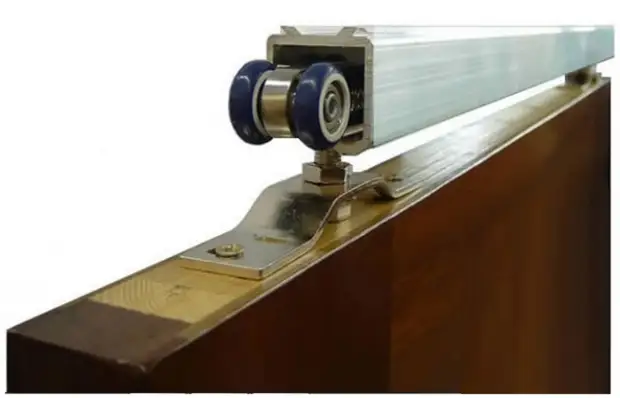
- The most important node, without which the work of such doors is impossible is a sliding mechanism. In principle, if you specify the width of your canvas to the seller, it will select you the necessary mechanism, but for general development it is necessary to know that its length should be larger than the doors cannon twice. You can purchase a mechanism a little longer - if necessary, it is easily clipped.
- Fittings for sliding interroom doors are handles and a special design castle if there is a need.

Accessories for sliding interroom doors photo
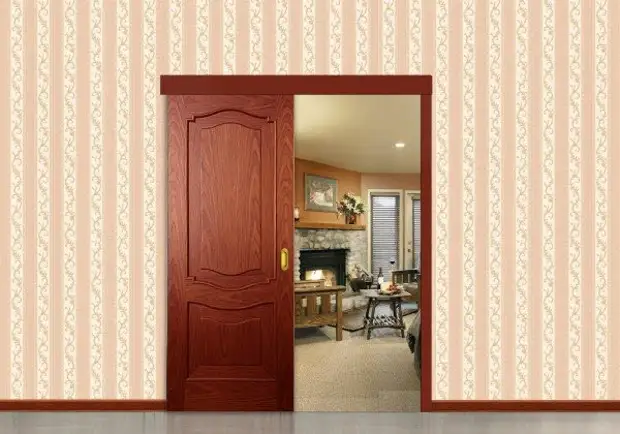
In principle, this is already enough to redo the old swing door into the sliding door. But, as they say, everything should be done thoroughly and dwells at all not necessarily. You should also think about a new door frame (they will need a rail, the width of which corresponds to the thickness of the simpleness in the doorway - it is necessary 5m), platbands, a bar closing the sliding system for doors and a thrust rail, if it is being conducted on the sliding interior door closing . And, of course, a new door canvas is useful - only in this case you can make a beautiful doorway.
You can choose and purchase everything you need in the market and in large building stores. The price of the question is not so big - at least less than the cost of similar swing doors.
How to make sliding doors: Cooking the canvas
To prepare the door leaf of the sliding door, it will be necessary either a manual milling and a Bulgarian with a drill, hammer and chisel. What you will work, choose, of course, to you, but from myself I will add that by means of a manual milling, all works are performed more accurate, and most importantly careful. If you represent the process of preparing the cloth to the installation of sliding doors on items, it will look like this.
- As a workout on the bottom end of the door canvase, strictly in the center, you need to cut the groove of 3mm wide - it is necessary for the operation of the lower guide, which simultaneously serves as an emphasis and does not allow the web in the process of working back and forth. It is best to do this with a manual millingrer, but this work can be performed with a grinder, equipping it with a circle of wood with a small tooth.
- Now print down the sliding mechanism and find a couple of rollers and brackets. First we connect rollers with brackets - for this, there are holes on the latter, in which the first are fastened by two nuts and washers. Now we take the resulting nodes and put them to the upper end of the door canvase and supply their contours, after which they choose the grooves depth, which is equal to the thickness of the metal bracket. And then with a screwdriver and screws, screw the rollers to the canvas. In principle, you can do without cutting brackets into the end of the canvas - if you are simply screwed to the end, then the appearance of the doors will suffer less than if you cut into the grooves, especially if these works are carried out by the hammer and the chisels.
- Now you need to install the lock.
- Finally, you will need to install special handles for sliding doors - they will also have to cut either two grooves on both sides of the canvas, or one oblong through hole. With the latter it will be easier - a small pass-through hole in the canvas in the canvas, insert the electrical jigsel linen into it and cut the seat in accordance with the pre-designated circuit.
With the cloth completed, now we go to the sliding mechanism and installation of sliding doors.
Installation of doors: Installation of the sliding mechanism and connecting it to the door of the door
The sliding mechanism is set simply enough - everything that needs here is to fix the guide profile according to the level of the horizon and the location of the doorway. Here you can allocate a couple of nuances.
- The edge of the guide should perform on one side of the opening by 50mm. On the other hand, the opening (with the one in which the canvas will be opened) The profile must go into exactly the width of the canvas. This moment must be calculated and cut the door guide if necessary.
- The height of the installation of the sliding mechanism - the calculations also need calculations. This installation size folds out of the two components - this is the height of the door leaf along with the rollers inclusive and the clearance under the doorway, which is 10-20mm (depending on the curvature of the floor).
- Installation itself, or rather the distance of the guide from the wall. Here, it all depends on the curvature of the walls - if they are smooth, then the guide without any additions is attached directly to the wall through the holes in advance. If the wall is a curve, then it may take to push the guide from it for a while - in this case, a wooden rail is attached to the wall first, and then the guide is fixed on it.
You can see the process of installing the sliding door clearly in this video.
The door canvas is installed on the guide quite simply - the rollers are started at its side. After the door takes the necessary position, it will be necessary to attach the stop to the floor, which we selected a long groove from the bottom of the door leaf. Open the door to the maximum so that they do not fly out, inside the guide self-tapping screw at the metal, first fasten the rubber pillow, which is a limiter, and then in the lower groove of the canvas, we turn half the stop and fasten it to the floor of a dowel on one side. Now we move the web in the direction of the closing, choose its right position and again fastened the upper limit of the stroke of the web, and then finally fix the outdoor stop by two more dowels.

Installing sliding doors scheme
In conclusion, I will say a few words about the design of the right side - without this stage of work, the installation of sliding interior doors will be incomplete. From the rail 10-20mm thick and the width corresponding to the thickness of the simpleness, a certain similarity of the door frame is twisted, which is mounted in the opening using the mounting foam. When a polyurethane sealant dry out, platbands are installed on both sides of the box. If you plan to install the door with a lock, then instead of one of the platbands, a stubborn timber is put with a groove for the web. In the same stubborn bar, the response part of the castle is mounted.
That's all. It remains to add only that the opening itself can be issued in different ways, and the wooden rail is not a panacea. For example, it looks quite well in this place laminate (it is also mounted on the foam), and the harmoniously selected natural stone or ordinary tile looks quite well. In general, thinking here is above what, and the choice of materials for the design of the opening depends solely on your preferences.
A source