
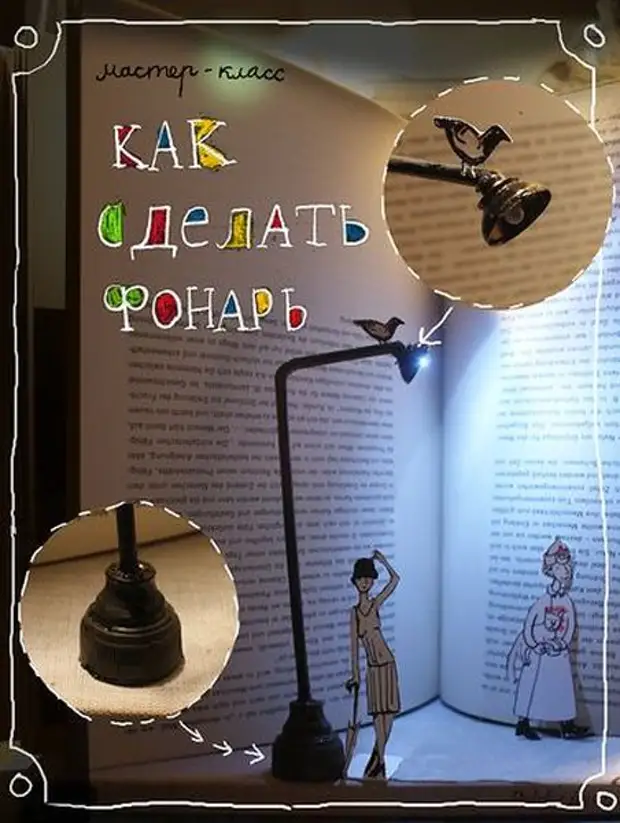
The girl told how his own hands you can make a miniature street lamp. But, accordingly, what he would shine ...
I want to tell about how I did lamps for illustrations to the book of Mandelstam "Two trams." There they are a little different, but made according to the same principle. Since the book is going on at night, I needed a lot of lamps, which would cover the city for which trams ride. They had to be on the one hand to be like street lights, and on the other hand, they also shine, that is, it was necessary to hide the wires somewhere. I thought for a long time, how to arrange it, until once it came to my head - a cocktail tube! It simply fits: inside you can hide the wires from the light bulb, and its bending is already very "lamppar".

So, start with the fact that cut two pieces of the wire of centimeters to 7 longer tubes and a knife to clean their tips: cut the plastic layer.

You will have two wires, which at both ends the metal part sticks out:

Further you need to attach these wiring to the LED. If you know how to solder - first, I envy you, and secondly - just solder them. If you, like me, do not know how to solder, then you have two exits. The first is to ask someone to solder someone :) For example, about my house there is a "radio metal" store, there is a pretty gentleman chinit TVs and tape recorders, and between this 100 rubles solder the wiring to the light bulbs.

Well, if this is all impossible for some reason, you can do differently. This method is less durable, but what to do. We are conferring the SWITT code and pliers gently regenerate the wires at the ends, so that it turns out a loop:

Here is such a looting:

Then impose the extended end of the wire in the loop:

And tighten as it follows. Do the same with the second wire.

Then cut a small piece of tape:

And clog the locations of the wires and LEDs:

Next, consider carefully your collection of beads and buttons and select in it, from which you can make a flashlight laying:

I chose a large metal button with a lion's muzzle, consisting of two parts and some small metal piece with a hole.

Pliers, I rented a button in the button, where two parts were connected:

And when to the end rented, disconnected:

As a result, I got here such a basis for a ceiling:

With the help of sewed and hammer I made a hole:

Then I inserted a light bulb into the ceiling, and the ceiling in a small metal thing. This thing is needed so that the location of the lamp and the ceiling is careful. Then I glued them with super-glue.

It is clear that, depending on what buttons you have, the method of manufacturing a ceiling can vary. When you did it, insert the wires sticking out of the ceiling, into the tube:

Glue the tube and a super-glue chill or a glue gun.

Then take a bottle cap and cut it all unnecessary: transparent cap:

Details in the hole:

And also cut two holes for wires inside:

There must be such a "knot":

And insert the tube into the lid hole so that the tube reached the first "gate". Stick it with a glue gun. Important! Do not warm up the gun too much, and then the tube is melted. Start glue as soon as it warms up, do not wait. If you do not have a pistol, I think, you can bore it with a palstika or make a lot of napkins and PVA, but, of course, it is longer and vigorous.

And then with the "Pokilip" glue, glue the coins (2-3 pieces) inside the lid. It is necessary so that the bottom of the lantern is heavy and he did not fall. Wires must go to the holes cutting for them.

Actually, the lantern is ready, it remains only to paint.

Strong it with brown paint - it will be beautifully shone through black.

Then swipe the light bulb with paper scotch and paint the lantern of aerosol paint.

It remains to connect electricity. Take the housing for the batteries and switch and or solder the wire, or if you do not know how to solder, insert the wire into a special "ear" on the switch and tighten it.

Just do with one wire from the lantern:

And connect the remaining lamp wire and the battery pack. Please note: the LED is important where plus, and where is minus - so if you are all connected, and the light does not ignite - change the lantern wires.

That's all! Lantern ready!

A source