
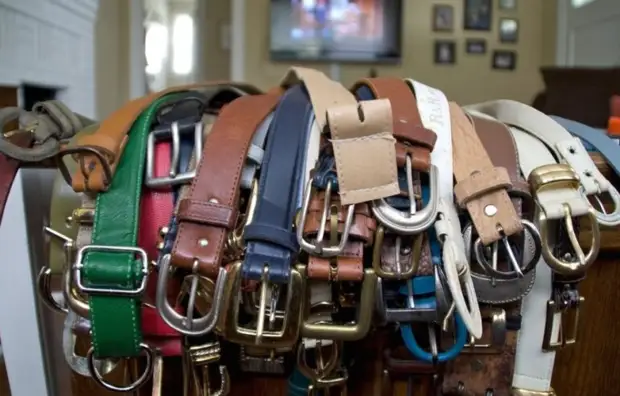
People love to use leather belts, as they are distinguished by beauty and durability. But old belts should not be thrown out or give away to the poor, as they can be used to create creative furniture for home.
What will need to have in order to create creative furniture from the belts?
Of course, it is almost impossible to create a closet or bedside table. But there is an opportunity to create a seat for many types of furniture with them. It may be a chair, and a stool, and a chair, and even you can make a soft and comfortable seat for the sofa, if there is a desired number of old belts in the house.
In our case, it would be preferable to use belts to create a comfortable chair. In this case, you can take either the old armchair without seating, or simply remove the scorched unreliable seat and replace it on the belt.
It is also worth noting that there are many disputes on the Internet about how it is worth securing belts when it comes to creating a reliable seating. But in our case, it is best to use the simplest, which means that the most reliable fastening.
To create an armchair using belts you will need:
- Several leather belts.
- Plywood.
- Hand saw.
- Pencil with a ruler.
- Screwdriver with screws.
- PVC glue.
It seems to be the process of creating a chair can take an extreme time, so you can recommend using the old chair or chair, which, as it were, to throw out, but your hands do not reach. Replacing the seat on the belt, and paints the old chair in white or yellow, you can upgrade the furniture by making it more modern.
The process of creating a comfortable chair using belts
The process itself can be divided into two stages:
- Creating a chair;
- Creation of seat belts;
But you should not be afraid to create furniture at home, since the furniture will be created from plywood, which is characterized by high strength properties and is quite easily processed.
First you need to cut all the elements of the chairs from plywood for seating, legs and a back. With the back is the easiest way, since in this case you can cut out of the plywood sheet is simply square or with a piece patterns, which then attaches to the base of the stool. It will be harder to cut the legs for the chair and the foundation to which the seat will be attached. In this case, you will have to literally glue all parts of the chair, increasing the layer behind the layer to create all the elements of the chair full and durable.
On the example of creating a base for a chair, you can specify the right direction to create all elements of the chair.
To begin with, it is worth cut pieces twelve pieces of plywood sheets of the same length.
Important! The use of PVC glue will help a noticeable way to simplify the gluing process of all elements of the chair!
PVC glue will perfectly take and gluits a reliably all the details of the base of the chair. Each part of plywood must be lubricated with PVC glue and press another. Each part of the base of the chair should consist of at least three layers of plywood for consumer strength. When gluing the parts of the chair costs all the glued elements to put under load.
According to such a scheme, it is worth creating and legs of the chair, gluing pieces of plywood, and a back, gluing at least two plywood sheets. It is necessary to fasten the part of the chair with the help of screws when all parts of the chair are dried.
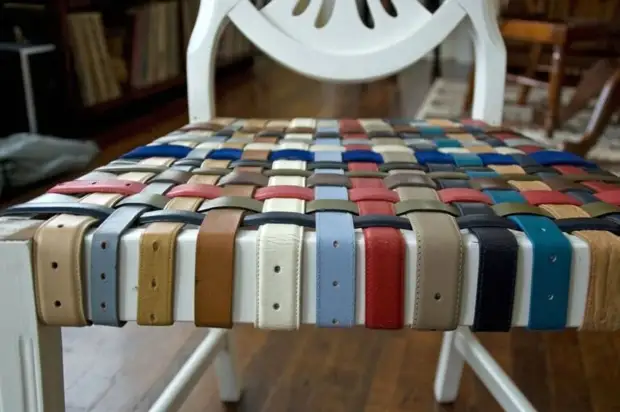
At the end, you need to bind the straps to the base of the chair in such a way that the attachment nodes are not visible outside. It is advisable to use for at least four vertical vertical seat seats and as much horizontally so that the seat is really durable. The presence of vertical and horizontal strips is sure, otherwise the seat will be unreliable.
But at the end you can enjoy the works of your hands, the most beautiful creative chair, which will impress anyone with his beauty and creativity!