
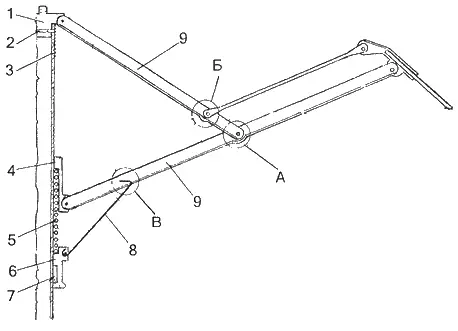
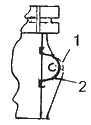
Usually, many emit umbrellas due to insignificant breakdowns, which actually be easy to eliminate even in a considerable craftsman. Basically, thrust are broken at the place of their hinge compound carried out using the axis. It is often happening with a large burden in the node "A" (Fig. 1), since this thrust in the expanded umbrella carries the main load, and even a small lateral pressure on it leads to a breakdown of thrust, resulting in a power springs compression hook.
Getting Started to repair traction, first of all, it should be removed the voltage in the elements of the umbrella framework, created by the power spring. For which the upper end of the umbrella be rests in any surface, for example, on the door, and the still of fixation of the umbrella in folded form compress the power spring so that it is possible to freely knock off all the hooks that hold the spring in the compressed state. Freeing the hooks, it is impossible to weaken the compression of the spring, otherwise there is a breakdown of other thrust.

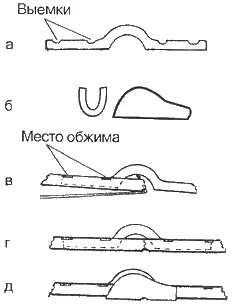
To repair the broken thrust will have to make a connecting overlay. To do this, cut out of 0.2 ... 0.3-millimeter tinnaya tin plate with a size of 45 × 13 mm (the width is delivered, because it is not always possible to symmetrically bend the plate exactly along the longitudinal axis), turn the plate in the "brother" to turn The latter was tightly put on the repaired craving, give the lining the desired form (Fig. 2, a).
The broken and whole thrust is released from the fabric if the first is deformed - it is straightened. Sections of the connected ends of the thrust that will be located under the lining, it is necessary to launch with an excess. If the axis on the attached (whole) traction does not have defects, the traction with the axis is installed in place, as shown in Fig. 2, B, the axis on both sides stick to the soldering, install the connecting overlay (Fig. 2, B). Fixing in the desired position, the end of the thrust and the lining with the help of the squeezing clamp, the lining is soldered to the thrust without disturbing the axis solders. Tightly insert into the lining the other half of the thrust (Fig. 2, d), after which the thrust is fixed and the lining along its entire length is missing. The connection site leads to the proper form, checking the performance of the hinge compound.
If the axis on the attached thrust is strongly bent and has any other defect, it is removed, the hole is drilled in the hole with a diameter of 1.5 mm, which coincides with the hole on the reacted thrust, insert the wire to the hole, which will perform the role of the axis. Next, they carry out the same operations on the connection of the thrust that were described above. It remains to remove the wire, make the axis of the desired length from it and connect the axis of the thrust. So that the axis does not fall out of the thrust and did not cling to the fabric, it is soldered to the lining on both sides (Fig. 2, e). Fastening tissue to traction restore. If there is easy access to the site of the soldering of thrust, the fabric from the frame is better not to be disconnected, but in order to avoid getting on the fabric hot droplets of tin it is necessary to put the gasket between the cloth and the platform site. The breakdown is similarly eliminated and in the B node (see Fig. 1).
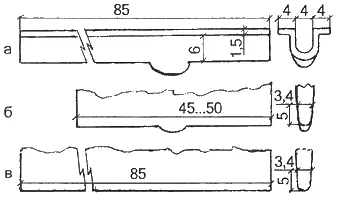
Umbrellas, in which the frame elements are made of thicker steel (in this case, the thrust have narrow sidewalls), broken thrust in nodes A, B and B are connected using plug-in eases, which crimp the sidewalls of traction. In such umbrellas, the breakdown of the traction is most often happening in the node in (see Fig. 1), since in this place the strength of the thrust is weakened by a hole intended for the hook of the power springs compression. For the repair of such thrust from the durable steel wire, the insertion is wound up, the form of which is shown in Fig. 3, a. The wire is selected by such a diameter so that the insert is tightly consisted between the sidewalls of the thrust. The length of the entire insert is approximately 45 ... 50 mm. The main requirement for insertion so that when installing it in place the hook hook is freely moving in the resulting cavity, and the insert itself did not interfere with the compactly fold the umbrella. To enhance the strength of the thrust at the location of the breakdown, you still need to be tinted with a thickness of 0.2 ... 0.3 mm to make a lining (Fig. 3, b). Having made fasteners, it remains the broken traction to straighten, get the finished connecting insert to enter the thin layer of tin, insert a traction close to the handle so that the highest point of the exhaust part of the insert is located above the end of the hook hook (Fig. 3, B), and enclose the end of the insertion Sideways traction. Further, on the free end of the insertion, there is a second part of the thrust, crimp the traction around the insert and disappear the last over the entire length. To increase the reliability of the connection to the repaired place, the lining is worn, the hole is pre-drilled in it with a diameter of 1.2 mm, which coincides with the hole on the regeneration and solder the lining to the thrust.
There are cases when after repairing the umbrellas of this type is not fully folded. One of the reasons for this is the displacement of the inserts of the ears in the repaired nodes (especially in the node A), usually arising from the side-quality crimping by their sidewalls. To eliminate such a defect, you will have to shift a small hammer on a speech of the traction of the part of the ears to move the ear in the right place and again firmly enhanced insertion of the sidewalls. Please note that the inserts of the ears for a more reliable connection with the rods are made (see Fig. 3, a).
In fact, broken traction is repaired only in the absence of whole thrust from any other not subject to repair similar in the construction of an umbrella. Separate the desired craving from the skeleton of the umbrella will not be difficult. It is enough to cut off with a knife of the rolling of axes on a suitable thrust and disconnect it from other traction and nodes. And the axis for the "new" thrust is easy to do from the wire (or carnation) of the desired diameter, without forgetting to solder the ends of the axis to the sidewalls of the thrust.
In umbrellas with an elongated power spring, along with the above, the breakdowns are often cracking the power spring sleeve. I note that all the outstanding sleeves with whom I dealt with, repair was not subject to, so they had to use suitable sleeves from umbrellas of other structures. You can install a new sleeve both through the top and through the bottom of the umbrella rod. You only need to determine which hairpin it is easier to knock out: or the stud, locking the handle, or the stud, holding the upper attachment knot. First of all, of course, you need to free the thrust from the broken sleeve and remove the latter. Installing the sleeve through the top of the rod is produced in the following sequence: shift down the depreciation spring (see Fig. 1), knock out the stud from the upper attachment assembly, remove this node and put a new sleeve. Assembly umbrella, it is clear, produced in reverse order.
All of the above repair work is performed when the power spring compression hooks shot. At the end of the repair, they check the presence of these hooks, they make the missing number in the form of existing ones, install the umbrella fixation bushing in the folded form so that the cavity (slot) of the hook on it is on the same line with the protrusion of the fixture, engage for the hooks sleeve, squeeze the power spring and Cut the hooks into the holes of the thrust.
Revealing and folding the umbrella, check the correctness of its repair and assembly.
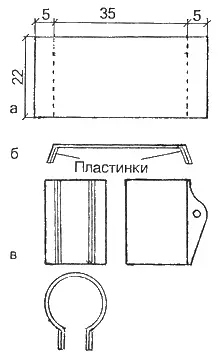
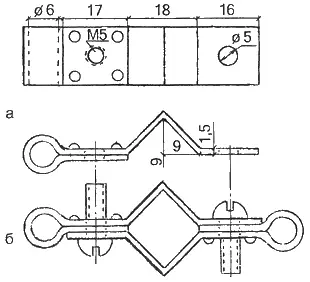
In the umbrellas with manual disclosure, especially with a three-step rod, in the mechanism that locks the umbrella in the disclosed form, often due to excessive voltage breaks down, in which the axis of the fixer is installed (in Fig. 4 Place of breakdown is shaded). If it is impossible to replace the failed mechanism, it can be repaired by making a clamp of 0.2 ... 0,3-millimeter tinned tin. It is clear, the dimensions of the harvesting for the clamp depend on the size of the sleeve of the mechanism. In fig. 5, and I brought the size of the harvesting of the clamp for the fixation mechanism in the disclosed form of your umbrella, where the size of 35 mm is the distance on the billet from the ear to the ears, measured by the external diameter of the sleeve. Similarly, the sizes of billets of clamps and other mechanisms are determined. The edges of the workpiece bend (by dotted lines) and, applying the edges to the ears of the mechanism, are transferred to the edges of the contours of the ears and accurately mark the opening of the opening axis. "Excess" plots on the bend remove. To increase the strength of the bodies of the clamp, it is better to roll to them cut along their size and shape of the plate (Fig. 5, b), without forgetting to drill in the holes of the hole. It remains the workpiece, not allowing the skew, to go around the tube (rod), the diameter of which corresponds to the diameter of the locking mechanism of the fixation mechanism, put the clamp in the place, that is, to the sleeve, eliminate the inaccuracies, pick up instead of the screw with a nut with a nut, collect the mechanism. The drawing of the finished clamp is shown in Fig. 5, c.

You can repair the mechanism and in another way. It is a little simpler and the repair spends less time, but the ears are less durable. In this case, they take a small plywood (or rail) with a thickness of about 5 mm and insert it into the slot of the fixation mechanism between broken ears. By the remaining part, the ear of the plywood is noted and drilled with the hole for the axis, is inserted into the hole of the appropriate diameter of the appropriate diameter, they are installed on the axis in the slots, from the debris of the ears or other suitable material to the body of the mechanism or glue the missing parts of the ears. Next of the tin (stainless steel, copper, brass), two strips of a half of the thickness of the ears are cut off, bend them with half a moth. Putting one half-breeding on the eye, as shown in Fig. 6, heated by a semi-hammer soldering iron, gradually pressing it in the eye. The second half-breeding is also pressed into another UCHO. It remains to remove the carnation-axis, remove the plywood, the ears to handle, after which collect the mechanism. Do not forget to check the quality of welding for strength. (For those who did not engage in welding parts from plastic, I inform that such work is performed in a well ventilated room.)
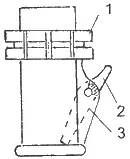
Children's umbrellas with automatic disclosure it happens that it stops returning to the original position of the ledge of a hooking at the retainer holding an umbrella in folded form. This is due to the fact that the lock is made of poor-quality metal, and simply under load bend. Eliminate such a malfunction can be quickly. For what will have to click on the locking protrusion (Fig. 7), move the ledge toward the handle, pull the lock from the rod tube, adjust the retainer at the point of bend, then insert the retainer into place. True, after a while the retainer will again lose the form, so it is better to immediately replace it with a new retainer from high-quality steel. If this does not exist, the lock is not difficult to make the elastic metal itself.
For those who decide to do Umbrella repair , I recommend to make the devices shown in Fig. 8 and 9. Although they are primitive, but much simplifies the repair process. So for molding overlays (see Fig. 2, a) will have to make a simple stamp. The strap matrix (Fig. 8, a) fuses from sheet steel with a thickness of 1.5 mm. In the center of the bottom of the "KORITCA" form a beard or other suitable recess tool. Punson (Fig. 8, b), which has in the center of the protrusion, made from the strips of 3 ... 4 mm thick. When forming a laying plate with a size of 45 ... 50 × 13 mm, it is put on the matrix so that under the center of the plate there was a deepening, the punches are instructed on top and beat the hammer on it. Everything. The cover is ready, it remains only to earn it a bit. By the way, the matrix described above will come in handy and for editors, but Puntson will have to make a new (Fig. 8, c). The deformed thrust is placed in the deepening of the matrix, after which they straighten with Punson.
It is still necessary to make fixtures for compressing the power springs (Fig. 9). The principle of operation of this adaptation is similar to the principle of action of a simple screw press. Here, two crossings "walk" two guides (Fig. 10), one of which performs the role of the base, and the second is the role of the slider, which can be moved, wrapping or turning the lambs on the guides where the thread M6 is cut. Each crossing consists of two halves (Fig. 10, a).

Tell a little a little, how to squeeze the spring with this device. First, for each pin (guide), two halves of the jumpers are put on and screwed along the lamb. Full assembly of fixtures are produced directly on the umbrella. The screws connect the halves, with the result that the resulting jumpers wrap the rod of the umbrella handle. Now the device is ready for springs compression. Just need to spin the lamb. This simplifies the process of removal and installation of crochets of the springs compression described at the beginning of the text.
A little about the fabric. The broken ends of the thrust tend the tissue of the umbrella. Small holes can be sealed with the same cloth using BF-6 glue, which is sold in pharmacies, but it's easier to join, how my friends do, a transparent self-adhesive film on a damaged place.
a source