
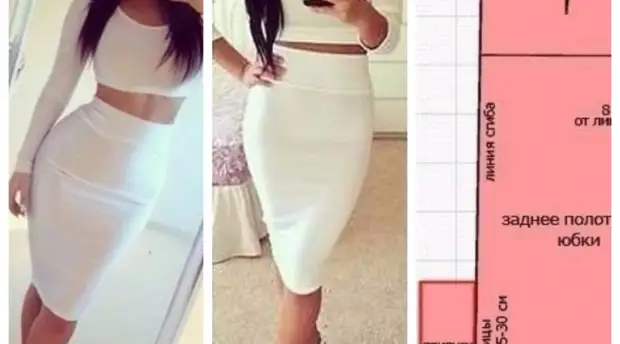
It is not more difficult to sewing a conventional direct skirt, especially since the pattern of the skirt-pencil is based on the basis of the base pattern of a straight skirt. Pencil skirt without side seams, stitched on the figure - pattern and job description below.


With the light hand of the brilliant Christian Diora in the 40s of the last century, the pencil skirt appeared in the wardrobe of fashionista, becoming the same icing thing as shoes and the legendary little black dress in an inimitable Coco.
Today, this universal style is popular than ever, so if in your wardrobe it is still missing, it's time to go to a boutique or atelier.
And maybe try to do on your own?
Step One: Pattern Direct Dual Dual Skirt
To build a pattern of a classic pencil skirt, first of all, we will construct the pattern of a regular straight duplex skirt.
To do this, we need the following measurements and tags:
Pot - Merka Falubbhata Waist;
CIS - Mereka of the thigh semi-coupling;
DS - Skirt length from behind;
DP - skirt length in front of the middle line;
Du - skirt length from the waist line on the side;
DST - the length of the back to the waist line.
Do not forget about freight for free felting:
PB (Poster on the thighs) = 2 cm;
PT (Poster on the waist line) = 1 cm.
Stages of constructing a seamless direct skirt pattern
Basic-Skirt-487 × 637-Custom (487 × 637, 53KB)
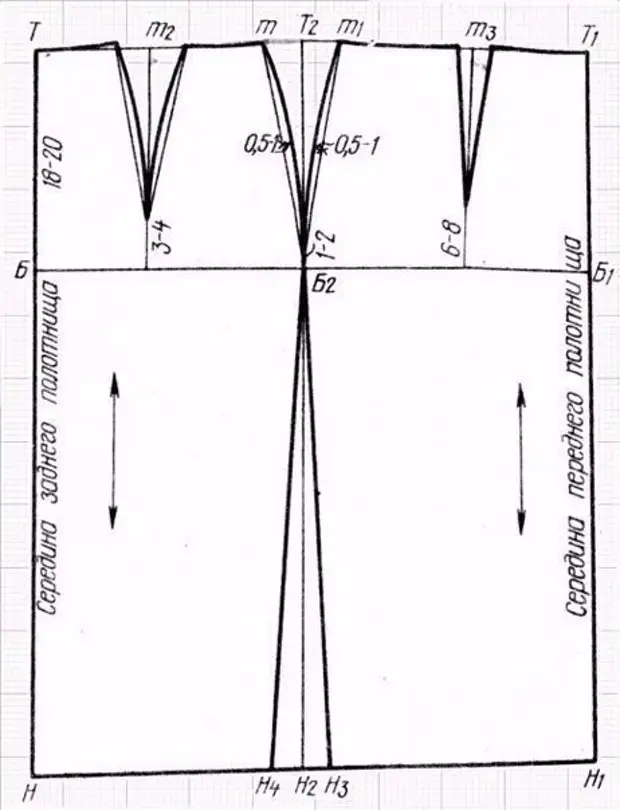
1. Rear cloth
middle line
In the upper left corner of the leaf, we put the point T and spend a direct vertical line from it.
Line Niza Skirt
In the midline from the point T, we lay the segment, which should be equal to the measurement of DS - the length of the skirt from the waist from the back. We put the point n: tn = ... See now from the point n spending a horizontal line to the right.
Thigh line
From the points indicated by us, we lay on the middle line of the rear panel segment, which is equal to 1/2 measurement DST - the length of the back to the waist line minus one centimeter. We put the point B. Thus TB = DST / 2 -1 cm = ... See when the patterns are built, as a rule, the distance to the hips from the waist line for all sizes is taken equal to 8-20 centimeters. From the point B spending a horizontal line to the right.
2. Front cloth
Middle line
BB1 = CB + PB = ... See
From the designated point b, we postpone the thighs of the segment, which is leveling the measurement of the thighs of the thighs together with the free felting increase. We put the point B1. And now through the point B1 we carry out a vertical line, indicating the intersection with the line of Niza letter H1. Up vertical from point H1 laying equal to the measurement of the length of the segment and put the point T1.
Line of lateral cuts
BB2 = (CB + PB) / 2 -1 cm = ... See
From the indicated point b, we postpone the thighs of the segment, which is leveling half of the measure of the CC - semi-coupling of the hips and an increase for free felting minus 1 centimeter. We put the point B2. Now, from the point B2, we carry out a vertical line, indicating the intersection with the bottom of the N2 point. Up from the point H2 lay the length of the skirt and put the point T2.
3. Rear and front cloth
By connecting the line T, T2 and T1 according to the line, we get the waist line.
4. Otachachi
On the pattern of a classic two-wing skirt usually make three wrappers. At the same time, the sum of solutions of all the extracts on the skirt σv equals the difference in the width of the skirt along the waist line and the width along the hips line: σB = (PB + PB) - (notes + PT) = ... cm.
Side Votache
TT2 = T1T2 = 1/2 * σB / 2 = ... See
The lateral pulp solution is equal to half σv. To the left and right on the point T2 lay on half of the solution and put the points T and T1, connecting them with a point B2. We divide the resulting segments in half and inside the filthy of the division points, we put perpendicular, and lay it on 0.5-1 centimeter on them. The outlet should be above the thigh line for 1-2 centimeters. Smooth curves connect the points T and T1 with a point located on 1-2 centimeters above the thigh line.
Rear wrap
TT2 = CC / 4 -2 cm = ... See.
Right from the point T set off along the line of the waist of the segment, which is 1/4 of the measurement of the CC - semi-coupling of the hips minus2 centimeter. We put the point T2. We carry out from the point T2 to the hip line the vertical straight line. Right and left on the point T2 lay on half the molding solution. The outlet should be above the thigh line by 3-4 cm. Concave curves connect the point marked on the line of the waist with a point 3-4 centimeters.
Front swallow
T1T3 = CC / 4 -1 cm = ... See
The anterior extract solution is 1/6 σv. To the left of the T1 point along the waist line, lay the segment, which is leveling 1/4 of the Merki, semi-coupling hips minus 1 centimeter. We put the T3 point. We carry out from the point T3 to the thigh vertical line. Left and right on the T3 point laying at half the molding solution. The outlet should be above the hips line at 6-8 centimeters. By the line, connect the points marked on the waist lines with a point 6-8 centimeters.
5. Side sections
Upon Niza, the width of the rear cloth in the straight skirt is leveling width along the hips, extended - 2-6 centimeters. By line, connect the points B2 and H3.
The width of the front panel in the straight skirt along the bottom line is leveling the width along the thighs, extended - on 3-4 centimeters more. By line, connect points B2 and H4.
Step Two: Pattern Pencil Skirt
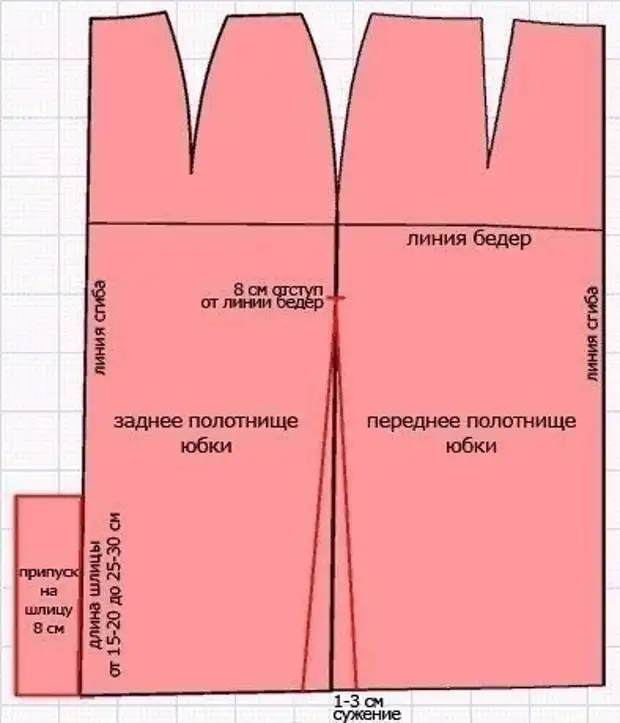
Pattern of direct skirt is ready. Now, taking her as a basis, we will build a pencil skirt pattern. The process of modeling a classic "pencil" is mainly reduced to narrowing through the side of the side seam and the construction of the slot on the rear cloth to preserve freedom of movements.
On the line of the Niza, we put the necessary amount of narrowing on the side of the side seam, which, depending on the length of the skirt, type of fabric, processing technology and the desired result, will be from 1 to 2 centimeters. From the Niza line, we now carry a line to a point located on 7-9 centimeters below the intersection of the thigh line with a side seam line. Since the bottom line to the side line should be approached at a right angle, adjust it with a pattern and a triangle.
The front panel of the skirt in the remaining parameters remains unchanged.
The modification of the rear panel depends on the process of decoring the rear section. The easiest way, without changing the rear cloth a straight skirt, except the lateral narrowing, simply to overcome the edges of the cut inside and process, so that the V-shaped neckline turns out.
But still, it is better to make a slot in the back section, and for this we will need to modify the pattern of the rear cloth. For the slot, you need an additional allowance of 8 centimeters. To add an allowance, the rear cloth will have to be cut off by two halves, and then connect the rear seam.
On the right half of the rear panel, the battery is folded in half to form a slot 4 cm wide. Lock on the slot on the left half of the panel is simply clamped inward and process.
After building the pattern, we cut the details of the skirt from the fabric, while not forgetting about the allowances of 1.5-3 centimeters on the rear and side seams, 4-6 centimeters for the poda below, 4-6 centimeters on the left (length 16-20 cm) to embedding the fastener .
Details are processed from top to bottom. First, we follow the molds, take it into the upper cutting of the belt or the corsage braid, after which we try the skirt and finally determined with the magnitude of the lateral narrowings.
If everything suits, stepping the moldings, stepping and coaching the side sections of the skirts, process the fastener, the upper slice and the slot. Bottom lad in the latter. Then revehaning the skirt and sew a loop. Congratulations! Now in your wardrobe there is an unusually feminine and elegant pencil skirt, stitched exactly on the figure!
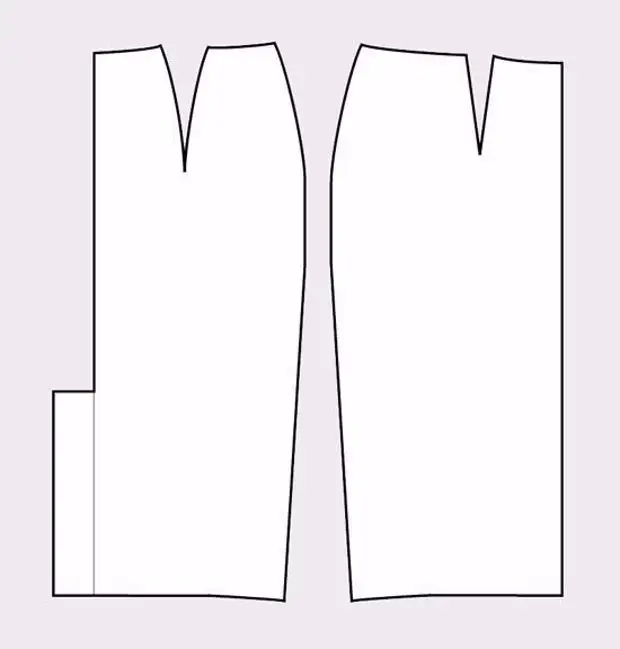
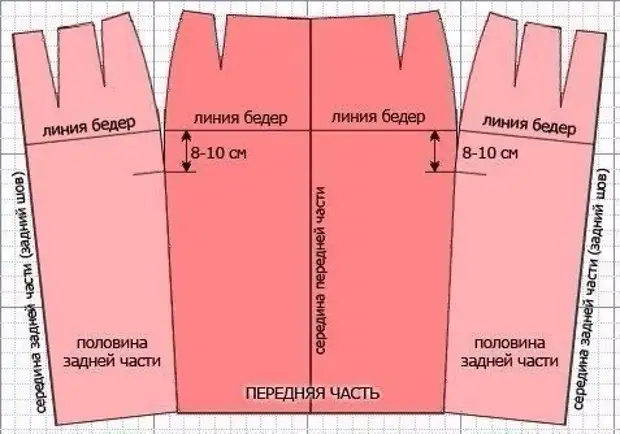
Pattern Pencil Skirt without side seams
In the first case, taking into account the incision to the slot, our pencil skirt had three seams - one rear and two side, but it is quite possible to do with one vertical rear seam. Sews on the sides will be, but only to 8-10 centimeters mark below the thigh line. Similar to the first option for building the pattern of this skirt-pencil, we take the pattern of a straight duplex skirt. Buing paper patterns of the back and front of the skirt, carefully cut off the part from each other and make duplicates.
- To balance too heavy bottom, making an image more air and fragile, will help reliably on the release of the tunic;
- The classic pencil skirt up to the middle of the knee in combination with a high heel will make you visually slimmer and above, visually slim and V-shaped neckline;
- The most advantageously pencil skirt looks in conjunction with a high-heeled shoe shoes, be it ankle, shoes, sandals or boots;
- To make an additional focus on the waist line, use the belt. If the waist is not pronounced vividly, we supplement the skirt-pencil with a free jumper to the waist with a free jumper or fastened in the skirt with a shirt on buttons;
- The skirt pencil with an overwhelmed waist of the fitted shape of a soft tissue will make the "boyish" lines with more smooth and feminine;
- The holders of lush forms are better forgotten about the low waist line and choose the tissues of dark tones.
A source