

In this master class, I want to share with you the process of creating a textile bracelet with an embroidery in the motive of Khokhloma painting. This is my first master class, and therefore it is very exciting for me, so if at some stage suddenly I will miss something or you will not be clear, I promise to tell everything and complement in the comments, as well as answer all your questions.
So, proceed.
Probably, there is no person in our country who would have ever encountered a Khokhloma painting. The idea of creating a textile bracelet on the motive of the Khokhloma painting was born at once, so she is bright, distinctive and our "native" that I certainly wanted to create a bracelet on this topic, at least touching this beauty to this beauty!
The drawing also did not make himself wait for a long time, revising the motives and options for the muffins of Khokhloma, I drew a scheme of embroidery bracelet, immediately I apologize for the "free apostasy" from the canons of this painting. :-) Entering the embroidery scheme.
Bracelet embroidery scheme:

Materials required for the manufacture of the bracelet

1. As a basis for embroidery bracelet, you can use any dense or duplicated fabric. But I really liked the fabric, which is used for the upholstery of furniture, yes, do not be surprised :) there are many different options, I use a darling (on a touch of velvety) with a small beautiful texture. It is dense, resistant to abrasion and has proven itself in embroidery. Bracelet.
2. Threads: x / b (red, black), thin line, Capron 50K (white and beige), Moulin green PNK them. Kirov 4112, Muline Metallized Anchor Lame 303 (Light Gold).
3. Needles for embroidery and beads.
4. Natural silk 100% hand painted (green and red).
5. Beads: Czech Preciosa - 10/0 № 17020, 93170, 46102, green (matte), TOHO Round 15/0 №22
6. Toned coral beads.
7. Singy procession.
8. Fabric X / W satin weaving for lining.
9. Metal rings, 14 mm diameter.
10. Kosya Baika black.
11. Scissors.
12. Embroidery scheme.
And also a sewing machine and a wonderful mood! :)
Stage 1. Embroidery

Through the bracelet line, we put a noteing line (without allowances on the seams) so that during the entire process of embroidery it does not erase and not lost.
Create a "strawberry"

one. A piece of silk size 5x8 cm fold in half and the ends of the silk are assembled into a bundle.
2. We apply our bundle to the lower boundary of the strawberry embedded in the ends and sew in the border and further (inside) fixing the ends.
3. I turn around from the side of the fold, we collect the same in the bundle and sew the surface of the strawberry on the upper boundary.
four. By the contour of strawberries, we sew our "air bubble" with small stitches :)
five. In chaotic order, pierce and label the places for future beads (strawberry seeds).
6. In the depths created by us, the TOOHO round 15/0 can be sewn.
7. Around the strawberry, along the very edge, we flash the golden-colored mouline with metallized threads with a switched seam.
Embroide the leaflets.

one. We look at the sheet of the sheet on the fabric. I allowed my liberty and retreated from the original sheet of the sheet, it's hard to "curb" your creative gusts, I wanted to make a leaf more alive and dynamic :) But I made adjustments to the bracelet drawing, so that you feel easier to navigate when embroidery (the bracelet scheme is attached above ).
2. Embroide the leaf on the outlined circuit. We enter the needle to the beginning of the leaf-out of us (from the wrong one on the face), make the fixing seam and lay the stitch along the contour forward. Return the needle to the previous place, shifting on a slightly contour sheet. Thus, we make stitches very tightly to each other, repeating the leaf bends.
3. We make columns from a golden bead at the base sheet. To do this, we take a thin line, fasten it from the inside and type 4 of the TOOHO of the Golden 15/0. We enter the needle back, but now in the third bisper, the fourth remains the leaf, in the material of the needle we enter at a distance of 2 mm from the initial puncture.
four. In the same way, we make different columns, alternating the height and bead size. On the second column, 2 Bispers Toho Gold 15/0 and one Bisper of Czech Preciosa 10/0, turned out to be a kind of "fungus" :) and so alternate, filling the foundation of the leaf.
five. We supplement our columns with single beheads, as alternating different sizes 10/0 and 15/0, in chaotic order close and at a distance, fully relying on your feeling of harmony.
Each curls

one. Embroide the grounds for our territory and different curls made of metallized Moulin of the golden color with a sabling seam.
2. Curls are made as follows, as the curl increases, I increase the stitches, also tightly stacking each other and continue to "twist" the curl growth. It turns out a surround curled spiral.
3. In the same way, we continue to other elements of our embroidery from golden threads, according to the drawing.
Create cups of strawberries

one. Making the central long leaf of the cup. To do this, we recruit 8 biserinis of green Czech Preciosa 10/0 by the analogy of columns. Only now the needle is now inserted into 7 beerin and remove out of 6, the eighth bearer remains leaving. Next, score 5 beads and now we enter into the tissue for a distance of 2 mm from the puncture.
2. We make two more leafs on the sides. Now we recruit 6 of the beads, in return the needle in 5 beerin, we recruit 4 beads and introduce 2 mm from the puncture into the fabric.
3. On the sides, we make two more single columns, on the one hand out of 3 beads, on the other - out of 4.
four. We supplement our sewelistic single beads, sewing them from the bottom of the leaf and columns in the form of a triangle.
five. In the same way, we create cupboards from other straws. You can experiment and make different.
Sevive berries

one. For berries, I decided to use coral beads. For sewing in this case, I used a thin line. We take one coral bead and the Red Bezerink Czech Preciosa 10/0. Back Introduce the needle only in the coral bead, the bead remains the leaf.
2. In the same way add other berries, according to the drawing or at your request.
3. Add single red bispers around coral beads. Thus, we turn out to be a wretched berry.
Final work with embroidery

one. Add beery (berries) on branches made of golden threads, according to the drawing.
2. We add blades from green Moulin. First add longitudinal threads at an angle, for greater volume of blades. Then embroider on top, tightly laying the stitches in parallel to each other.
3. We continue to embroider other blades and droplets. Fill in green elements bracelet, according to the drawing or according to your imagination!
four. We alternate between the stinks of the twig. They embroider them with a stalking seam.
five. Create white flowers. To do this, we take a white Czech beads Preciosa 10/0 and sew the beads with a simple bunch, she gets up with us on the edge. Next, add 4 white bispers in a circle. Inside sew a red bead.
6. Add red beads (berries) on green stems.
And voila! Our embroidery is ready for further work! :)

We plan a cut line, on each side of 7 mm.
Stage 2. Build bracelet.

one. Cut off the cut line around the perimeter of the entire bracelet.
2. Cut from the lining fabric the item, the same in size as our main bracelet with allowances on the seams. And cut out from a synthet board a large lining approximately 7 mm on each side. Surplus We are then cutting.
3. We fasten the parts of the lining and syntheps with the help of the needles and plan the lines of decorative lining.
four. We grabbed both parts by the outlined lines.

five. On the perimeter of the lining lay the line at a distance of 5 mm from the edge.
6. Cut off the surplus of the sinteration along the border of the lining fabric.

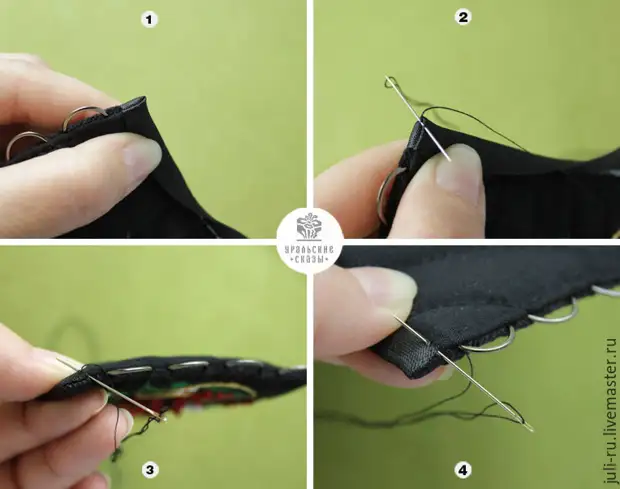
7. We look at the lines of sewing of metal rings. The ring must be in the middle from the seam line.
eight. To the edge of the basic bracelet tissue with embroidery, sew rings on the outlined lines.

nine. On the lining we plan an arbitrary embroidery element. Embroide the curls and blades with a switched seam, as well as on the front side of the bracelet. Use threads Muline metallized and green.

10. We connect the lining parts and the basics of the bracelet with an embroidery face inside and fasten the needles.
eleven. We shoot the part from three sides at a distance of 7 mm, the bottom side is left open! Do not forget to make fixtures: at the beginning of the seam by 10-15 mm, on the corners, the same 15 mm in both directions, at the end of the seam.
Attention! In order to avoid injuries and distortion of rings, we spend the sides by hand, that is, we can grind the wheel without using the bottom pedal! Thus, we feel rings and if suddenly the needle rests on the ring, then we shift on 1 mm fabric and so control this important process.
12. We pass the second time for all three sides, without fixing seams.

13. Cut off the surplus of the lining fabric, should remain 3 mm from the seam.
Attention! On the sides, we cut off only the lining fabric very neatly, not the touching basic tissue with rings.
At the corners, cut off at an angle. And on top, we cut and the lining and main fabric together should remain 3 mm from the seam.

fourteen. Soak our bracelet on the front side. In the corners we help to push the pencil or other sharp item so that the corners of us get smooth and beautiful.
fifteen. The bottom edge of the bracelet is fixed with needles and spend 6-7 mm from the edge, be sure to put the fixing seams at the ends by 10-15 mm.

sixteen. We fix the edge of the bracelet in three sides, for this we take a needle with black threads and we flash small secret stitches through the edge of the bracelet at a distance of 2-3 mm from the edge.

17. Send oblique beyk to the bottom of the bracelet. To do this, we attach a beaker with the help of needles, from the edges of the bracelet (on the sides) should remain 15 mm of the free ends of the oblique bey.
eighteen. We attach it to the bracelet, not forgetting to put fixing seams.
nineteen. We bring the free end of oblique bey inside the bracelet.
twenty. We enhance the bottom bracelet oblique baker, we must have a neat corner.
21. Neat fine stitches fix the corner and in the same way we ascend the oblique bay to the lining.
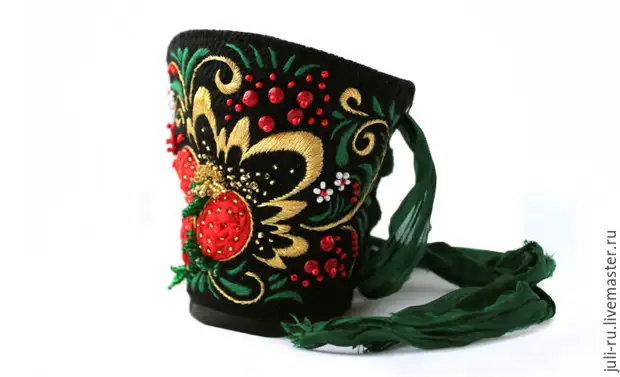
And voila! Bracelet ready! Little details remained :)
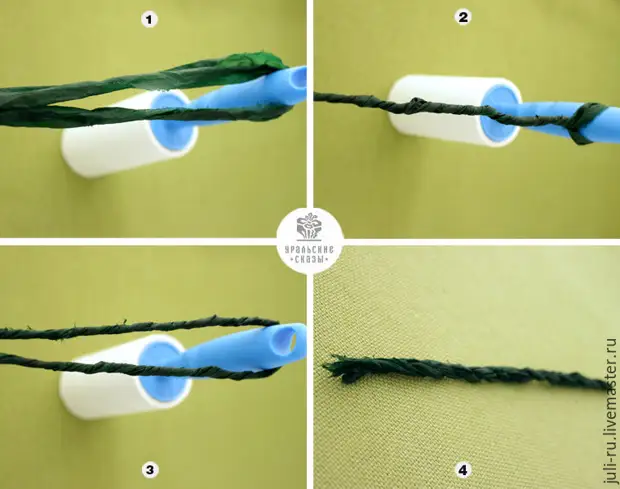
We make a stupid ribbon made of natural silk for ties. We take a segment of a silk size of 4 x 90 cm in a wet form and bend it in half for any item that happened to you :) I turned up "clever" :) You can do it on the door handle. And twist it around this item, then we fold again in half and twist again. We get such a wonderful harness, leave it to be dried. Then we crawl it, and the beautiful fashionable ribbon is ready!
We put our bracelet on the handle and admire beauty! :)
I will be very glad if my master class was useful for you!
P.S. And do not forget to put the plus, if you like the master class!
A source