
"- Shark, sew not sewing? - So I, tea, to blow up "(local rustic folklore from my grandmother)
So, after reading everything previously written, you decided to spoil the first cut of the tissue.
The point is not even that with the first pancakes is always a problem, although not without it. The first thing should always be spoiled! But not like damn, but competently, for all the rules of damage to the fabric.
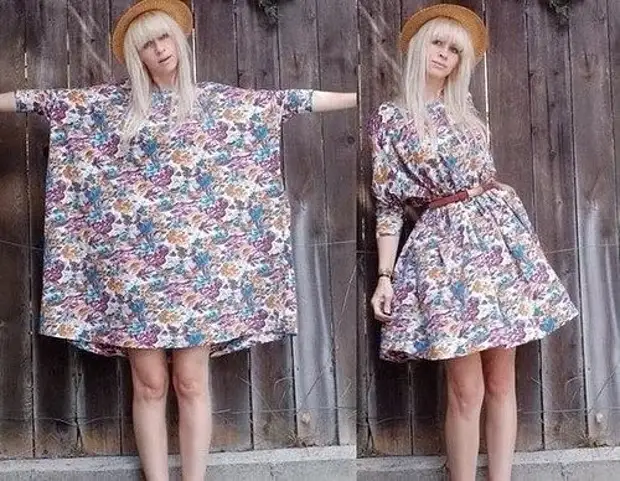
The main idea is to create a trial sample to determine the deviations of its shape from the pattern parameters (it is from the pattern, in no case from the beauty standards, which does not exist at all!). In the process of shopping, you probably noticed that not all clothes 44 sizes sits equally, moreover, most often he is paired, 42-44 or 44-46, which gives a discrepancy in landing on the figure. The same case is also with the finished patterns in magazines.
The waist may well be in 36, and hips in 40 sizes. What to remove the pattern?
The medium calculation method is clearly not suitable.
Yes, and without experience, estimate "on the eye", as much as you need to reduce the pattern, will not come out.
That is why in front of the first sewing of a good fabric, experiment on a test sample. For a test sample, choose the most simple x / b fabric, no more than three kopecks, that is, the most tallest. This is necessary for your hand to do not get drown when, after cutting and first fitting, you will begin to cut it, ruthlessly and in the most prominent places What wears the beautiful name "Adjustment".
Of course, knowing the deviations of its shape, the main changes are made in the paper pattern, and the trial sample is no longer sewn. However, without studying the features of landing various types of clothing on its figure, it is quite difficult to assume what place in the pattern it is necessary to change and how much. Therefore, first sew. Then - cut.
Creating a trial sample in the overall staircase of the steps that must be done to implement the idea, occupies the honorable fifth place.
In total, there are 10 steps in the stairs, and through a series of steps you can jump over completely legal grounds, and some require a very attentive transition.
Staircase steps
1. Select model.
2. Selection of fabrics under the selected model. Sometimes it happens on the contrary: first in the store will like some kind of rag in the store, and then the concept of the product is determined. Without the experience of sewing with such an approach, it is easy to get to come, the model from this fabric may be above your features at this stage.
3. Definition of sizes. You should not neglect to shoot the measurements every time before the new sewn, otherwise it happens like Marshak: "However, during the way the dog could grow up."
4. Transfer patterns on paper or printing from disk, cutting parts, forming points for seams.
5. Cutting, sewing and fitting a test sample.
6. Correction of landing, making changes to the paper pattern.
7. Cutting, tailoring and fitting of the product from the main fabric.
8. Correction of landing.
9. Performing other operations, final ironing, selection of accessories.
10. Light exit. Separately, I would like to pay attention to the step 4 and the formation of points on the seams.
The disgusting attitude towards this step is able to irrevocably close access to the step 10.
There are several schemes for creating points on the seams. For example, there is a fairly meaningless and cost scheme, which is taught on all labor lessons and sewing courses and describe in all textbooks. The detail is cut on the predetermined circuits, lay on the fabric, and only after that a small battery with the use of a scale line. A huge minus of this technology - at the time of laying on the cloth, the part has a smaller size than with stripping to the width of the allowances, which interferes with the change in the layout density.
Moreover, sometimes anticipation from the start of sewing is so great that you can simply forget to draw the allowances. The result of such forgetfulness is the thing becomes minimum of less. There is another way, so I always did my friend, however, the features of the figure did it allowed such disrespect for the laws of Croy, and the stitched things lay well. She removed the pattern from the magazine to the size of his size, and the fabric was reproduced. Without letters. Only here is not enough, in different parts of the details, dimensions differ from each other unevenly, somewhere by 1.5-2 cm, i.e. just on the width of the allowance, and somewhere all lines go together.
In other words, with this method, in one part of the part, the desired size is obtained, and in the other - something that is smaller than the smallest size. Of course, this method has the right to life as a kind of correction of the pattern, only for this it is necessary to sew a lot of things and make sure that such a solution is appropriate. For myself, I found another way, extremely simple and 100% protecting from all the above-described minuses: the details of the pattern should be immediately cut into the seam letters. The first few times for the workout of the glaze is better exactly according to the ruler to draw a cut line: on the side seams, measure 1.5-2 cm from the edge of the part, at the bottom - 4 cm, on rounded edges - 1 cm.
Subsequently, you can save a lot of time, immediately, "on the eye", cutting out the part with the allowance. An additional plus of this method - you can safely optimize the alignment of parts on the fabric without prejudice to the size of the product. Another important aspect of stacking on the seams is their width. In principle, it is possible throughout the perimeter of the product In addition to the Niza, form the same allowance, because in roundable points, the allowances are still cut to 0.5 cm so that the rounding does not flush. So isn't it equal, cut 0.5 cm or more? At the same time, the second question immediately arises, and why cut something at all, you can immediately sit on 0.5!
I want to immediately warn all the particularly cunning, I tried to do it, it turns out nonsense. The fact is that the sewing machine's foot is about the same width, 0.5 cm, so with such a distance from the edge, it constantly leaves the sideways, while doing the line is uneven. Some exhibit even greater trick and instead of the ordinary foot put a paw for stitching lightning (it looks like half of the usual foot). And again I want to warn you, so I also did, it turns out even big nonsense. Such a foot is very badly promoting the fabric, so the product is lying all the time to fold and slip the sideways.
Hence the main conclusion from all of the above: Savings - the thing is undoubtedly fundamental and requires a competent and thoughtful approach. The costs that do not give advantage in the future should be ruthlessly reduced and be able to distinguish them from investments, which only now seem to be expensive, and in the near future they pay off a hundredfold and are a reliable investment in the quality and landing of the finished product. "The economy should be economical" - a brilliant phrase, which sounded on the reporting report of the Central Committee of the CPSU XXVI Congress of the CPSU February 23, 1981, has a direct attitude. It is an understanding that can save on what can be saved, and on what it is impossible, in many respects answers the question "how to sew easily and just?".

A source