
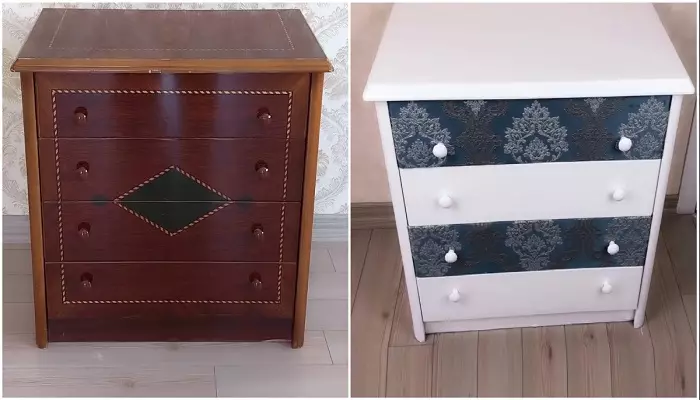
Good furniture is always sorry to throw out, especially if you know that in return for something is possible at an affordable price, it is unlikely to succeed. For this reason, many craftsmen try to transform the old man so that the desired piece of furniture has served not yet one ten years. As, for example, turned the old banging bedside table into a rather stylish and original version, which is not even ashamed to put in the bedroom with a modern interior. And most importantly, such transformations did not need large financial costs.

Even if the bedside table is in such a deplorable state, it can be put in order. | Photo: YouTube.com/ © Sultanin Oyuncak Atolyesi.
Who has old good-quality furniture at home, which has lost an attractive look or is completely batted and the household, do not rush to the trash can. First you need to see if it is possible to reanimate this piece of furniture and only then decide on his further fate. As a rule, old furniture can be repaired not only to repair, but also to complete recovery and even a fundamental update of the appearance. We just need to know some subtleties and tricks that some bloggers are happy with pleasure, removing available master classes.

With minimal cost, a completely embossed bedside table was turned into a stylish piece of furniture. | Photo: YouTube.com/ © Sultanin Oyuncak Atolyesi.
As, for example, it was made by the craftsmen from the channel Sultanin Oyuncak atölyesİ. They showed how to make a stylish piece of furniture from a very unsightly bedside table with drawers. And such an update technique can be used to restore the attractiveness of any chest, and most importantly, the original transformation of large financial investments will not be required.

Preparatory stage to transformation. | Photo: YouTube.com/ © Sultanin Oyuncak Atolyesi.
In order to start updating the shabby bed, you should pull out all the boxes, remove accessories. Then all the details of cleaning the contamination, if necessary, carefully remove the existing detachments and sanding all chips. If initially facade and side parts were opened with a layer of epoxy resin, then the glossy coating is better removed. To do this, you can use a grinding machine or a special solution for removing the paintwork. Sometimes the construction hairdryer is heated and a hot layer is removed with a spatula or knife. If it is a layer of varnish, it will be enough to sand with ordinary grinding paper.
Important: Whatever cleaning method you have chosen, the entire coating process should be carried out in a well-ventilated room and in appropriate clothing. Also, we should not forget about the use of personal protective equipment - gloves, glasses and mask / respirator.

All existing details and chippers need to be removed and sanding the surface. | Photo: YouTube.com/ © Sultanin Oyuncak Atolyesi.
In the event that there are deep damage or explicit flaws, they need to be hidden using a special putty for wooden products. If all work is carried out in the residential room, it is recommended to use acrylic material, it practically does not smell. After the layer of the applied putty will dry well, the surface must be sanded and make it perfectly smooth. This is especially important on visible places, such as the facades of the boxes, a countertop and sidewalls, which will later be covered with paint.

Initially, a layer of primer is applied to all surfaces, and after drying, they are covered with several layers of paint of the desired color. | Photo: YouTube.com/ © Sultanin Oyuncak Atolyesi.
After all the surfaces are cleaned of dust and degreased, you need to progress them. In the event that it is planned to open the product with light colors, it is better to choose an acrylic soil white. When the primer dries, you can start painting parts by the main color. For these purposes, you can take both glossy paint and matte - it all depends on the preferences of the owner and the overall interior design. Because in this embodiment, two of the four boxes will be covered with a cloth, the last only brands.

Old handles can also be put in order. | Photo: YouTube.com/ © Sultanin Oyuncak Atolyesi.
At this stage should decide what to do with accessories. In this example, the handles for the boxes decided to simply paint into the main tone, and not replace them with new ones. For their staining, you should not even use a brush or roller, each item is better to dip in the desired paint and give extensive material to drain so that there are no amusements or frozen droplets.

The process of fastening the tissue with a glue gun. | Photo: YouTube.com/ © Sultanin Oyuncak Atolyesi.
Now you can make the design of the boxes to which the fabric decided to glue. For these purposes, a dense material is best suited, which does not give a shrinkage, but also does not stretch. Color you need to choose to taste, but so that the updated piece of furniture harmoniously fit into the existing situation. At the same time, it would be nice to consider the invoice, with such a technique of restoration, it plays not a last role: the brighter the drawing will be allocated, the more expressive the furniture will look.

For reliability, fasten the corners of the tissue with nails and can be installed accessories. | Photo: YouTube.com/ © Sultanin Oyuncak Atolyesi.
In this example, the cloth to the very facade was not glued, and only around the perimeter of the facade setup from the inside was the adhesive melt, using a special pistol. For strength only fastened wrapped corners with small nails. But in order to make this work qualitatively, it is worth listening to the advice of masters, which strongly recommend gluing the fabric completely and a dry way.
And this means that at first the surface is stuffed with PVA glue, it is time for drying, and then a generous layer of glue is applied again and a cut is applied. After the tissue tensioned tightly and it took the right shapes, the surface was dried using a preheated iron or a construction dryer (to accelerate the glue polymerization process), but on the back side it is possible to fix it as well as they did in the video.

It remains only to put boxes in place and the updated bedside table. | Photo: YouTube.com/ © Sultanin Oyuncak Atolyesi.
When the boxes are ready, it remains only to fix the updated accessories and set them into place. After that, the transfigured bedside table can occupy the place allotted in the bedroom or children's bedroom, but in the kitchen, in the bathroom or hallway boxes with fabric rates are better not to install.
Who is interested in a more detailed process of alteration of an old bedside table, it can be viewed in the next video.